|
|
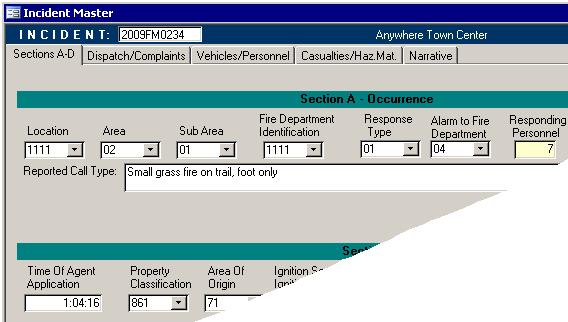
IntroductionWhile it has been designed to give you a comprehensive look at each incident, it can be a bit overwhelming. There are several tabs along the top through which you can access a different aspect of the incident. To make it easier to find information about each incident, the form has been made larger, but now requires a resolution of 1024x768. More information is available on each tab, so fewer tabs are needed.
The picture above shows some of the expanded form with the new tabs. This allows less data to be hidden just because the fields are on tabs that do not have focus. One problem is that the larger screens would make this help file too wide. Because of this, many of the screen captures below show only portions of each tab. There are also some buttons for performing a variety of tasks which are described near the bottom of this page. At the bottom left hand side of the Incident Master, there
exists a group of buttons that function as a record selector. If you wish, rather than use the search button, you can manually scroll through the different incidents in the
system. They will usually be in the order according to the incident number at the top of the screen. Though there is no delete button, incidents can be removed from the system. Instructions are found at the bottom of this page. The TabsIt is useful to be able to look up the facts of any incident; however, so much information is tracked for each incident, that it would not all fit onto one screen. Especially since many monitor's resolution are still set at 640x480 or 800x600 with Terminal Services. This means that each tab contains a small part of the incident. Each tab has one or more sections of data needed for the Standard Incident Report as outlined in the Occurrence Reporting Manual which is available from the Office of the Fire Marshal's (OFM) web site. One feature that works with all tabs appears near the top right corner of the screen. In the picture below, the pale yellow word Fire appears because the mouse was last pointing to the 01 in the Response Type box. That yellow word will display the description of any code you point to that has been taken from the Standard Codes List. Other than the Incident number also along the top, and the buttons along the bottom, nothing else is shared between the tabs. These tabs are described below. Times
Sections A and B
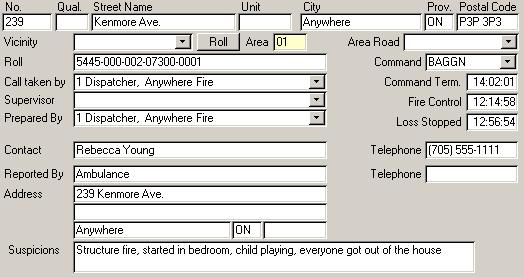
The first tab contains sections A and B. According to the Occurrence Reporting Manual (June 2001 version which was still current as of April, 2007 [http://www.ofm.gov.on.ca/english/Publications/SIR/default.asp]): Section A is completed for ALL fire and non-fire occurrences. This section identifies the "where" and "when" of the incident, "who" responded, and to "what" they responded. Section A must be completed for all fires and non-fire responses, namely those with "Response Type" codes 11 to 99. Section B is completed for ALL fires and explosions. This section is completed only for those occurrences with "Response Type" codes 01 or 02. This section identifies the "what", "how" and "why" details of the incident and estimates the extent of any monetary losses involved. It must be completed for structural, vehicle and open area fires. This screen also contains a few extras some of which are needed for various reports, but they are not required on the Incident Report.
The last four calculated fields are sent out as part of the Electronic Transfer to the OFM. Sections C and D
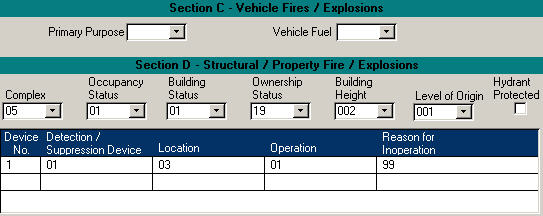
The lower part of the first tab contains sections C and D. According to the Occurrence Reporting Manual (June 2001 version): Section C is completed only for incidents involving VEHICLE fires or explosions. In other words, this section is completed for those occurrences with "Response Type" codes 01 or 02, where the "Property Classification" is coded 901 to 999. This section is used to record details specific to the vehicle involved. Section D is completed only for incidents involving STRUCTURE fires or explosions. Complete this section for occurrences with "Response Type" codes 01 or 02, where the property involved was a structure. This section is used to gather details on the structure involved and identifies whether Alarm/Detection/Suppression devices were available and involved at the scene. For the purposes of 10-in-10 reporting, it is important to know if the property was with range of a fire hydrant. Though this field appears in Section D, it is not electronically sent to the OFM. Dispatch
Some of the information, which is collected by the Dispatcher, is required by some incidents. For example, if the Response Type in Section A is a fire or explosion and the Property Classification in Part B indicates a structure, then the Address information along the top should be completed where applicable. You can use the Roll button to search for the property. If you select a roll in this way, the street information along the top will automatically be filled in for you. This also allows for linking with the Property Management and property tax systems. Some of the other data that Dispatch collects is stored in fields that are detailed below:
Complaints
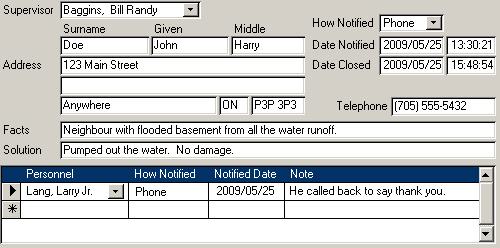
If management or Council desires, complaints about each incident can be tracked using this screen. The Personnel section at the bottom keeps track of each follow up correspondence for the current complaint. Vehicles
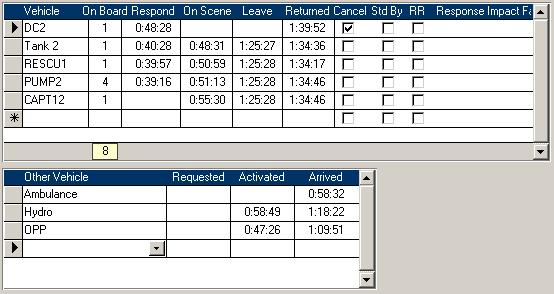
There are two sections to this tab. The top section shows data contained in the dispatch report. As each vehicle responds they are entered on the dispatcher's log. When they call in saying they have arrived on scene with so many on board, the appropriate fields are filled in. At the bottom of the On Board column is a total of those on board. The next fields contain times indicating when each particular vehicle responded to the call, arrived on scene, left the scene, and returned to base. The Cancel box should be checked if that vehicle was cancelled en route. Cancelled vehicles usually do not have anything other than a responded time. The Std By check box denotes that they responded, but were put on stand by. The RR box should be checked if the vehicle was rerouted to another incident. The last column holds Response Impact Factors that will appear on the OFM Response Excel Format report. The bottom section tracks non-fire department vehicles, like Ambulance, OPP, or Bomb Squad, that were requested or arrived on scene. Personnel
The main reason for tracking the personnel who attended the incident is for the Electronic Transfer. Each incident needs to have a count of the number of responding personnel. Another reason is for the points they collect which get converted to cash at least once a year. You can also store any notes about this employee with respect to the current incident if needed. Finally, if a fire fighter performed duties at an incident that fulfill the requirements of Enabler 3 for a course, you can indicate that in the bottom section. First, click on the correct person then select the appropriate session from the list. Casualties
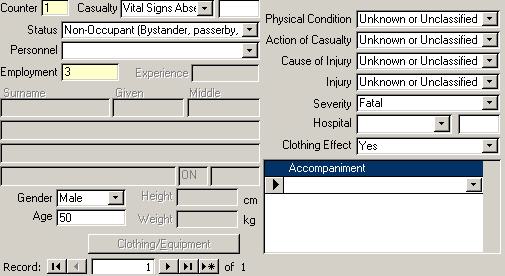
Casualties have to be reported to the OFM. A lot of information, including the name and address section, is automatically filled in if the casualty was a firefighter. If the casualty was not a firefighter, then many fields do not require data. Accompaniment is used to store which personnel accompanied the casualty to the Hospital. The Hospital with Time of Arrival is for departmental use only. Hazardous Materials/Equipment
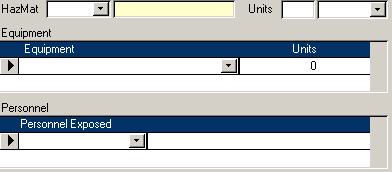
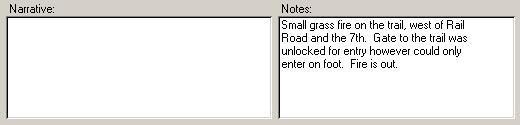
Any hazardous materials that were involved in the incident can be listed here. There is also a section for Equipment which can be used for inventory tracking. The equipment section can show where and how much of each equipment was used. Finally the Personnel section at the bottom of the form should be used to indicate personnel who were exposed to the hazardous material. NarrativeThis tab contains both the Narrative and a Notes field. A sample picture of these fields is in the picture below.
The dispatcher's log can be stored in the Narrative box if your dispatch makes it available. These two fields are not included in the file sent electronically to the OFM,
but the data from the Notes field is included on the printed Incident report. ButtonsThere are several buttons along the bottom of the Incidents Master form. While Close is used to only save and exit, the rest are detailed below.
|
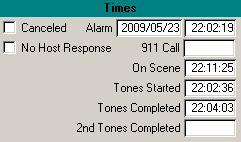 This screen, as shown on the right, also contains the incident start date and time, several other
times and a couple check boxes.
This screen, as shown on the right, also contains the incident start date and time, several other
times and a couple check boxes.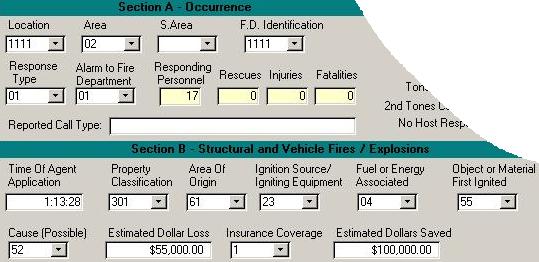

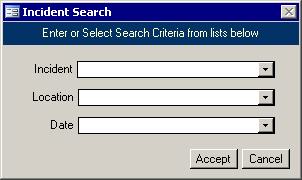 Search
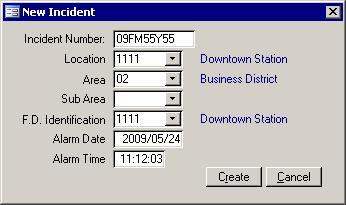 The OFM requires every incident to have a location, area, Fire Department Identification, alarm
date, and alarm time. They use this to uniquely identify each incident that gets imported into their system. Since Fire Watch II can export to a file which is sent to the OFM, each incident must have this data
or it will be rejected by their system. Once this data has been entered, click the Create button.
The OFM requires every incident to have a location, area, Fire Department Identification, alarm
date, and alarm time. They use this to uniquely identify each incident that gets imported into their system. Since Fire Watch II can export to a file which is sent to the OFM, each incident must have this data
or it will be rejected by their system. Once this data has been entered, click the Create button. 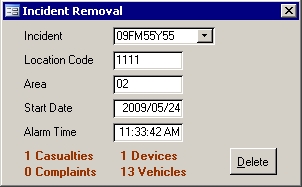 The ability to delete an incident depends on a couple of things. First you have to be granted the right to delete an incident.
Second, the ability to delete an incident from the incident form must be turned on. Both of these are done in the
The ability to delete an incident depends on a couple of things. First you have to be granted the right to delete an incident.
Second, the ability to delete an incident from the incident form must be turned on. Both of these are done in the | [Personnel] [Sessions] [Vehicles] [SCL] [Incidents] [Equipment] [Inspections] |