|
|
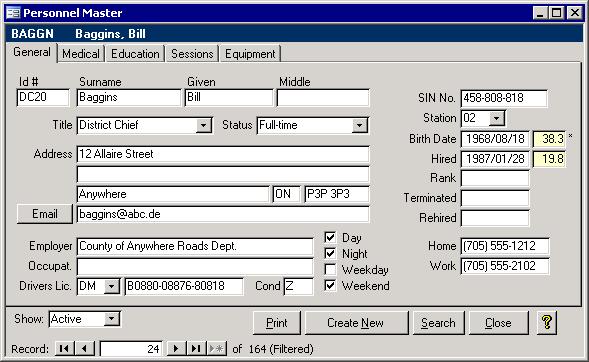
IntroductionIf you click the Personnel button from the menu, the first screen that appears is the General tab as shown below with the records sorted by Surname. Also available, regardless of which tab is currently selected, are a few command buttons along the bottom.
The TabsSo much information is stored about each employee that to try to pack it all onto one screen would make the screen look a bit overwhelming; therefore, the information has been broken up into groups. There are several tabs along the top through which you can access a different aspect of the person. GeneralThe first tab contains the most often used information like their name, job title and status, the station to which they are affiliated, as well as how to get a hold of them including their mailing address. The top boxes of the Address are used to hold up to two lines of the street address. The last row has three boxes are for City, Province, and Postal Code respectively. This tab also contains their Social Insurance Number (SIN), birth, hired, terminated, rehired, and rank obtained dates along with their driver's license information. You will also find four check boxes that indicate a fireman's availability for day, night, weekday, and weekend. To the right of Birth Date and Hired fields are yellow boxes that indicate the person's age and years of employment with the department. The age box has an asterisk beside it; double clicking on the age will produce an age distribution chart. Finally, clicking the Email button will initiate a message to the e-mail address in the box to its right. The picture above shows an example screen shot of the General tab. Medical
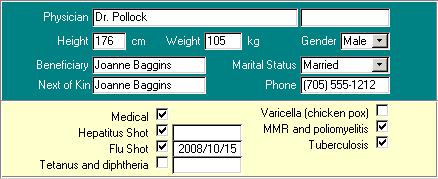
The Medical tab has information like family doctor's name and phone number, Next of Kin's name and phone number, and statistics like height in centimeters and weight in kilograms. It also tracks whether they have had a medical, their Measles, Mumps, Rubella and Poliomyelitis shot, a Varicella (chicken pox) vaccine, a Tuberculosis vaccination and when their last Hepatitis, Tetnus/Diphtheria, and Influenza shots were. You can use this system how you like. If your office does not need to track all of the information, like the date of the Hepatitis Shot, then that box can be left blank. Education
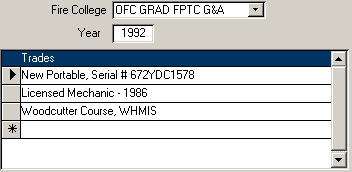
This screen shows the Fire College from which the employee graduated and in what year. As well, many people have pertinent skills that were learned outside of the Fire College . These trades can be listed in the bottom section. Sessions
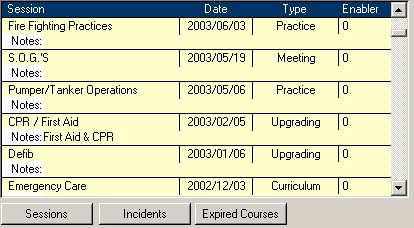
Since some Fire Departments pay bonuses to fire fighters that upgrade their level of curriculum training, a Sessions tab was needed. Nothing can be changed here. It simply shows the entries that have been made on this firefighter's behalf in the Session section of Baker and Associates' Fire Watch II program. As their name is added to the attendance sheet of training and practice sessions, more entries will be visible on this tab. The Sessions tab has its own buttons called Print Sessions. Clicking the Sessions button will let you preview a report, on all sessions this employee attended. Please note that some of the sessions listed may have expired. Click on the Expired Courses, for a list of expired sessions. The other button, Incidents, lists all incidents in which this person participated by Year. Equipment
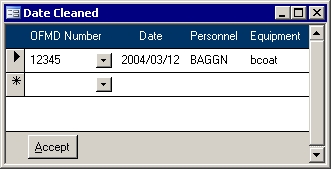
The above screen shows the equipment used by my example firefighter. Each piece of equipment tracked by the Office of the Fire Marshal has an OFMD number. For the safety of the firefighters, it is important to maintain their equipment on a regular basis. If a firefighter does get injured, the Fire Department must be able to prove that it was not negligent in the maintenance of the equipment which may have contributed to the injuries. This screen shows when each piece of equipment was last returned from being cleaned and repaired. There are also three buttons on this form which are described below.
The ButtonsThere are several buttons along the bottom of the Personnel form. While Close simply saves changes and exits the form and the button with the question mark will pull up this page, the other buttons do a bit more. This button gives access to a report for the currently selected employee. It contains almost all of the information contained on the different tabs of the personnel form. This report can be of use during annual performance evaluations.
|
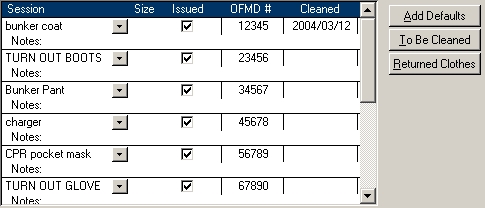
 Add Defaults: Each firefighter is issued a variety of equipment,
like a bunker coat, bunker pants, boots, helmet, gloves, and so on. Clicking the Add Defaults button will copy the default equipment to the current personnel. See the
Add Defaults: Each firefighter is issued a variety of equipment,
like a bunker coat, bunker pants, boots, helmet, gloves, and so on. Clicking the Add Defaults button will copy the default equipment to the current personnel. See the 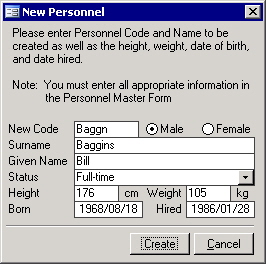 Create New
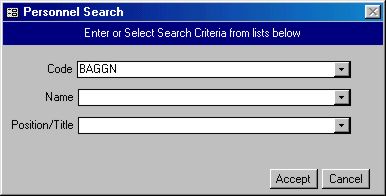 |
Tabbed forms make it difficult to search for records using the Ctrl+F (Find) function, so a separate screen has been created. It allows you to find an employee based on their code, name, or position.
| [Personnel] [Sessions] [Vehicles] [SCL] [Incidents] [Equipment] [Inspections] |