Introduction The Property Inquiry is a tabbed form. Each tab shows information about a
different aspect of the roll and may contain one or more buttons. The main screen has its own buttons and a bunch of red words, or flags, at the bottom that indicate which rolls have certain features. All of
this will be explained here starting with the Names tab.
Names Tab The first
screen you see, upon clicking on Property Inquiry from the Property Management menu, will look similar to the picture below. 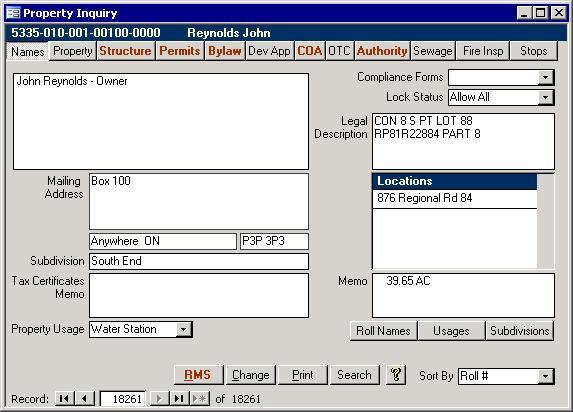
The Names tab shows general contact information as well as several extra fields.
- Names:
The unlabeled field in the top left corner shows all names with their occupancy status for the given roll. These are from the Municipal Tax Manager as are the Mailing Address fields.
- Subdivision:
This field is used to group rolls by a subdivision name on the Roll Subdivision Status report. You can access this report using the Subdivisions
button on the bottom right of this tab. The data does not have to coincide with MPAC's subdivision numbering.
- Tax Certificates Memo:
Also from the Municipal Tax Manager system, this memo contains information about the roll that must appear on Tax Certificates. It
appears here since building permit data is sometimes stored there.
- Property Usage:
Selecting a value from the pull down list will allow you to classify the current roll based on how it is used. One example is you could create
a usage code for group homes and assign it to the current roll. That way the Property Usage report, available by clicking the Usages button on the bottom right
of this Names tab, will include current roll in the group homes section. New Property Usage codes are added using the
Codes form.
Compliance Forms: The box in the top right of the Names tab shows a list of Compliance Forms that have been issued for this roll. Its completion status does
not affect whether or not it will appear in the list. Selecting a value from the list will pull that record up on the Compliance Forms screen.
Locking Status: The unlabeled field in the top right corner is the Locking Status field. It will usually contain Allow All, but may contain Lock Permits, Lock
Inspections, or Lock Permits and Insp. If it contains Lock Permits, then permits can be neither added nor edited. As well, the Change Roll # and Fees screen will
not be accessible. The Inspections form will be available but locked as well. If the Locking Status is Lock Inspections, then the current roll will not appear in the pull
down list of the Inspection Scheduler. All will be locked if the Locking Status field is set to Lock Permits and Insp.
Legal Description: This is useful for finding the roll when a location has yet to be assigned.
Locations: Most rolls have one or more driveways. For example, as wells as their main driveway, a golf course or ski resort may have a driveway that goes to a
garage or maintenance shed. If your municipality uses our 911 system, then all driveway locations for this roll will appear in the Locations box.
Memo: The memo field on the bottom right is from the Roll Book.
Sort By: Use this field, found in the bottom right corner, to change the sort order of the entire form.
There are also eight buttons in the above picture. The one on the bottom right with the yellow question mark can be used to access this help page. There may also be words in
dark red on the bottom left or tabs or buttons may have words on them that are dark red instead of the usual black. They are called flags. The rest of the buttons and the flags are detailed below.
Roll Names Button
The Roll Names button will pull up the Roll Names report for the currently selected roll. This is a simple report that contains most of the fields listed above. It can also be included in the Master Report.
Usages Button
This shows a list of rolls grouped by the data in their property usage field. It is simply another way of classifying rolls. You can add property usages like Group Home or Water
Station to the available list using the Codes form.
Subdivisions Button
The Roll Subdivision Status report shows all rolls that have data in their Subdivision field. The data does not have to coincide with MPAC's subdivision numbering. RMS Button
This button will pull up a form which lists all of the files to which the current roll is linked. If there is no data for this form, then the button's RMS letters will be black; otherwise, they will be red.
Change Button
For those who know the administrator password, this button will launch the Change Roll Numbers form. This form shows everywhere that roll is used. If the roll is not in the
Master table, the name will show up as Missing. If the roll to be changed is in use by the Fire Watch system, you may want to inform the Fire Department that their data
needs to be changed. It is not the fastest form since it has so much data to pour through, but it is powerful. That is why a message box asks you to double check each roll change. Print Button 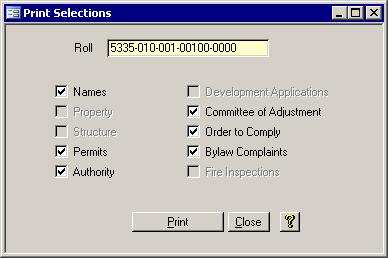 The Print button near the bottom, which is visible from all tabs, will allow you to print the Master Report. Clicking this button will bring up the
Print Selections form shown on the right. Put a check into the boxes beside the sections you wish to appear on the Master Report before clicking the Print button at the bottom of the Print Selections screen.
If the chosen roll does not have data for a certain section, then that section's box will not be enabled. For example, if there are no
entries on the OTC tab of the Property Inquiry, then the Order to Comply check box will be greyed out. The Print button near the bottom, which is visible from all tabs, will allow you to print the Master Report. Clicking this button will bring up the
Print Selections form shown on the right. Put a check into the boxes beside the sections you wish to appear on the Master Report before clicking the Print button at the bottom of the Print Selections screen.
If the chosen roll does not have data for a certain section, then that section's box will not be enabled. For example, if there are no
entries on the OTC tab of the Property Inquiry, then the Order to Comply check box will be greyed out.
Search Button 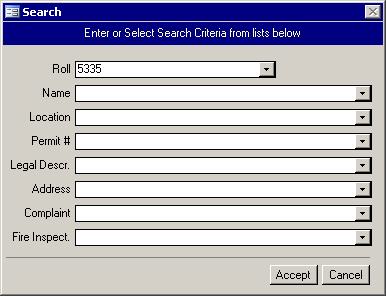 Back on the Property Inquiry screen, there is a Search
button beside the lower Print button. It will pull up the screen on the left. It provides you with several fields with which you can find the roll of your desire. Most of them correspond to one of
the tabs on the Property Inquiry form. It is important to note that the Location and Address pull down lists are similar. They both show location information from the Roll Book, but they are slightly
different. The Address list shows the locations with the street number first which is padded with zeros while the Location list shows the street name first then the padded
street number. They both end with the qualifier then units. Only locations from the Roll book are included. Extra locations stored in the 911 system are not used here. Back on the Property Inquiry screen, there is a Search
button beside the lower Print button. It will pull up the screen on the left. It provides you with several fields with which you can find the roll of your desire. Most of them correspond to one of
the tabs on the Property Inquiry form. It is important to note that the Location and Address pull down lists are similar. They both show location information from the Roll Book, but they are slightly
different. The Address list shows the locations with the street number first which is padded with zeros while the Location list shows the street name first then the padded
street number. They both end with the qualifier then units. Only locations from the Roll book are included. Extra locations stored in the 911 system are not used here.
Flags The red words on the Property Inquiry form are called the 'flags.' The tabs which have
red text for their labels have data for that roll. The only exception is the Property tab, which almost always has data. One other flag that may be visible is the Lot Grading flag
along the bottom of the form. This will appear if a Grading Inspection was set to Acceptable for any permit for this roll.
Property Tab
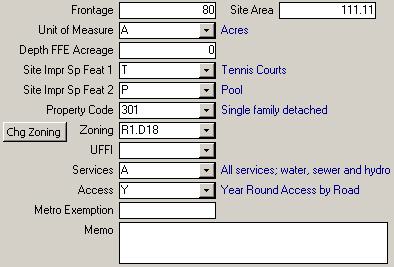
The Property tab shows property characteristics for all primary entries and site dimensions for certain subordinate entries. Here is a brief explanation of the lesser known fields:
- The Frontage is usually the width of the lot along the street in feet.
- The Site Area has its units specified in the field with the label "Unit of Measure."
- Depth FFE Acreage is the property depth on all primary records that are outside the property code range of 200 to 299. If it is within that range, this field holds the Farm Forestry Exemption acres.
- There are two Site Improvement and Special Features fields which indicate the existence of structures that affect market value of the property like the following:
Boat house, pool, elevator, sauna, tennis courts, etc.
- Zoning shows the municipality's zoning code of a property.
- UFFI field indicates whether the structures have, or once had, urea formaldehyde foam insulation.
- Access indicates the means of access to a property.
- Metro Exemption may not be used anymore.
- Memo can be used to hold temporary information about a roll, but it will probably get cleared each January when the SAS is run.
While that is it for the fields, there is also a button on the Property tab. Chg Zoning Button The Chg Zoning button will pull up the Change Zoning Codes form shown below. 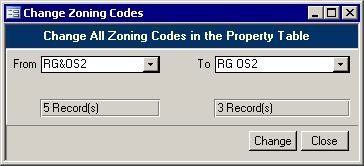 Use the Change Zoning Codes form to amalgamate zoning codes that exist in the system. In the example on the right, all five property records that have a
zoning code of RG&OS2 will have their zoning code changed to RG OS2 once the Change button is clicked. There are a few Change forms such as this one available in the Property Management system
which are used to clean up different codes or other data. Use the Change Zoning Codes form to amalgamate zoning codes that exist in the system. In the example on the right, all five property records that have a
zoning code of RG&OS2 will have their zoning code changed to RG OS2 once the Change button is clicked. There are a few Change forms such as this one available in the Property Management system
which are used to clean up different codes or other data.
Structure Tab
A property can, of course, have multiple structures. They are listed here with the
details about each structure on the property. There is actually too much data here for one tab, so there has to be a scroll bar. As well, along the bottom are record selectors.
If more than one structure exists for the current roll, you can use these buttons to navigate between the structures. Unlike the Municipal Tax Manager system, all of the
data is not on the screen at one time, but this design makes it easier to edit the information when needed. Be careful when editing. If changes are not submitted to the
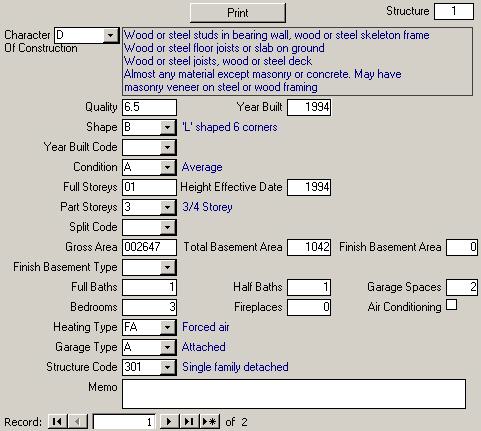
Assessment Office, then any changes entered on this screen will be removed when the SAS is updated next January.The pull down list for the Character of Construction code has five columns, four of which
show in the box to its right. Those five columns are as follows: Character of Construction Code, Framing Description, Floor Description, Roof Description, and Walls
Description. If you forget this, they are listed along the top of each column in the pull down list. The rest of the fields are fairly self explanatory.
Permits Tab
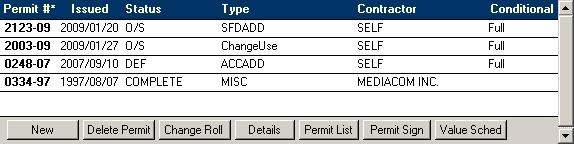
This tab contains a list of all the permits issued for the selected roll. ability to keep
track of building permits. As shown in the picture above, the top part of the tab is in blue and shows the labels for the text fields of each record below. Two lines are used in
order to save space since so much information is stored for each permit. Though the top line is yellow, they may still be editable depending on the roll's locking status described above. As well, if more than a few permits exist for the current roll, then they
are all visible on the screen by using the vertical scroll bar which would be on the right. Each of the fields are described below.
- Permit Number:
The Permit Number can be assigned based on the date, but this will depend on how many permits are issued each year. Double clicking the permit number will open the Permits form for that permit. Use the Details button to get it
to filter all permits for the current roll.
Issue Date: This is the date the permit was issued. When entering a new permit, the Issue date will be blank. When the Issue date is finally entered, an RMS file
will be created. If that roll has multiple permits, you will be asked which permits should be associated with the permit now being issued. This feature is used to link
change use and septic permits with their main building permit.
Status: The status of the permit is stored in this field. While typical values include Cancel, Complete, Deficiencies, and Outstanding, other permit status
codes can be added to the list using the Codes form.
Type: Also available on the Codes form, the Type field indicates the type of construction allowed under that permit. One permit is issued per construction type.
Contractor: This field stores the name of the contractor that did the work. It is best to pick from the list. If a name is typed in which is not in the Contractor
table, you will be asked if it should be added to the list. Check the spelling before doing so. The best solution is to type the first letter or two and pick from the list.
You can expand the list by hitting Alt and the down arrow on the keyboard at the same time or using the mouse.
Conditional: This field indicates if the permit must meet certain conditions within a specified number of days. If it is set to Full or is blank, then there are no outstanding conditions.
There are also several buttons along the bottom of the permits tab: New, Delete Permit, Change Roll, Details, Permit List, Permit Sign and Value Sched. These are described below. New Button 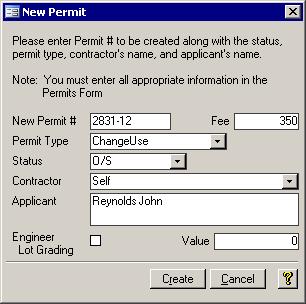 The New permit form will appear similar to the one in the picture on the right. The next permit number will show with the last two digits being the current year. The
owner's name will automatically appear in the Applicant box, so it does not have to be typed in every time. Of course, it can be changed if it is incorrect. The Permit number, Fee, and Status boxes also have
default values. All you have to do is select the Permit Type and the Contractor. The New permit form will appear similar to the one in the picture on the right. The next permit number will show with the last two digits being the current year. The
owner's name will automatically appear in the Applicant box, so it does not have to be typed in every time. Of course, it can be changed if it is incorrect. The Permit number, Fee, and Status boxes also have
default values. All you have to do is select the Permit Type and the Contractor. If you pick ChangeUse or Septic as the type of permit, a higher series of numbers
will be used. The fee is determined in the Setup Wizard
. In the example in the picture, the septic permits are in the 2000 series. That is, septic permits will start at 2001. The default fee for septic permits
can also be set in the setup wizard. If the fee is zero or blank, then no fee will be added automatically. As well, if the Setup
Wizard was used to turn on the Use Permit Fee/Value Schedule option, then editing the amount in the Value field will calculate the fee. If the permit type is of a set fee other
than the regular building permit flat fee and has no value, like a demolition, then just enter the appropriate fee and skip the Value field. The Value Schedule section below has more information about the calculation.
Other items are added automatically for new permits. A new file in the Records Management System is created for non septic permits. As well, it is verified that the roll
is in the Legal Descriptions table and the current permit is linked to that roll. Finally, the new permit is added too as long as all the required fields have been completed.
Delete Roll Button
This button currently does not delete the permit, but sets it to deleted and hides it. This is so the permit numbers could not be reused. A purge deleted screen will probably
be added so deleted permits against a roll to be removed will not interfere with the SAS update process. Change Roll Button Mistakes happen. Sometimes permits are put against the wrong roll number. Sometimes
roll numbers change, are deleted, or properties are split or are combined into one. These are all reasons for the existence of the Change Roll # on Permit. To move a permit, first
select the permit to be moved by clicking somewhere on its record on the Permits tab. Next, click the Change Roll # button. A screen similar to the picture below will appear. 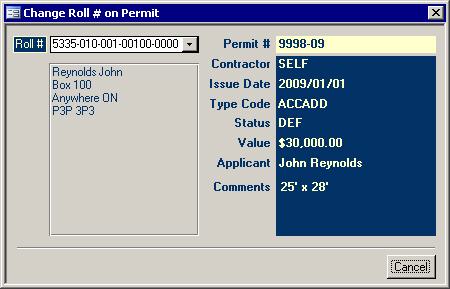
The Roll # box shows the roll to which the permit was assigned. Simply choose the correct roll number from the list box.
Details Button This button will bring up the Permits form showing all permits for the currently selected
roll. This is slightly different from double clicking on a permit number which will show only that permit. Permit List Button This button gives access to a report that shows some key roll information and lists all of
the permits for the currently selected roll. If there is more than one owner, then the first two owner names will appear on the report. Permit Sign
You can print a sign to be posted on the construction site using this button. The Setup
Wizard can be used to alter some of the data for this report like Municipal Name. Value Sched 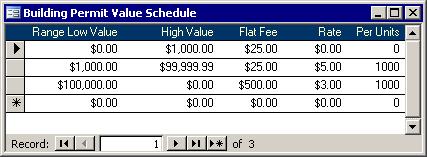 Clicking this button will pull up the Building Permit Value Schedule
as shown on the right. The data on this form is used to calculate the permit fee amount based on the value of the construction project. The edited
permit value is compared to the Low-High range to find the range in which it fits. If the Per Units or the Rate column is 0 then only the flat rate is used; otherwise, the permit
value less the range's low value divided by the Per Units amount gets multiplied by the rate. The flat fee is then added to this as per the formula below: Clicking this button will pull up the Building Permit Value Schedule
as shown on the right. The data on this form is used to calculate the permit fee amount based on the value of the construction project. The edited
permit value is compared to the Low-High range to find the range in which it fits. If the Per Units or the Rate column is 0 then only the flat rate is used; otherwise, the permit
value less the range's low value divided by the Per Units amount gets multiplied by the rate. The flat fee is then added to this as per the formula below:
Of course, BP Value is the value of the Building Permit. If the building permit was for a shed valued at $1500, then the $1,000 to $99,999.99 line in the picture above would be used as follows:
Obviously, fractions are used. As well, only one line from the Building Permit Value Schedule table is used for each calculation.
Bylaw Tab 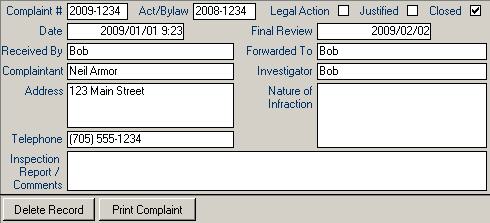
The above screen is used to keep track of bylaw complaints that involve a property. Most deal with lack of licensing or permits, trespassing, noise pollution, farm animals in
the yard, excessive debris in the yard, or with dogs that are barking, running loose or attacking. Some of the complaints may end up leading to Legal Action. There are also
two buttons along the bottom of the tab for deleting and printing the currently selected record.
Development Applications Tab 
Whenever a development application is received, it is entered onto the Development Applications form. These applications list one or more rolls that are to be affected. If
the current roll is listed on one or more development applications, then some of the details will appear on this tab. Double click on the Application # to pull up the Development Applications form. COA Tab 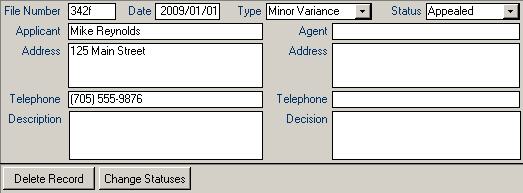
The Committee of Adjustment (COA) is a body that is composed of individuals appointed by Council to consider requests for minor changes, or variances, to the municipality's
Zoning Bylaw. The purpose of the Committee is to provide a forum for the expeditious and practical consideration of minor variances to the municipality's bylaws. Variances are
minor if they are not of sufficient magnitude to warrant the formal consideration of Council. The committee is also authorized to give consent to an owner of land who
wishes to sell, convey or transfer an interest part of their land if, in its opinion, the application conforms to the provisions of the Planning and Development Act, Official Plan and the Zoning Bylaw.
The COA tab keeps track of these applications. The File Number can be up to 10 characters. The values available to the Type and Status pull down lists can be fields
and type field will accept either Minor Variance or Consent. More statuses and types can be added to the lists using the Codes
form. There are two buttons along the bottom of the COA tab. The first lets you delete the current COA record for the current
roll. The second button pulls up a form similar to the Change Zoning
form which is accessible from the Property tab except it is used to amalgamate COA statuses.
Order to Comply (OTC) Tab

Construction that is happening without a permit may be issued an order to comply (OTC). Keep track of these orders to comply by entering them on the OTC tab for the
appropriate property. Once a permit has been taken out for the work, select that number from the Permit # column. The buttons along the bottom of the OTC tab allow
you to delete an OTC, view a scanned image of the order that was written up on paper, and view a report showing the still permitless orders to comply.
Authority Tab

Records stored on this tab indicate that authority was given to alter the current roll in some way. Some will be short term and will have an expiry date. The installation of a
floating dock or the alteration of an aspect of the shoreline are usually authorized for a short period of time. Others, like letters to the Alcohol & Gaming Commission may not
have an expiry date. Use the Codes
for to add more agencies to the Authority pull down list. There is also a Summary button along the bottom. This provides a list of rolls that
have information on their Authority tab on the Permit Inquiry screen. The rolls are grouped by whether or not their Authority has expired.
Sewage Tab 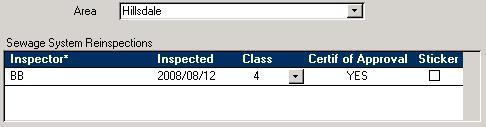
Properties that have some kind of sewage system, like a privy or a trench, are subjected to periodic inspections. The Area can help group the roll while the bottom section of
this tab keeps track of when inspections are done as well as whether or not a certificate of approval was issued. Double clicking the inspector's name will bring up the the Sewage System Site Reinspection form.
Fire Inspections Tab 
Fire inspections are done as a preventative measure. If a building permit has been
issued and an inspection must be done by the fire department first, check this tab before booking inspections. If there are outstanding issues, then there will be a Correct
By date and possibly a Reinspect date. Double clicking on the File # will pull up the Fire Inspections form, shown below, to that File Number.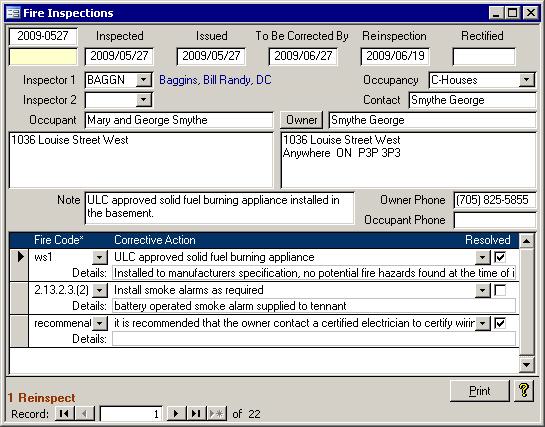
This is similar to the Inspections screen used in the Fire Watch II system, but it is more
limited. The data can be neither edited nor deleted. Nor can the building department add fire inspections using this form. The only button available is a Print button that will
produce the Fire Inspection report. The information on the report and on the above Fire Inspections screen is drawn directly from the Fire Watch II system.
Stops Tab 
If an order to comply has not been followed, and a permit was not issued, then a building inspector can issue a stop work order. Once the paper work has been
completed, type its data into a line on this tab. You can also scan in an image of the original stop work order form to be pulled up with the Images button. Once a permit has
been issued, enter it into the Permit column, so this stop work order will no longer appear on the Permitless report. |