Reports Menu
This brings up a form that provides access to several reports which can be limited to a date range. Those
reports are described below.
- Permit Report:
This shows a simple list of all of the permits in the system, regardless of status, that have an issue date between the chosen dates.
- Permit Summary:
Displays a count of permits by status as well as the total values and fees for each construction type that was used on permits within the chosen date range.
- Development Charges:
This report details the Development Charges collected on a per permit basis grouped by the construction type for the user provided date range. You must pick at least one
development charge from the list for this report to run.
- Inspections by permit:
When selected, this choice lets you preview a list of inspections sorted by permit number where the permit issue date is within the chosen boundaries.
- Inspections by Inspector:
For the date range selected, this will show a list of inspections performed by each inspector.
- Outstanding Provisional:
All provisional inspections, where the inspection date is within the user selected date range, that have not yet had a final inspection will appear on the report. It
does not matter if the final inspection was successful either for a provisional to not appear on this report.
- Delete Permits:
To see a list of permits that have been deleted, select the date range and click the Print Report button. If you actually want to remove the deleted permits from the table,
you will have to use the report in the Setup Wizard.
Conditional Permits: Permits where the Conditional Permit code is not blank or full and are within the given date range will appear on this report. See the Permits help screen for more information
Re-Inspection Report: This will list all inspections that have been flagged as requiring a follow up inspection. You have the choice to print, for a specified date range, all inspections or only
those inspections were done by currently active inspectors.
Contractor Details Report: Lets you preview a report showing the details of each contractor including the permits on which they worked.
Bylaw Report/Summary: A form is pulled up that gives access to five reports. A date range can be selected before the desired report is printed.
- Complaint Reports:
This report shows each complaint on its own page with places at the bottom for the Chief Bylaw Officer's signature.
- Summary by Complaint #:
The bylaw complaints are listed on this report. Usually more than one will fit on each page. You can print it sorted by either the complaint number, the
Act/Bylaw number, or the Investigator.
- Summary by Act/Bylaw:
When you want the summary report grouped and sorted by the Act/Bylaw field, select this option. The date range still applies, and any complaint that has nothing in its
Act/Bylaw field will show first in the list.
- Summary by Investigator:
This will print the summary for the given date range, but sorted by the Investigator name. Records without investigators will show first.
- Outstanding Complaints:
While it has a similar format to the Complaint Summary, only records that have not been closed will preview to the screen.
COA Report/Summary: This gives access to four Committee of Adjustment reports. Similar to the Bylaw Report/Summary above, a detailed report, summary report and an outstanding (where the status is
not Complete) report are available for a user specified date range. The fourth report is a list of COA decisions that are currently within the appeal period of 21 days of the Application Date.
Development Report/Summary: This gives access to three Development Application reports. Similar to the COA Report/Summary above, a detailed report, summary report and an outstanding (where the
status is outstanding) report are available for a user specified date range.
Rolls By Name: When this is clicked, a form pops up where you can print the report for all rolls. Or you can select all of the names of property owners for whom you wish to view a list of
property information. You can also select which property codes should appear as well as change the title of the report. The roll number, address, property code, and legal description appear on this
report.
Vacant Land: This report lists all rolls and the owner name where the Unit Class code is VL (Vacant Land). When you select this report from the Reports sub menu, you will be asked to enter a
Location filter. If you leave it blank and click the OK button or click the Cancel button to cancel the filter, the report will appear with all rolls. If you enter a filter, then only the rolls with
that filter in the location somewhere will appear on the report. For example, if you enter a filter of 12, then all properties whose street address is 12, or 1121, or are on Highway 12, etc. will all
appear in the list.
Statisitcs Canada Inquiry:
This opens a form that has its own help page.
Mailing Labels: This lets you print mailing labels for a range of roll numbers. You also get to pick the type of label and how many labels to skip. For example, if you have a sheet of Avery
5160 labels of which the top three are missing, then enter 3 into the Skip field, so you can use the rest of the label sheet. Just make sure you feed the paper in properly!
Mail Merge Data: You have the choice of exporting the Contractor List, Outstanding Permits, or Sewage System Letters data. This data is put into files which can be used as a data source by a word
processor. The location of the files is specified in the Setup Wizard in the Mail Merge Path box. The files names will be ConsData.doc, SSData.doc, and PermData.doc respectively.
Septic Insp. 25 Years: Rolls that have septic systems need to have their septic systems inspected at least once every 25 years. This report includes primary rolls for all Single family detached
dwellings that are not on water and were built over 24 years ago, and who have not had a septic permit for a number of years. That number of years is set in the Setup Wizard in the Septic Permit Cutoff field.
Septic Insp. on Water: Rolls that are on water need to have their septic systems inspected more often. Single-family detached or Seasonal/recreational dwelling - first tier on water built more
than 19 years ago will appear on this report if they have not had a recent septic permit. The same Septic Permit Cutoff set in the second step of the Setup Wizard will be used to figure out whether or not a septic permit is recent.
Permit Year Mismatch: Permits that have an issue date whose year is different from the last two digits of the year in the permit number will be included on this report.
Permit Date Out of Range: Issue dates that are blank, are from before 1973, or are beyond the current year will cause their permit to appear on this report.
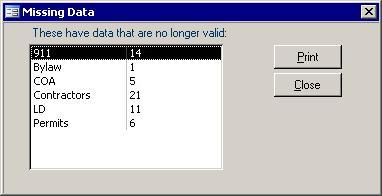 Missing Data: Roll numbers come and go over the years. As roll numbers are deleted
from the tax system, especially subordinate
rolls, they may not have been deleted or updated in the Property Management system. This menu option will pull up a form that shows you a count of records
that are missing data. As well, since the roll number on the permit is so important, after printing the Permit With Old Rolls report, the Transfer Permits screen will be
launched, so you can fix the data right away. While most have to do with rolls, others, like Contractors show the permits that list a contractor that does not exist in the Contractors table.
SFD/Lot Grading: A form will be launched upon the clicking of this menu item. With this form, you can filter by part of the legal description. There are also a
couple of date fields that are used with some of the reports. Below is a description of each of the Missing Data: Roll numbers come and go over the years. As roll numbers are deleted
from the tax system, especially subordinate
rolls, they may not have been deleted or updated in the Property Management system. This menu option will pull up a form that shows you a count of records
that are missing data. As well, since the roll number on the permit is so important, after printing the Permit With Old Rolls report, the Transfer Permits screen will be
launched, so you can fix the data right away. While most have to do with rolls, others, like Contractors show the permits that list a contractor that does not exist in the Contractors table.
SFD/Lot Grading: A form will be launched upon the clicking of this menu item. With this form, you can filter by part of the legal description. There are also a
couple of date fields that are used with some of the reports. Below is a description of each of the
- SFD Grading Report:
The records that had their Included box checked will appear in the Grading report for Single Family Dwellings (SFD) grouped on
whether or not they have had an acceptable Grading inspection.
- Grading:
The Grading report shows all rolls with their grading permit number. Upon clicking the Print Grading button, you will be able to enter
part of the Legal Description. For example, if you only want the rolls from a new subdivision -- M929 plan, then type in M929 into the dialog box that appears asking for part of the Legal Description.
- Vendor:
The properties that have been set to be included will appear on this report that acts as a bill. Below each Included check box on the form is
an amount field. The amount you type into that field for the selected rolls will appear on this report. This report then goes to the billing department to
pay the vendor for the grading work done on the municipalities behalf.
- Deposit Forms:
When a lot grading deposit is taken, this form is used to keep track of expenses that get deducted from the deposit. These charges
could include lot grading plan reviews, inspections, and re-inspections. If the charge you need is not in the system, then use the Codes page to add the new charges under the Lot Grading Deposit Fees code. When the job is
done, then the unused amount of the deposit must be refunded.
Adequate: Two reports will appear showing data restricted to the start and end dates that were entered. The first report shows all rolls that had an
acceptable occupancy inspection done within the specified date range. Also shown is the number of inspections, re-inspections, and provisional
inspections. Similarly, the second report shows acceptable grading inspections as well as the number of inspections per permit for the same date range.
Legal Desc: For issue dates within the chosen date range, permits with legal descriptions will appear on this report as long as the construction type was Single Family Dwellings (SFD).
Compliance Forms: When a property is sold, a Compliance Form must be competed. The compliance form has up to three pages for building, zoning, and
sewage systems information. They are stored on the system and can be reprinted at any time. The Setup Wizard
allows you to change default values that will be used for newly created forms. Because they are just defaults, they can be
changed once a new record has been created. As well, once created, Compliance Forms must be printed, signed and dated. Compliance Forms cannot be deleted until they have been set to completed.
|