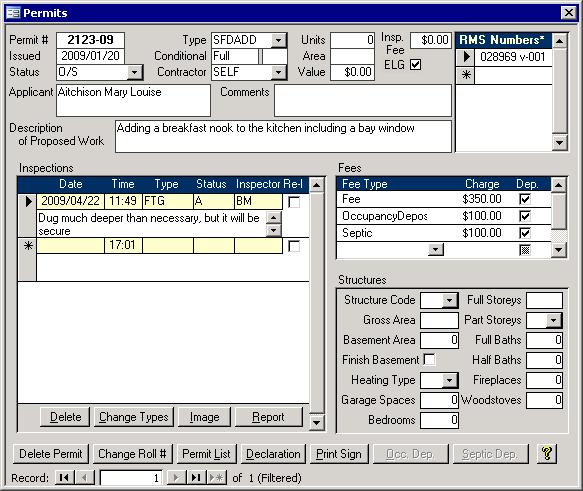
Introduction The Permits form is a big form with many sections: Permit Information,
RMS, Inspections, Fees, Structures, and Buttons. It is usually pulled up from the Permits tab
of the Permits Inquiry screen. Historically, this has been the most important part of the Property Management system: The ability to keep track of building permits. Each section is described below.
Permit Information Section
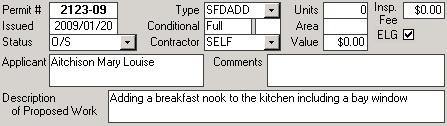 |
As shown in the picture above, the top left part of the form has information for each permit. Each of the fields are described below.
- Permit Number:
The Permit Number can be assigned based on the date, but this will depend on how many permits are issued each year.
- Issue Date:
This is the date the permit was issued. When entering a new permit, the Issue date will be blank. When the Issue date is finally entered, an RMS file
will be created. If that roll has multiple permits, you will be asked which permits should be associated with the permit now being issued. This feature is used to link
change use and septic permits with their main building permit.
Status: The status of the permit is stored in this field. While typical values include Cancel, Complete, Deficiencies, and Outstanding, other permit status
codes can be added to the list using the Codes form.
Applicant: The name of the applicant is usually the property owner's name.
Type: Also available on the Codes form, the Type field indicates the type of construction allowed under that permit. One permit is issued per construction type.
Conditional: If blank or full then there are no conditions. Otherwise the outstanding tasks have to be completed by the number of days in the small box
after the Conditional box.
Contractor: This field stores the name of the contractor that did the work. It is best to pick from the list. If a name is typed in which is not in the Contractor
table, you will be asked if it should be added to the list. Check the spelling before doing so. The best solution is to type the first letter or two and pick from the list.
You can expand the list by hitting Alt and the down arrow on the keyboard at the same time or using the mouse.
Units: This can be used to give more detail on the scope of the permit and may be needed by Statistics Canada.
Area: Some permits, like additions or single family dwellings need the square footage to be filled in. This data is then sent to Statistics Canada
Value: Also needed by Statistics Canada, this is the cost of the structure or addition. If the
Setup Wizard was used to turn on the Use Permit Fee/Value Schedule option, then editing the amount in the Value field will show a message
with the re-calculated fee.
Insp. Fee: Once a permit has an acceptable provisional, final or tile bed inspection, this field gets filled in with the current value of the Inspection fee.
This can be changed in the Setup Wizard.
ELG: Engineered Lot Grading indicates whether or not the subdivision is a part of a development application project. When an inspection is scheduled for such a
roll, a warning message will appear if the Grading inspection type is chosen.
Comments: Any notes on the project can be added in this field.
Description of Proposed Work: This field is on the standard permit application that was designed by the ministry after the passing of Bill 124.
That's about it for the permit information section. Descriptions of the other sections continues below.
RMS Section 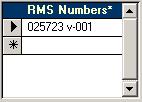 The Records Management System (RMS) keeps track of all files.
Since each permit is linked to at least one file when the permit issue date is entered, that file number will appear in the RMS section on the top right of the Permits form. More links can be
added if that permit is referenced in other files too. Double clicking on an RMS number in the list will open a Files Inquiry screen. You won't be able to edit any of the data, but you can see the
information. Included is a Permits tab, so you can see which permits have been associated with each other. The Records Management System (RMS) keeps track of all files.
Since each permit is linked to at least one file when the permit issue date is entered, that file number will appear in the RMS section on the top right of the Permits form. More links can be
added if that permit is referenced in other files too. Double clicking on an RMS number in the list will open a Files Inquiry screen. You won't be able to edit any of the data, but you can see the
information. Included is a Permits tab, so you can see which permits have been associated with each other.
Inspections Section
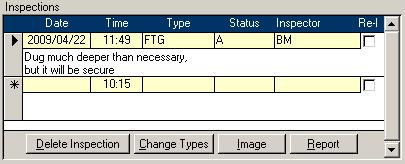 There are two rows of data for each inspection on this
form. The top has yellow fields while the Comments section beneath it is white. This is done to make it easier to distinguish between records. In this instance the yellow fields
are not an indication that the field is not editable. The locking status of the roll will determine whether or not inspections can be edited. The currently selected inspection is indicated with a triangle in the grey area to the left
of the record. This is used on many forms. If the roll is locked, then the Delete Inspection button will not allow you to delete the currently selected inspection. On the
other hand, the Report button will show a preview of the Inspection report regardless of the locking status. This report shows all inspections for the currently selected permit.
The Image button also works regardless of the roll lock. It will show a scanned picture of the inspection form if it's file has been properly named: Permit Number - Inspection
Date (yyyymmdd format) - Inspection Time (hhnn format).pdf. For example, the inspection above would need a file name of 200209-20090101-1001.pdf. Finally, the
Change Types will produce a form that will allow you to change the inspection status for all inspections. This should rarely be needed. There are two rows of data for each inspection on this
form. The top has yellow fields while the Comments section beneath it is white. This is done to make it easier to distinguish between records. In this instance the yellow fields
are not an indication that the field is not editable. The locking status of the roll will determine whether or not inspections can be edited. The currently selected inspection is indicated with a triangle in the grey area to the left
of the record. This is used on many forms. If the roll is locked, then the Delete Inspection button will not allow you to delete the currently selected inspection. On the
other hand, the Report button will show a preview of the Inspection report regardless of the locking status. This report shows all inspections for the currently selected permit.
The Image button also works regardless of the roll lock. It will show a scanned picture of the inspection form if it's file has been properly named: Permit Number - Inspection
Date (yyyymmdd format) - Inspection Time (hhnn format).pdf. For example, the inspection above would need a file name of 200209-20090101-1001.pdf. Finally, the
Change Types will produce a form that will allow you to change the inspection status for all inspections. This should rarely be needed.
When an inspection status is set, some things may happen depending on the inspection type. If it is an acceptable Lot Grading inspection then the permit's Lot Grading Deposit
record will be pulled up to make sure it is not missed. If the Deposit record has not been created yet, the program will create it now. As well, if the inspection type is Final or
Provisional, then the permit's status will be set according to the inspection's status. One other small hidden feature exists. You can click on the white space beneath the
Re-Inspection check box to show who entered and who modified the inspections as well as when. Click in the same spot again to get those fields to disappear.
Fees Section 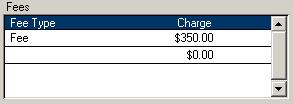 Permit and Septic fees as well as Educational Development Charges can be issued with some permits. Those that are applicable are tracked in the Fees section as shown in the
picture on the right. This is for the Building Department's use only and has no direct tie to either Cash Receipts nor to the General Ledger.
Permit and Septic fees as well as Educational Development Charges can be issued with some permits. Those that are applicable are tracked in the Fees section as shown in the
picture on the right. This is for the Building Department's use only and has no direct tie to either Cash Receipts nor to the General Ledger.
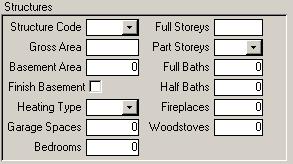 Structures Section Structures Section
The Property Inquiry's Structures tab may not have the most up to date information that is available. New Single Family dwellings can be tracked with this structures
section. Only the key information is needed. Buttons Section 
There are seven buttons along the bottom of the permits form. Their function when clicked is described below.
- Delete Permit:
This will set the permit to deleted. It will not be removed, but will be hidden instead. This prevents numbers from being used more than once
since all permit numbers must be unique.
- Change Roll #:
The form that is pulled up allows you to move permits between rolls. See the Inquiry
help section for more details.
Permit List: A report will be generated showing all permits for the roll to which the current permit belongs.
Declaration: If a Septic Waiver/Declaration has been scanned in for this permit, then it will appear when this Declaration button is clicked. The files should be the
permit number with a pdf extension. For example, 200309.pdf.
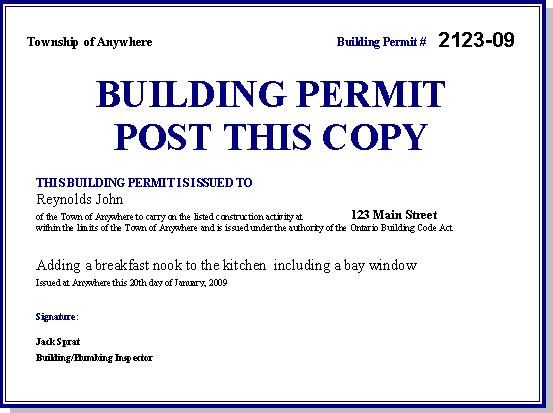
Print Sign: Municipalities often require that the Building Permit be posted in a visible area at the construction site. Some of the data is from the permit form while the rest is stored in the
Setup Wizard. A sample sign is shown below.
Occ. Dep.: This button, which stands for Occupancy Deposit, will be enabled if
there is an acceptable Final or Provisional inspection for the permit. Clicking it will pull up the Occupancy Deposit Refund report that shows the allowable and actual
count of inspections. If the allowable number of inspections was not exceeded then a refund to the property owner may be in order. If the owner refund is negative, then they owe that amount.
Septic Dep.: Enabled if there is an acceptable tile bed inspection, this button gives access to previewing the Septic Deposit Refund report.
|