Introduction This wizard takes you through setting up the system's information. It is
automatically run when you first launch Baker and Associates software for the first time. If you do not complete the wizard, your changes will be cancelled and it will continue to run when you first enter the
system. Once it has been finished, it can be run at any time by the administrator. It is accessible through the main Property Management menu. Each time it is run, you must proceed to click Next until
you can click the Finish button; otherwise, your changes will not be saved.
 Step 1: Checklist
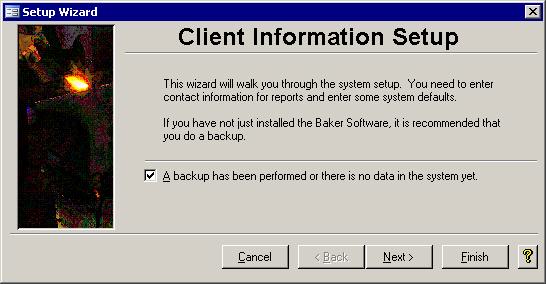
Before you can begin you have to back up the system to save the previous
configuration. If you are running this Baker and Associates software for the first time, you can just check off the box by clicking in it with the mouse. Click Next to continue on.
 Step 2: System Defaults
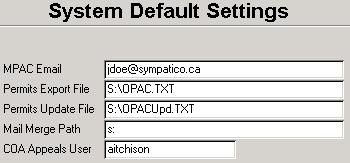
The Default Settings screen lets you choose the data for various places in the Property Management system.
- MPAC Email:
This is the email address of the person at your local Municipal Property Assessment Corporation (MPAC) branch to whom the building permit and structure data should be sent.
- Permits Export File:
The filename for the export file which contains all new permits.
- Permits Update File:
This field holds the full path and file name for the text document that contains a list of all permits that have been updated.
- Mail Merge Path:
The path to the folder where the mail merge data sources will be saved goes here.
- COA Appeals User:
The Committee of Adjustments (COA) Appeals report will show for the person with the entered username.
Once the fields on this screen have been set up properly, click the Next button.
Step 3: Permits Defaults 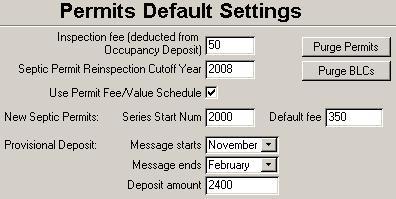
The Permits Default Settings screen lets you choose the data that affects how permits are handled by the Property Management system.
- Inspection Fee:
The current fee amount for a single inspection should appear here. When an acceptable provisional or final permit is completed, then the
occupancy deposit is refunded. As well, when an acceptable tile bed inspection is entered into the system, then the septic deposit is refunded. In both cases, upon
entering the acceptable inspection, this inspection fee is copied to the permit record. This allows for the fee to increase without affecting the previous permits.
- Septic Permit Cutoff:
The cutoff year for checking for septic permits for septic reinspections. Rolls that have permits dated in that year or more recently will be
excluded from the Septic Inspection 20 Year report.
- Use Permit Fee/Value Schedule:
If you use a schedule to determine the fee based on the value of the building permit, then you can turn on this feature to get
the system to calculate the building permit fees for you.
- New Septic Permits:
You can specify the series number and default fee for septic permits. This default fee is independent of the septic deposit amount.
- Provisional Deposit:
There are three boxes in this section. A deposit is required when the lot grading cannot be verified. A message about the requirement of a
deposit should start when the snow flies. The first box, Message starts, should contain the month in which your area starts to get snow. Similarly, the second
box in this section, Message ends, should have the last month of the spring thaw. The last box, Deposit amount, is the dollar amount of the deposit that is required.
This amount will show in the body of the message text.
- Purge Permits:
There is a Purge Permits button which brings up the Deleted Permits report. Upon closing that report you can remove any deleted permit from
the system that is not linked to the Records Management System (RMS).
- Purge BLCs:
If the Municipal Tax system won't permit the SAS update to proceed because a roll is in use in the Property Management system, you may have to
remove the deleted Bylaw Complaints using this button. When the Purge BLCs button is clicked the Deleted By law Complaints report will appear on the screen.
Print the report then close it. Upon closing the report, you will be asked if the deleted complaint records should be removed from the system.
Clicking the Next button will move you on to the fourth step's screen.
Step 4: Inspection Scheduler 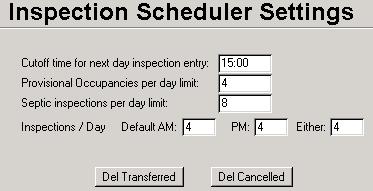
Many options are available for scheduling inspections. There are even a couple of buttons that perform certain tasks. The details for each option and button are outlined below.
- Cutoff time:
There comes a time each day when the jobs for the next day have to be assigned. No more inspections should be able to be scheduled after that
time. That cutoff time is put into the top box on this screen. Use 24 hour time to make sure the correct time is entered.
- Provisional Occupancies per day limit:
There can only be so many provisional occupancy inspections per day due to the limited number of inspectors that can
perform a provisional occupancy inspection. Also on this screen are two buttons that will delete all of the old transferred and deleted records from the inspection scheduler.
- Septic inspections per day limit:
Due to a limited number of inspectors available to perform septic inspections, the number that can be performed in one day must be capped.
- Inspections / Day:
The next three boxes are where the default number of inspection bookings per time period are entered. In the picture above, there can,
by default, be only five inspections scheduled for any morning, five for the afternoon and another five that can be designated for either the morning or
afternoon. The number of allowable bookings can be altered on a day to day basis using the Limits screen. The number of inspections that can be done in a day depends on how many and when inspectors are available. If one of the regular
inspectors goes on holidays, or needs some time off for bereavement leave, illness, or for some other reason, then the number of inspections for that day must be reduced.
Del Transferred button: This allows you to clear out the old scheduled inspections that have already been transferred to the Permit Inspections section.
Del Cancelled button: This button will purge the system of all cancelled scheduled inspections. It is a good idea to clean up the data once a season or more frequently during the building season.
Once this screen has been completed, click the Next button to move onto the Compliance Form Settings step.
Step 5: Compliance Forms
This step of the wizard tracks default data needed for the Compliance Form. When a property is sold, a Compliance Form should be competed. 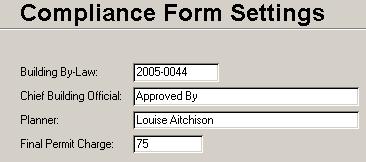 The compliance form has up to three sections for building, zoning, and sewage systems information. They are stored on the system and can be reprinted
at any time, but the fields listed in the picture on the left will be used for newly created forms. They are the defaults that will appear on the Compliance Form entry screen. Because they are
just defaults, they can be changed once a new record has been created. Changing these defaults will not change the data in any existing Compliance Form record. As well, once created, Compliance
Forms must be printed, signed and dated. The compliance form has up to three sections for building, zoning, and sewage systems information. They are stored on the system and can be reprinted
at any time, but the fields listed in the picture on the left will be used for newly created forms. They are the defaults that will appear on the Compliance Form entry screen. Because they are
just defaults, they can be changed once a new record has been created. Changing these defaults will not change the data in any existing Compliance Form record. As well, once created, Compliance
Forms must be printed, signed and dated.
Step 6: RMS 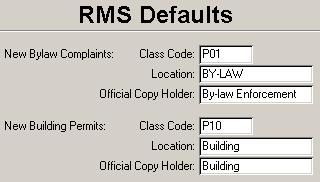 When new Bylaw Complaints or new
building permits are created, a new file is usually created in the Records Management System (RMS). There are some exceptions. For example, septic permits do not trigger the creation of a
new RMS file. Some fields in the new file are filled in automatically with some default values. These default values can be set in this step of the Setup Wizard. Both complaints and permits
can have the following set by default: Class Code, Location, and Official Copy Holder. The RMS staff will determine what these values should be. When new Bylaw Complaints or new
building permits are created, a new file is usually created in the Records Management System (RMS). There are some exceptions. For example, septic permits do not trigger the creation of a
new RMS file. Some fields in the new file are filled in automatically with some default values. These default values can be set in this step of the Setup Wizard. Both complaints and permits
can have the following set by default: Class Code, Location, and Official Copy Holder. The RMS staff will determine what these values should be.
Step 7: Scanned Images 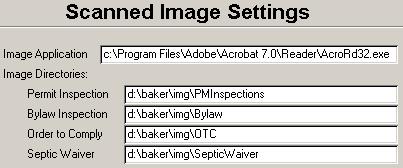 Four types of documents can be scanned in, saved as a pdf (Adobe Portable Document Format) file, and accessed from within our Property Management
system. PDF files are used because of their ability to store more than one page per file. While the top box in the picture above stores
the full path and file name of the executable program that can view pdfs, the bottom four image directory boxes are described below.
building permit
form has an Inspections section that has an Image button. If any properly named file exists in the directory listed in the Permit Inspection box, then the word Image on the button will change to a dark
red. The image file will be opened when the Image button is clicked. The file name must start with the permit number followed by a hyphen, then the inspection
date (yyyymmdd format), then another hyphen, finishing with the Inspection Time (hhnn format) and a ".pdf".
Bylaw Inspection: The Property Inquiry screen's Bylaw tab has an Inspections button which will open an image of the scanned complaint inspection. The files
must be named with the complaint number first then -00.pdf where the 00 can be any two digit number from 01 to 99. The Inspections button will open all that are
numbered in sequence. If you have 5 files numbered 01 to 04 with the last file numbered 06, then the 06 file will not be opened. The same button is on the
Bylaw Complaints form. That form is accessible by double clicking on a complaint number on the Property Inquiry screen's Bylaw tab. Both screens indicate how
many inspection files exist for the currently selected complaint.
Order to Comply: Put the directory path which contains the OTC pictures into this field. The OTC tab, of the Property Inquiry screen, has an Images button that
will open any Order to Comply that has been issued against a permit for the property and that has been scanned and saved properly. The file name will be the
order number with -00.pdf on the end. In this case it is actually -00 since there can only be one Order to Comply issued against each permit.
Septic Waiver: The Permits form also has a declaration button. The word Declaration will be dark red when an image file exists. Clicking this button will
show any Septic Waiver image that has been scanned in and saved in the folder entered in the Septic Waiver field as in the picture above. The program assumes
that only the permit number ended with a ".pdf" was used as the file name. These waivers are used with Compliance Forms. The list of building permits is built for
each Compliance Form until the form is completed. If a Septic Waiver image file exists then that box will be checked on the report within the list of permits. Four types of documents can be scanned in, saved as a pdf (Adobe Portable Document Format) file, and accessed from within our Property Management
system. PDF files are used because of their ability to store more than one page per file. While the top box in the picture above stores
the full path and file name of the executable program that can view pdfs, the bottom four image directory boxes are described below.
building permit
form has an Inspections section that has an Image button. If any properly named file exists in the directory listed in the Permit Inspection box, then the word Image on the button will change to a dark
red. The image file will be opened when the Image button is clicked. The file name must start with the permit number followed by a hyphen, then the inspection
date (yyyymmdd format), then another hyphen, finishing with the Inspection Time (hhnn format) and a ".pdf".
Bylaw Inspection: The Property Inquiry screen's Bylaw tab has an Inspections button which will open an image of the scanned complaint inspection. The files
must be named with the complaint number first then -00.pdf where the 00 can be any two digit number from 01 to 99. The Inspections button will open all that are
numbered in sequence. If you have 5 files numbered 01 to 04 with the last file numbered 06, then the 06 file will not be opened. The same button is on the
Bylaw Complaints form. That form is accessible by double clicking on a complaint number on the Property Inquiry screen's Bylaw tab. Both screens indicate how
many inspection files exist for the currently selected complaint.
Order to Comply: Put the directory path which contains the OTC pictures into this field. The OTC tab, of the Property Inquiry screen, has an Images button that
will open any Order to Comply that has been issued against a permit for the property and that has been scanned and saved properly. The file name will be the
order number with -00.pdf on the end. In this case it is actually -00 since there can only be one Order to Comply issued against each permit.
Septic Waiver: The Permits form also has a declaration button. The word Declaration will be dark red when an image file exists. Clicking this button will
show any Septic Waiver image that has been scanned in and saved in the folder entered in the Septic Waiver field as in the picture above. The program assumes
that only the permit number ended with a ".pdf" was used as the file name. These waivers are used with Compliance Forms. The list of building permits is built for
each Compliance Form until the form is completed. If a Septic Waiver image file exists then that box will be checked on the report within the list of permits.
If the wrong folders are entered into the above four fields, then the files will not be found and the buttons will do nothing. Once this screen has been set up, click the Finish button to save your work.
 Step 8: Scanned Images
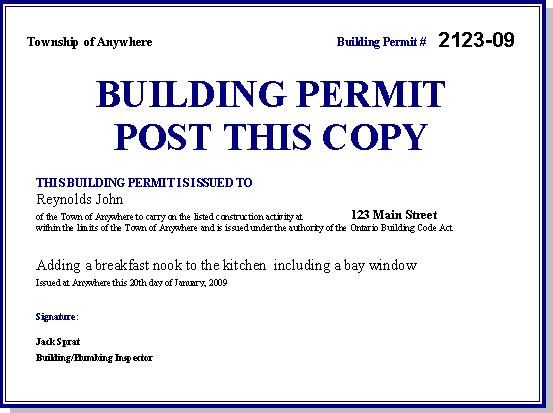
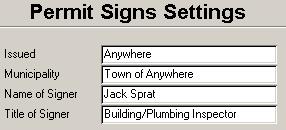 Construction sites are often required to post the Building Permit in a visible area. This step of the Setup Wizard allows you to view or alter the data that appears on the printed sign that gets posted.
- Issued:
This is the place where the permit was issued. In the picture of a building permit sign showing below, the Issued line is just above the Signature section.
- Municipality:
The name of the municipality appears twice on the report.
- Name of Signer:
The data in this field will be shown in the Signature section.
- Title of Signer:
The information in this box will be the last line of the report and should contain the title of the person identified in the Name of Signer box.
|