Introduction The Inspection Scheduler allows inspections for building permits to be planned
in advance. There are many restrictions to when an inspection can be booked. These include the number of available inspectors, when the contractor or home owner will be available, and sometimes even
the type of inspection. This form is designed to help the building department sort through all of these variables.
Main Form The main Inspection Scheduler form is shown below.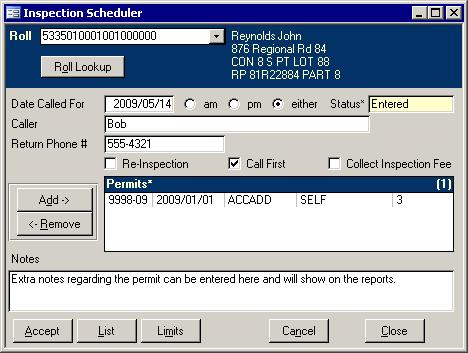
The top dark blue section is used for finding the roll number of the property involved. If the roll number is known, simply select it from the list. Otherwise, use the Roll Lookup
button to find the property. If the selected roll has been locked, you may not be able to continue until you select a different roll. Once the roll and date are filled in, you must
choose the time of day that is requested, or in some cases, available. See the Setting Limits section below for more information. Once the caller's name and phone number have been entered, check off the appropriate boxes:
- Re-Inspection:
This indicates that a prior inspection had taken place and was found deficient, thus requiring another inspection.
- Call First:
Indicates that the inspector should call the Return Phone # before proceeding to that site.
- Collect Inspection Fee:
If the inspection fee has not yet been paid, and arrangements have been made for the inspector to collect the money when the inspector goes on site, put a check in this last box.
The next section of the form involves selecting the permits. While most inspections involve only one permit, more than one permit can be listed. If you used the Roll Lookup
button to search by permit number and the selected permit is not Complete, Cancel, or Deleted, then it will automatically appear in the Permits list. If one or more permit is
missing from the list, use the Add button to list the available permits to be added. 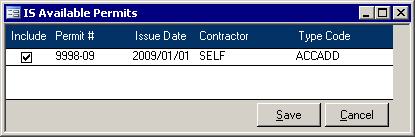
The Add button pulls up the IS Available Permits screen shown above. Simply check off the permits to include then click the Save button, or hit Alt+S, to save the new list.
This window will actually replace the list with only those that have been checked off, but life isn't that hard. The computer will put a check in the boxes of those that were in
the list before the Add button was clicked. 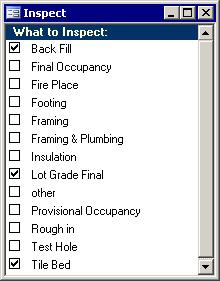 Once you are back at the main screen, you can double
click on each of the permits to pull up the What to Inspect form shown here on the right. Check off the requested types of inspections. These will appear on
the Morning and Afternoon Inspections reports. These reports are available from Scheduled Inspection List form described below in the Buttons section. Once you are back at the main screen, you can double
click on each of the permits to pull up the What to Inspect form shown here on the right. Check off the requested types of inspections. These will appear on
the Morning and Afternoon Inspections reports. These reports are available from Scheduled Inspection List form described below in the Buttons section.
Now that all that information has been set up, you can
finish up the scheduled inspection by adding any extra notes that are needed by the inspector like directions or other instructions. The last notable field is the Status field. All fields that
have an asterisk (*) in their label indicate that clicking or double clicking will perform a task. In this case, any status that is not Entered, will be reverted back to
Entered. This is handy in case the wrong date was chosen when booking or the wrong record was cancelled.
Buttons There exist several buttons along the bottom of the main Inspection Scheduler screen.
Most of the usual buttons are there: Accept to save the current record and move to a new record, Close to save and exit the form, and Cancel to set the Status to Cancelled.
One notable exception is the Search button. There is no search screen, but you can use the List button to pull up the Scheduled Inspection List screen described below.
Finally, there is a Limits button. It is detailed at the bottom of this section.
Scheduled Inspection List
Clicking the List button found along the bottom of the Inspection scheduler screen will make the Scheduled Inspection List form, shown below, appear on the screen.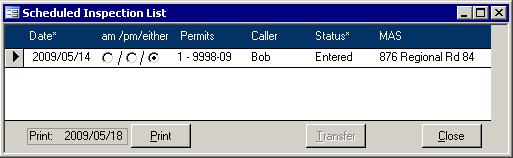
You can double click on the date of a scheduled inspection in the list to pull up that
record on the main Inspection Scheduler screen. As well as the primary inspection scheduler information, the Scheduled Inspection List form shows the count and permit
numbers affected. In the above example, the 1 - 9998-09 means there is only one permit and its number is 9998-09. If it had read 2 - 0074-07/0509-09 then there are
two permit numbers listed: 0074-07 and 0509-09. If more than two permits were selected, only the first two numbers will show. This form has buttons too. The Close
button will simply close the form, but the other two are more involved. The Print button will show you the
Morning and Afternoon Inspections reports for the
date that shows in the gray box on the left. That date defaults to the next business day, but can be changed to show the report for any day. If no inspections have a
status of Entered or Booked for the chosen day, then the reports will not print. Upon closing the reports, you will be asked if you want to set the inspections statuses to booked.
Once a scheduled inspection has been set to booked. It can be transferred to the Permit Inspection table. If more than one permit has been selected, then each will get a
new inspection record. The inspector can then go to each of the new Inspection records and set the statuses. Setting Limits
 While your department has an average number of
inspections that can be done each day, sometimes that number is reduce. I could be because an inspector is off sick or is planning to be busy for the afternoon. For
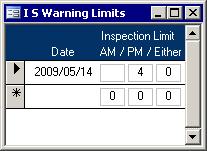
whatever reason, sometimes the number of inspections that can be done in one day has to be altered. The Setup Wizard is used to enter the defaults, but the form
on the right is used to alter those values for a given day. Use the Limits button on the Inspection Scheduler to launch this form. Once up, you can use it to specify the
day and the number of inspections for each time period. They all default to zero because usually this form is to reduce the number from the defaults. In the example
shown, the blanked out AM box means the default number of inspections for the morning will be used. The PM has been reduced to 4 since only one of the two inspectors will be
available. The Either limit was left at 0, so this option will not be available. While your department has an average number of
inspections that can be done each day, sometimes that number is reduce. I could be because an inspector is off sick or is planning to be busy for the afternoon. For
whatever reason, sometimes the number of inspections that can be done in one day has to be altered. The Setup Wizard is used to enter the defaults, but the form
on the right is used to alter those values for a given day. Use the Limits button on the Inspection Scheduler to launch this form. Once up, you can use it to specify the
day and the number of inspections for each time period. They all default to zero because usually this form is to reduce the number from the defaults. In the example
shown, the blanked out AM box means the default number of inspections for the morning will be used. The PM has been reduced to 4 since only one of the two inspectors will be
available. The Either limit was left at 0, so this option will not be available.Now, what effect do these limits have on the Inspection Scheduler screen? The easiest
way is to describe effect using examples. Assuming the default AM limit is 8, you would be able to enter 8 inspections for the AM. If you tried to enter a ninth, then it would
automatically be changed to PM. If that is full, that is, if there are already 4 inspections scheduled for the afternoon, then it will try to change it to Either. Of course, since my
example has 0 for Either, the program will tell you that the chosen date is full and another will have to be entered.
|