Introduction There are three types of billings: Interim, Final, and
Supplementary. To get a bill, each Roll must have an owner or tenant with a sequence number of 001, a mailing address, and a school tax code.Interim: This takes half of what was levied for each property
for the previous year when calculating the interim. New rolls, as of January 1, do not receive an interim bill. You can split the billing into different batches based on Realty tax class, but if you rely on
the system to calculate the Schedule 2 and Schedule 3 for the Standardized Final Bill, then all tax classes will have to be billed at the same time. Final: This billing is usually done at the end of summer when
the final tax rates have been approved by council. When billing the final bill, you will have to use the same batch sequence as was used for the interim billing. For example, if for the interim bill you
billed Residential and Farmland in batch 1, Commercial and Industrial in batch 2 and Pipeline made up batch 3, then the final billing will use the same Realty Tax Class Codes for each of its batches. The first
final billing batch will have to include only Residential and Farmland. Batch 2 will have to be for Commercial and Industrial while Pipeline will remain as Final Billing Batch 3. Again, if you rely on the
system to calculate the Schedule 2 and Schedule 3 for the Standardized Final Bill, then all tax classes will have to be billed at the same time. Supplementaries: Several different changes to the roll that can
affect the amount of tax levied are all lumped under this one heading. If you need to do Supplementaries, Omissions, Assessment Review Board decisions, Class Changes, or Cancellations, you will need to first enter
the data into the Assessment Adjustment
screen. When you do actually run through a Supplementary billing, you will notice that you do not get to choose which Realty Tax Classes are included in the billing. This is because Supplementaries are done in batches. All rolls in the current batch will be included in the billing.
Stepping This wizard walks you through the Interim billing. It will also
highlight some differences between the Interim and the Final and Supplementary billings. The billing process has been broken down into small chunks to make it as easy as possible.
 Step 1: Select Billing Step 1: Select Billing
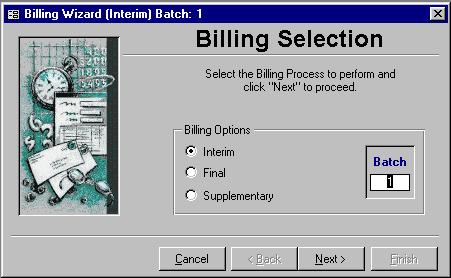
Select which billing and a batch. If the chosen billing batch has already been updated, you will be limited to only printing reports. When you are content with your selection, click the Next button.
 Step 2: Choose Realty Tax Classes Step 2: Choose Realty Tax Classes
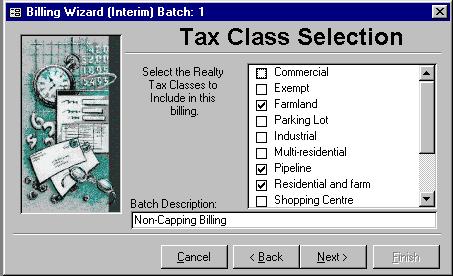
Sometimes legislation effects when the billings can be done. The figure above shows how you could choose only some tax classes for a specific billing. If you are not doing
all classes in a billing, then the Batch Description is quite important. It should contain a description that will distinguish it between the other Interim billings on the Tax Certificate.
Note: The classes chosen for a given batch during the Interim billing will be used for the same batch on the Final billing. For example, if the first Interim batch contained
Residential and farm and Farmland, then those are the only two classes that can appear on the first Final batch. Note: This screen is not present on the Supplementary billing. Rather the Batch
Description will appear on the next screen.
Step 3: Generate 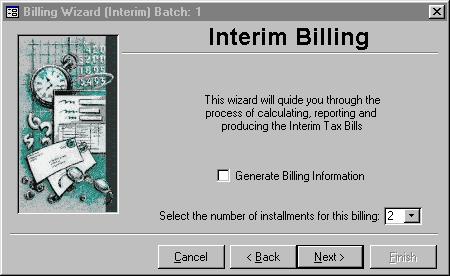
This step generates the current status of the system and sets up data for several reports. No data is changed at this step, but the status is saved and used during the
billing. The first time through this screen for each billing batch, you must generate the billing information. If your reports provided to you in the next step show something is
wrong, then correct the problem and regenerate so the current status is re-saved. If you want to regenerate, place a check mark in the box to the left of Generate Billing
Information by clicking in it with the mouse. You are also given a chance here to change the number of installments that will be used for this billing. When you are ready, click the Next button.
Step 4: Report Selection 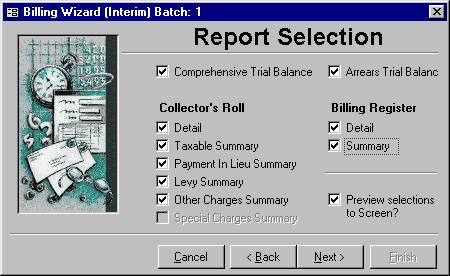
Several different reports are generated during a billing. If you notice a check box that is greyed out, that means it contains no data. Below is a list of each report with a short description:
Comprehensive Trial Balance: Shows all rolls
Arrears Trial Balance: Shows only rolls with arrears
Collector's Roll Section:
Detail
: All rolls with assessment values to balance with roll book
Taxable Summary: Totals for rolls that are not Payment in Lieu with an extra
totals section
Payment in Lieu Summary
: Totals for only PIL rolls with an extra totals section
Levy Summary: The transactions that will be put into the GL (This must balance)
Other Charges Summary: Lists totals for Local Improvements
Billing Register Section:
Detail
: only rolls that will get a bill show up with installment amounts
Summary: Totals of the Detail Billing Register
Step 5: Checklist
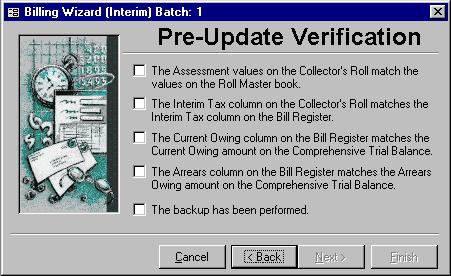
Make sure everything balances before proceeding and that a backup has been done. After this step, transactions will be put into the system, so in the event of an error, you
will need to restore from backup. After you do each step then check them off by clicking in its box, the Next button will be enabled, so you can continue on to Step 6.Note:
The third point will be true only if you are doing a billing for all realty tax classes.
Step 6: Due Dates 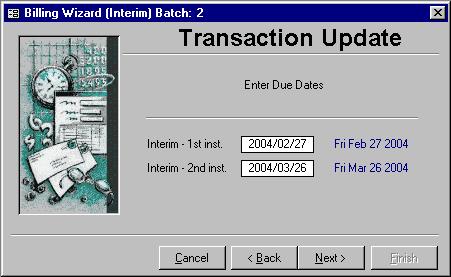
Depending on the number of installments you chose during Step 3, you will see either one or two due dates on this screen. Simply enter in the dates by which you wish each
installment paid The computer automatically calculates the first date as 21 days from the current system date as per legislation requiring a minimum of 21 days from the post
marked date. If there is a second date, then it is calculated as 28 days from the first installment date. The 28 was chosen as the default since it will always be a weekday if
the first date is a weekday. Click the Next button when the dates are correct.
Step 7: Second Trial Balance 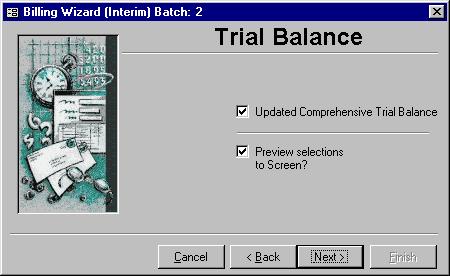
The Comprehensive Trial Balance plus the amounts on the Levy Summary both printed in Step 4 should equal the total on the Comprehensive Trial Balance printed when you have
a check mark in the Trial Balance box and click next.
Step 8: Print Mortgage Bill List
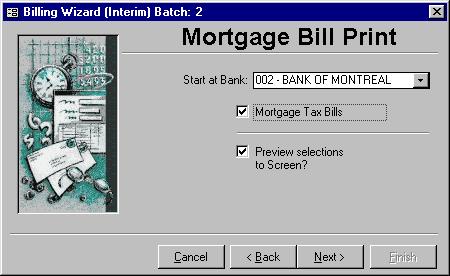
The Mortgage Bill List Print is quite similar to the Mortgage/Bulk List printed in Step 10. Which you should print depends on the preferences of the banks. Some want only one
and not the other while some banks want both sent to them. The onus is on you to print only what is needed for each bank.
Step 9: Print Tax Bills 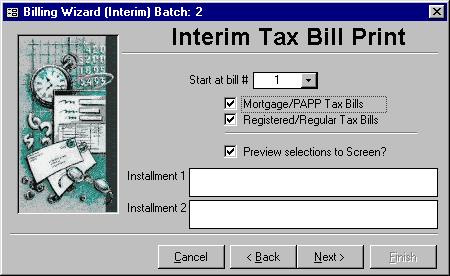
This will print the bills. If you are only going to have one installment, you could put a
message into the Installment 1 box like, "There is only one installment for this billing." Or you could use this to announce a historic Municipal event. The choice is yours.
Step 10: Print Bulk List 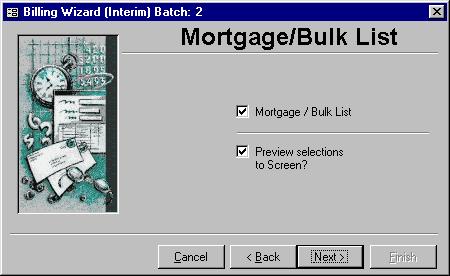
The bulk list is a condensed version of the Mortgage Bill List printed in Step 9. It is used more due to its compact size. Usually you need 3 copies of the bulk list. One you retain
for your records and two go to the bank. The bank uses one as a check list which gets sent back to you and they keep the third copy.
 Step 11: Complete Step 11: Complete
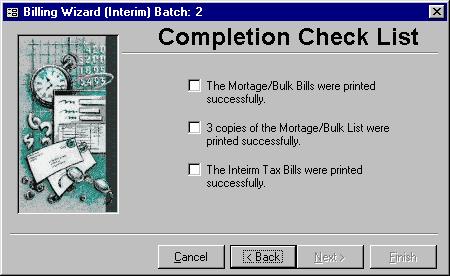
Do not click the Finish button until you are sure everything went through properly and that all bills were printed. When you do click the Finish button, several things happen.
The billing is marked as being completed, the next batch number is incremented, and the transactions that are pending from the billing are made permanent. If you were doing a
Supplementary billing, then, depending on the effective date, the levied and assessment values are changed. Finally, the transactions on the Levy Summary is transferred to the General Ledger. |