Introduction
The purpose of subsidiary ledgers like Accounts Payable is to track details and only send totals to the General ledger. At the heart of the Accounts Payable are the vendors. Anyone who is owed money must be in the
Vendor table in order for a cheque to be printed by the system. This section depicts for what the different fields on the vendor form are used.
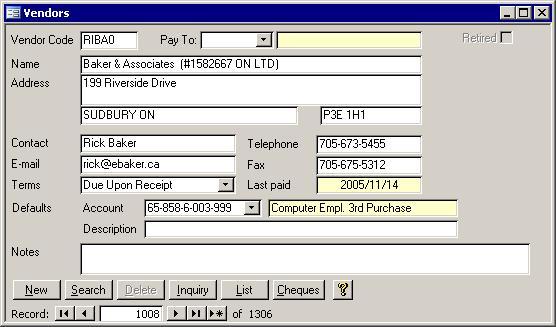
The Fields
- Vendor Code: Each vendor has a code that uniquely identifies them from all other vendors.
- Pay To: A code of another vendor whose name and address should appear on cheques.
- Name: This is the personal or company name of the vendor.
- Address: This is the mailing address of the vendor including a box for city and province and a box for postal code. When entering a new vendor, the default City Prov Country from the Setup Wizard will be used.
- Contact: If a company name was used in the name field, you can enter the name of the primary contact here.
- Telephone: The phone number of the vendor or contact should be entered here.
- Fax: If needed, you can store the Fax number too.
- Email: If the vendor prefers correspondence via the Internet, you can store their electronic mail address.
- Terms: This is a required field that stores the terms of payment you have been assigned by each vendor. When entering a new vendor, the default terms from the Setup Wizard will be used.
- Last Paid: This non-updatable field is used to calculate inactive vendors during the General Ledger's Year End Archive Wizard.
- Default Account: If you usually only use one account for a specific vendor and you want that account to come up automatically when you enter a Purchase Order or Bill, you can choose that account here.
- Default Description: Any description entered here will automatically be entered onto the Purchase Order or Bill when this vendor is selected from the list.
- Notes: This field will store any information you wish.
The Buttons
Search
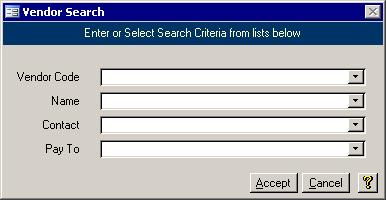 Clicking this button opens a form that allows you to jump to any vendor. The form will
look like the one in the picture on the right. You can search by one of four criteria: Vendor Code, Vendor Name (which may be a business or a person), Contact Name, or the Vendor Code that is in the Pay To field
. Selecting a value from one of these pull down list boxes will change the current record of the Vendor screen to the selected vendor. Clicking this button opens a form that allows you to jump to any vendor. The form will
look like the one in the picture on the right. You can search by one of four criteria: Vendor Code, Vendor Name (which may be a business or a person), Contact Name, or the Vendor Code that is in the Pay To field
. Selecting a value from one of these pull down list boxes will change the current record of the Vendor screen to the selected vendor.
Delete
The Delete button is used to delete the vendor if possible. Only vendors that are not in use can be removed from the system. It may be a good idea to check the last paid date before deleting the vendor.
Inquiry
The Inquiry button will launch a form, similar to the one below.
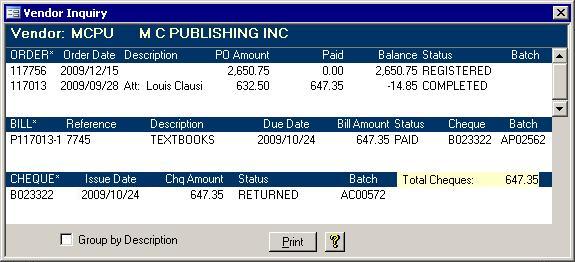
This screen will show the status of the currently selected vendor's account. On that form, there is also a button that lets you
print the current status of the vendor's
account. You may notice that the Order, Bill, and Cheque labels all have asterisks. When you double click on the Order number, the Purchase Orders form will launch and
show you that purchase order. Double clicking a bill number will bring up that bill on the Bills form while double clicking on a cheque number will show a
report for only that cheque.
List
This shows a
list of all vendor's in the system.
Cheques
If you want a
list
of all cheques for a vendor for the effective year, this button will provide it for you.
|