Introduction
Purchase orders are useful to enter a committed amount for a budgetary expense when a quote has been received and accepted. If the Remote/School system is used then there are more restrictions. For example, when the
budgeted amount has been exceeded, the purchase order cannot go through until someone at head office overrides the block. This section will walk you through the main aspects entering a purchase order in either system while
highlighting key areas.
Entering a Purchase Order
When you first enter the Purchase Orders screen, most fields will be blank. Only the Status and the order dates will have default values of ENTERED and the current date respectively.
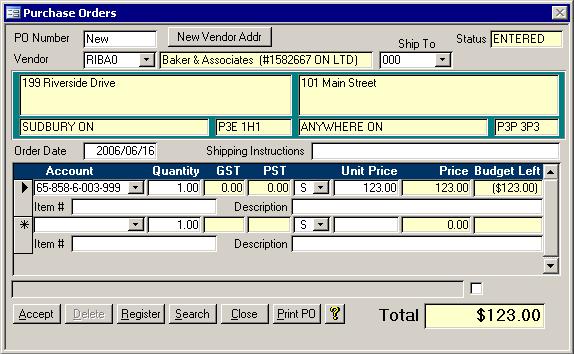
- You could start in the PO Number field. If you are using preprinted purchase order forms that have a stamped purchase order number, you must enter the number on
the form into the PO number field. It will automatically be padded with zeros.
- Next, choose a vendor from the list. If the vendor code starts with an S, then press that key on the keyboard to quickly jump down to the appropriate section of
the list. The vendor name will automatically appear once the vendor has been chosen.
- If the Ship To box is not blank, you should verify the Ship to location even though pressing tab in the Vendor box will cause the cursor to skip down to the Account
field. If it is blank, then pressing tab or enter after selecting the vender will put the cursor into the Ship to field.
- The Account field will now sport the default account for that vendor if it has been set on the Vendors screen.
- Verify the Quantity then enter the unit price.
- If the tax code is not correct, you can change it now.
- Finish by filling in the Item number and Description fields. If the vendor has a default description, it will have already been brought into the description field, but you can still make changes to it now if need be.
- If any shipping instructions are needed, like bring to room 101, these should be put into the Shipping Instructions box before the purchase order is printed.
- If you need to print the purchase order then you can print it now to check your work.
- Click the New button if you printed the purchase order, or Accept if you did not.
The purchase order has now been completed and the screen is ready for you to enter the next one. Once you have entered all of your purchase orders, you should print the
register. If it is correct, then the register should be committed.
The Buttons
There are six buttons on the Purchase Order form as described below.
Accept
When you are done entering the purchase order, just click the Accept button. If you enter a new purchase order and click Close or Register instead of Accept, your work will not be saved.
Delete
This will delete the current purchase order. Only purchase orders that are not committed or printed will be available to be deleted.
Register
When you click the Register button, the
Purchase Order Register
, will appear. Clicking Register before Accept will bring up the Purchase Order Register without the new purchase order.
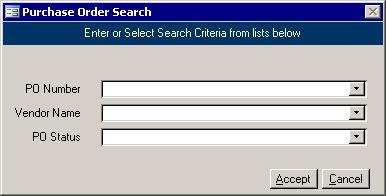 Search Search
This brings up a form that lets you jump to a particular Purchase Order. A sample search screen is shown on the right. It is similar the the Vendor search screen. It contains three pull down lists
that allow you to locate a purchase order by its number, the vendor's name or by the status of the purchase order.
Close
licking the Close button will check the data and close the form.
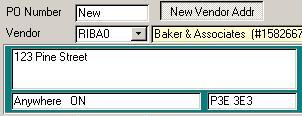 New Vendor Address New Vendor Address
As in the picture on the right, it may look like a button, but it does not act like a normal button. Instead it is used to toggle the visibility of the New Address fields. Any address that is typed in will be used
instead for this Purchase Order only. If you only type in the postal code, then the address and city/province from the vendor's record will be used. If you hit the New
Vendor Addr toggle a second time, any data you entered into the three new address fields will be erased.
|