Introduction
Whenever a vendor invoices you, that bill must be entered into the Bills table for a cheque to be issued. This section shows you how to enter a bill and lets you know what all the buttons do; however, since they do not show
up on the Purchase Orders form, some fields need some explanation.
The Fields
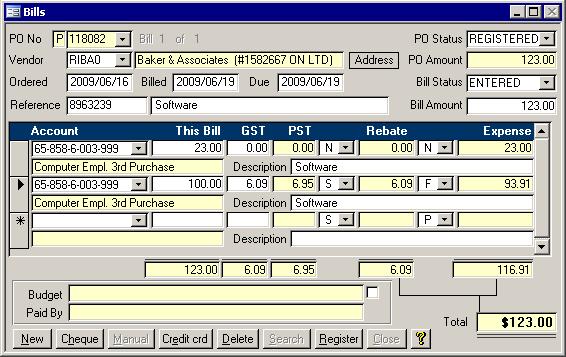
The bill 3 of 6 is a guide. If you enter two bills against a PO then delete the first one before you print the bill register, then the second bill will show up as bill 2 of 2 even though you deleted the first. If you
delete the second one only then it will say bill 1 of 1. While most of these fields appear on the Purchase Orders screen, below is a description of a few other fields:
- Ordered: The date of the Purchase order will show up here. If you do not use purchase orders, then this will default to the current date.
- Billed: This date is the date the bill was entered into the system. If you want to change this to the date on the bill itself, you can do so.
- Due: The due date should be brought over from the paper bill you received. This will allow you to pay your bills only when they are due, thus leaving your money in your bank account earning interest a
little bit longer.
- Reference: Most put the bill number into this field. For extra security to make sure that a bill is not paid twice, you can use an option in the Setup Wizard to verify that all bill references are unique
for each vendor.
- Description: The unlabelled box to the right f Reference is where you can put in a description of the bill.
- Expense: In the detail section of the bill, there is a column for Expense. This will be the This Bill amount less the GST Rebate. This is the amount that goes toward the expense account shown.
Entering a Bill
Entering a bill is similar to entering a purchase order. In fact, if purchase orders are required, then entering bills is quite easy since most of the work is already done. All you have to do
is select the purchase orders number and many of the fields will be automatically entered for you. If the quantities and prices have not changed, then you may only have to enter the bill reference and description. If
you do not enter purchase orders, then you must start by selecting a vendor.
Once again there are some defaults that are entered for you as soon as you open the form. These are PO Status, Bill Status, Billed date, Ordered date, Due date, Tax code
and Rebate code. Some of these can be changed after you select the vendor. When you get to the Reference field, you may not be able to leave until you enter the vendor's
invoice number. Putting a check in the box beside Unique Bill reference in the Setup Wizard will determine if the reference is required. If it is like a phone bill that does not
have an invoice number, just enter the date like 20090619 to make sure you are using a unique value. Finally, make sure to enter the Bill Amount near the top right.
The detail section of the bill needs more information. All you really need to do though is select the account and the This Bill amount and the rest will be calculated for you. The
Expense is calculated as This Bill amount less the Rebate amount. Calculating tax on individual items may result in the total tax on this form not being equal to the total tax
showing on the bill. Simply change one of the GST amounts if this occurs.
Buttons and Extras
Budget field
Shows the budget amount of the account in the current detail record when visible. At the end of this box is a Show Budget Check box. Clicking this check box toggles
between making the Budget field data visible and invisible.
Paid By field
Shows the cheque or credit card used to pay this bill.
Accept
Click this button when you are done entering a bill and want to save it. When you are browsing previously entered bills, the Accept button will read New instead. Both will save any changes to the current bill before sending you to a blank Add New Bills form.
Cheque
This button will save the bill then show you one of two screens. Which screen will appear depends on how many bills have been entered for the currently showing vendor.
 The screen on the right will pop up if the vendor has only one bill. That is,
if there is only one bill currently in the system that has a bill status of Entered, Printed, or Registered, then this window is used. This screen will allow you to print a cheque for the
current bill. The next cheque number that will be used on the cheque is shown in the white box along the top of the window. As well, an input box is made available for you to enter the
Signature Diskette password. For the cheques to be signed electronically, three things have to happen: The screen on the right will pop up if the vendor has only one bill. That is,
if there is only one bill currently in the system that has a bill status of Entered, Printed, or Registered, then this window is used. This screen will allow you to print a cheque for the
current bill. The next cheque number that will be used on the cheque is shown in the white box along the top of the window. As well, an input box is made available for you to enter the
Signature Diskette password. For the cheques to be signed electronically, three things have to happen:
- The signatures have been saved to a disk,
- the path to that disk has been entered into the Setup Wizard, and
- the correct signature password must be entered.
On the other hand, if the vendor has more than one bill waiting to be paid, then the screen below will appear.
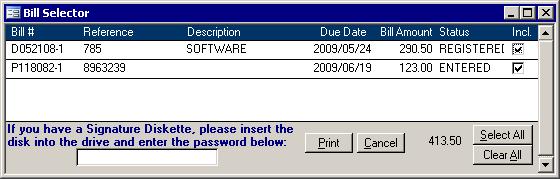
With this form, you get to choose which bills to pay with this quick cheque. You also have the chance to enter in the Signature Diskette password, but the same 3 criteria as
above must be met for electronic signatures to be available. The only thing that is missing from this 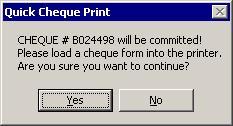 Bill Selector form is the next cheque number and a message asking you
to load cheque paper into the printer. Rest assured, that feature was not skipped. If there is a long list of bills that you have to pour though, or even if you want to look them up manually from a short list, it is
easy to forget to load the cheque form paper into the printer. When the Print button is clicked, the message on the right will appear just at the right time. Clicking its Yes button will print the cheque.
There is an extra step when there is more than one bill for the vendor, but the added flexibility it affords is useful. Bill Selector form is the next cheque number and a message asking you
to load cheque paper into the printer. Rest assured, that feature was not skipped. If there is a long list of bills that you have to pour though, or even if you want to look them up manually from a short list, it is
easy to forget to load the cheque form paper into the printer. When the Print button is clicked, the message on the right will appear just at the right time. Clicking its Yes button will print the cheque.
There is an extra step when there is more than one bill for the vendor, but the added flexibility it affords is useful.
 Manual Manual
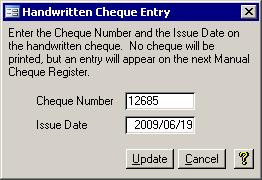
Clicking this button saves the bill then shows you the screen below allowing you to register the cheque number for a cheque that was handwritten against this bill. This is only available for bills that have a bill status of
Entered. You will receive a message stating this if you click the Manual button for a bill that does not have a bill status of Entered. If the bill has not yet been entered, the screen on the right
will not appear. Instead another message will explain that the bill must first be entered.
Credit crd
Indicating that a bill has been paid by a credit card is easy. Really, this is a toggle button. 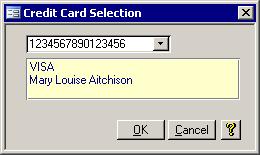 Upon clicking this button for the first time, one of two things will happen. If
there is only one credit card in the system, then its information will appear in the Paid By box. Clicking it again will erase the credit card information from the Paid By box. Upon clicking this button for the first time, one of two things will happen. If
there is only one credit card in the system, then its information will appear in the Paid By box. Clicking it again will erase the credit card information from the Paid By box.
If more than one credit card exists in the system, then the screen on the left will appear allowing you to choose a credit card number from the list. In case you clicked the Credit crd button by
accident and Credit card information now shows in the Paid by box, not all is lost. Just click it again. Upon the next click of this button,
if there is credit card information in the Paid by box, then it will just be toggled off.
Delete
Click this to delete the current bill. You cannot delete a bill once a cheque has been issued except by using the Voiding Cheques form.
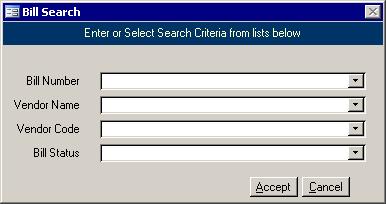 Search Search
Used to access another form that lets you jump to another bill, this form is similar to the Vendors search form. A sample search screen is shown on the right. It contains four pull down lists
that allow you to locate the desired bill by its bill number, the vendor's name, the vendor's code or by the status of the bill. Once you have selected an item from the list, the Accept button will
automatically be hit for you. If you use the keyboard instead, then you will have to click the Accept button or press Alt+A to initiate the Accept button.
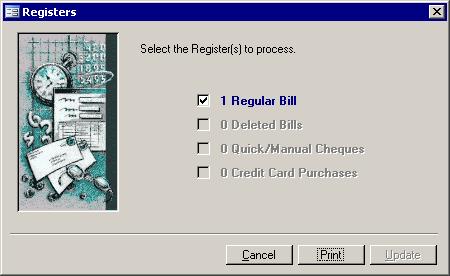
Register
Clicking this brings up the Register selection screen. From this screen you, depending on the data, you may be able to print the
bill register, the
deleted bill register the
credit card register and the
quick/manual cheque register. Check the registers you wish to see
and click the print button. When the registers are closed, you can click the Update button to commit the registers you chose.
Close
Click this button to close the form. This button was added when the X in the top right corner was disabled. The Close button will check the data before shutting down the Bills form.
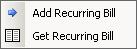 Recurring Bills Recurring Bills
Right clicking the title bar of the Bill form produces the menu shown on the right. When you are on a bill, you can choose to add it to the list of recurring
bills. Likewise, when you are on a new bill you can retrieve the bill information from the get screen shown below.
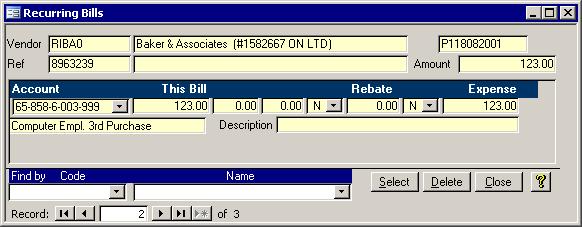
Use this screen to find the desired recurring bill and click the Select button. The information will be copied to the bill form with today's date ready for you to change the reference and bill amounts as needed.
|