Introduction
Like most Baker and Associates programs, there are some system settings that can be modified using the Setup Wizard. Note that there is a Close button. Most of the steps below are saved when the Next button is
clicked. The Close button will not cancel changes.
 Step 1: Backing Up the Data Step 1: Backing Up the Data

This first screen asks you to verify that you have a backup of your data before altering the system settings. If you have a good backup or no data has yet been entered into
the system, then put a check in the check box. Doing so will enable the Next button.
 Step 2: Setting the Defaults Step 2: Setting the Defaults
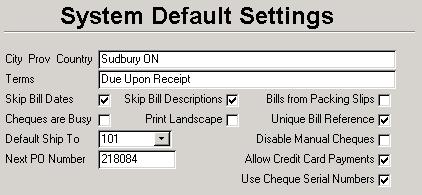
- City Prov Country: This entry will be used as the default for the City Province Country field section of the Mailing address when adding a new vendor.
- Terms: Also used when entering a new vendor, this is what will automatically be inserted into the Terms field by default.
- Skip Bill Dates: When entering a bill, some people always leave the bill and due dates at their defaults and would like the cursor to skip over those fields. If the
Skip Bill Dates box has a check mark, then pressing the enter or tab key after selecting a vendor code will cause the cursor to jump down to the reference box.
- Skip Bill Descriptions: If you like to leave the descriptions in the Bill Detail section at their default value, and want to skip having to hit the Tab key one
extra time per item, you can put a check in this box.
- Bills from Packing Slips: If you want to create bills based on only what has been received, then put a check in this box. If this box is left blank, then the entire
purchase order will be used to create the bill.
- Cheques are Busy: This indicates that someone is printing cheques. Only one person can print cheques at a time. If someone is printing cheques and the power
goes out, no one will be able to print cheques until this check box is cleared.
- Print Landscape: The Cheque Voiding Register usually prints out in portrait format; meanwhile, the Cheque Register prints out landscape. If this box is
checked, then the Cheque Voiding Register will print out landscape as well.
- Unique Bill Reference: If you want the system to check that an invoice has not been entered twice into the reference for a vendor, put a check mark in this box.
If this box is left blank, then no integrity checking will be done on the vendor reference field when accepting a bill.
- Default Ship To: For users that are at head office and are not restricted to General Ledger accounts from a specific location, the location entered into this box will be used for their purchase orders.
- Disable Manual Cheques: When this box is checked, the Manual button on the Bill form will never be enabled. That way you cannot click on it by accident. This
is useful if you never issue hand written cheques.
- Next PO Number: If you need to change the value of the next Purchase Order number, you can do so here.
- Allow Credit Card Payments: This will enable the two Credit Card menu items in the Administration sub menu. Once a credit card has been entered into the
system, the Credit Crd button on the Bills will be available for bills that have a bill status of Entered.
- Use Cheque Serial Numbers: The new standardized cheque includes a mandatory serial number in the MICR line encoded on the bottom of the cheque. If
you are now using cheque forms that have serial numbers in the MICR (Magnetic Ink Character Recognition) section, then you can associate that unique number
with the Baker assigned cheque number. To be able to do so, you must turn on this option in the Setup Wizard.
Step 3: Choosing a Cheque Signature Password
 Each cheque that is printed must be signed by one or more people. It is possible to store the
signatures in a file on a floppy disk. If the disk is in the drive and the correct password is entered, then the signatures will be electronically printed onto the cheques. If the password is
incorrect or the disk is not in the drive, then no signatures will show, and the cheques will have to be signed manually. Along the bottom, and just above the buttons, is a Signature Disk Directory box. To be able to
have cheques signed electronically, this field must contain the path to the file that contains a picture of the signatures. Each cheque that is printed must be signed by one or more people. It is possible to store the
signatures in a file on a floppy disk. If the disk is in the drive and the correct password is entered, then the signatures will be electronically printed onto the cheques. If the password is
incorrect or the disk is not in the drive, then no signatures will show, and the cheques will have to be signed manually. Along the bottom, and just above the buttons, is a Signature Disk Directory box. To be able to
have cheques signed electronically, this field must contain the path to the file that contains a picture of the signatures.
Step 4: Entering the Tax Codes
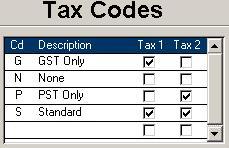 The distributions for the bills and purchase orders both
show the default tax code for the chosen account. This screen shows how those tax codes will affect the taxes charged on the item. New codes can be entered here if needed. Simply type them in along the
bottom blank row. You can also change the codes and descriptions of the existing records. If GST gets changed to HST in your province, then you can change it here. More likely though, you would want to
add HST as another entry and set the effective dates for all the rates in the next screen. The distributions for the bills and purchase orders both
show the default tax code for the chosen account. This screen shows how those tax codes will affect the taxes charged on the item. New codes can be entered here if needed. Simply type them in along the
bottom blank row. You can also change the codes and descriptions of the existing records. If GST gets changed to HST in your province, then you can change it here. More likely though, you would want to
add HST as another entry and set the effective dates for all the rates in the next screen.
Step 5: Checking the Tax Rates
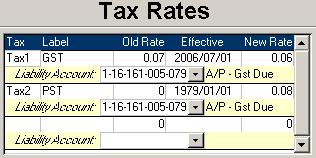 While it does not happen often, tax rates do get changed. New rates can
be added in and will start to be used by the bill form one the bill date matches or is beyond the Effective date in the screen above. If it is just a simple rate change, you can just alter the current
record. For example, if the PST rate is to change from 0.08 to 0.09 as of 2009/01/01, then change the old rate to 0.08, the new rate to 0.09 and the Effective box to 2009/01/01. Once bills are being
entered with a bill date that is 2009/01/01 or later, then the new rate will automatically be used. While it does not happen often, tax rates do get changed. New rates can
be added in and will start to be used by the bill form one the bill date matches or is beyond the Effective date in the screen above. If it is just a simple rate change, you can just alter the current
record. For example, if the PST rate is to change from 0.08 to 0.09 as of 2009/01/01, then change the old rate to 0.08, the new rate to 0.09 and the Effective box to 2009/01/01. Once bills are being
entered with a bill date that is 2009/01/01 or later, then the new rate will automatically be used.
 Step 6: Setting the Rebate Rates Step 6: Setting the Rebate Rates
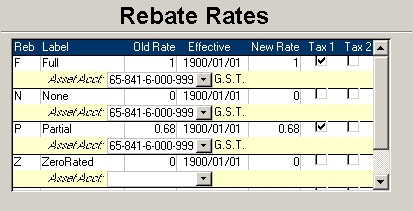
If you get a partial Tax rebate on some accounts and full rebate on others, then you need to set up rebate codes, so the rebates will be calculated for you automatically.
Similar to the Tax Rates, this can be set up to handle changes before hand. The new rate will automatically be once bills are entered with a bill date of the Effective date or later.
|