Introduction A list of cemeteries that are managed by the municipality is needed. That
list is stored on the Cemetery Codes screen. It is a simple list like many screens in the Cemetery Manager system.
The Fields 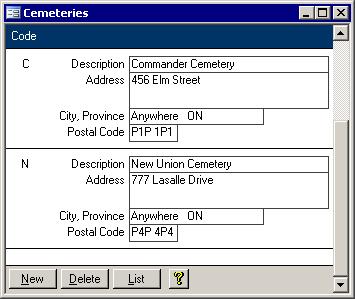 When you first enter the Cemeteries screen, as shown in
the picture on the right, you will see a list of all of the cemeteries under the municipalities control. A description of each of the fields is below: When you first enter the Cemeteries screen, as shown in
the picture on the right, you will see a list of all of the cemeteries under the municipalities control. A description of each of the fields is below:
- Code:
A unique identifier is required for each cemetery record. Codes can be up to two characters long. It is sorted by this field, and it is required because it gets
used in the Plot Codes.
- Description:
The name or some other description of the cemetery must be entered. It is used on the Certificate of Interment Rights report.
- Address:
The street or mailing address of each cemetery should be entered.
- City, Province:
while part of the address, a separate field has been set up for the entry of the city name and province.
- Postal Code:
The last field is used to store the postal code. It can handle 7 characters including a space.
As well as these fields, there are also some buttons along the bottom of the form that are covered in the next section.
The Buttons
There are four buttons at the bottom of the Cemeteries screen. The first two serve a dual purpose. The functions of all of the buttons are explained here.
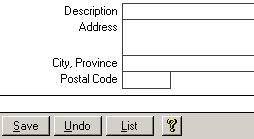 New/Save: The first button on the bottom left of the screen usually says New as in the picture
above. Once clicked, you will be put to a new record and the button's label will change to Save. The screen will look similar to the picture on the
left. The cursor will start you in the Code field. When you are done entering the New/Save: The first button on the bottom left of the screen usually says New as in the picture
above. Once clicked, you will be put to a new record and the button's label will change to Save. The screen will look similar to the picture on the
left. The cursor will start you in the Code field. When you are done entering the 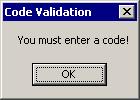 new cemetery's
information, just click the Save button. If you click Save without entering a unique code, then a message box, like the one on the left will appear reminding you that the code is required.
If you had hit the New button by accident, just click the Undo button to get rid of the unsaved record new cemetery's
information, just click the Save button. If you click Save without entering a unique code, then a message box, like the one on the left will appear reminding you that the code is required.
If you had hit the New button by accident, just click the Undo button to get rid of the unsaved record
 Delete/Undo:
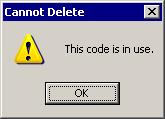
The second button also has two uses. Normally it will say Delete. Clicking this button when it is labelled Delete will cause the Cemeteries screen to try to
delete the current cemetery. If it is being used by a record in the Plot Master, then you will see the message as shown in the picture on the right. If it is not in use, then the entire record
will be removed. On the other hand, if the button is labelled Undo then clicking it will remove the unsaved record and set the Save and Undo buttons back to New and Delete. Delete/Undo:
The second button also has two uses. Normally it will say Delete. Clicking this button when it is labelled Delete will cause the Cemeteries screen to try to
delete the current cemetery. If it is being used by a record in the Plot Master, then you will see the message as shown in the picture on the right. If it is not in use, then the entire record
will be removed. On the other hand, if the button is labelled Undo then clicking it will remove the unsaved record and set the Save and Undo buttons back to New and Delete.
List:
When you click the List button, the Cemetery List
, will appear. It is a simple landscape list of the Cemeteries in the system. Yellow Question Mark: This button brings up this help page. |