Introduction
All the kennels in the municipality are recorded on this form. It contains the contact information as well as the date they last picked up their annual kennel license.
The Fields
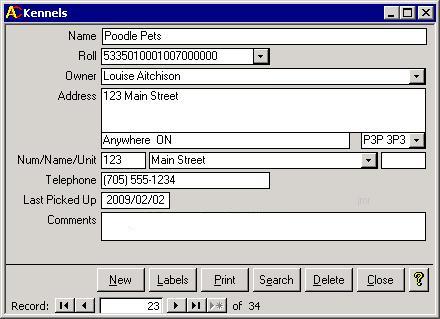 When you first enter the Kennels screen, as shown in the picture on the right, you will see the first
Kennel in the table sorted by the top Name field. A description of each of the fields is below: When you first enter the Kennels screen, as shown in the picture on the right, you will see the first
Kennel in the table sorted by the top Name field. A description of each of the fields is below:
- Name: The name of the kennel should be put here. It is usually a company name. If there is no name, it can be left blank. This
is allowed because the reports are pulled up using a hidden unique identifier. Records in which the Name field has been left blank will appear first since the form
is sorted by Name. Those records will then be sorted by the Owner name next.
- Roll: While few people know their roll number, it is a unique identifier that is
assigned to each property in the Municipality. The animal system uses the roll number to check for address changes. If there is an address change in the Municipal Tax Manager system for a roll that is used in the Animal Control system,
then you can print an address change list. The roll also links the Property Management system to this system, so a list of animals can be created for each
roll that has a scheduled inspection before an inspector goes on site.
- Owner: The name of the owner should appear in this field. This should not contain a company name.
- Address: There are actually three boxes for the address that end up being put onto the mailing labels. The large box can hold multiple lines of the street address
or post office box number. You can put in a maximum of 84 characters including hard returns. Beneath that box is a box for the city and province as well as a pull down list for the postal code.
- Num/Name/Unit: The next row of boxes are for the street number, the street name, and, if required, the unit number.
- Telephone: If the dog is picked up, it is important for the animal control officer to
be able to quickly contact the owner. Of course, this is assuming the dog has some kind of tag on its collar other than a municipal dog tag.
- Last Picked Up: The annual kennel license needs to be purchased and picked up
each year. Once it has been bought, update the date in this field.
- Comments: If any extra notes are needed about the kennel, you can enter them
into the Comments box. It is a memo box, so it can hold over 65,000 characters.
As well as these fields, there are also some buttons along the bottom of the form that are covered in the next section.
The Buttons
There are four buttons at the bottom of the Cemeteries screen. The first two serve a dual purpose. The functions of all of the buttons are explained here.
New/Save
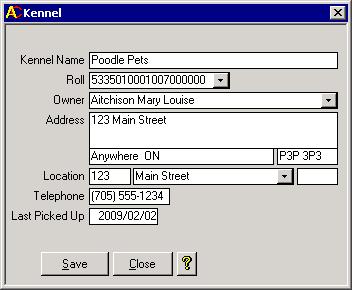 The first button on the bottom left of the screen usually says New as in the picture above. Once clicked,
you will be put to a new record and the button's label will change to Save. The screen will look similar to the picture on the left. The name of the kennel is required, so the Save button will not function
until the Kennel Name field has data. None of the fields have default values, but similar to adding a new animal, selecting the roll, owner or location will fill in the rest of the information with data from the Municipal Tax Manager system. Since the tax system does not keep track of phone numbers, you will have to enter it yourself. As
well, the Last Picked Up date should be entered if the owner paid the license fee and picked up the license. The first button on the bottom left of the screen usually says New as in the picture above. Once clicked,
you will be put to a new record and the button's label will change to Save. The screen will look similar to the picture on the left. The name of the kennel is required, so the Save button will not function
until the Kennel Name field has data. None of the fields have default values, but similar to adding a new animal, selecting the roll, owner or location will fill in the rest of the information with data from the Municipal Tax Manager system. Since the tax system does not keep track of phone numbers, you will have to enter it yourself. As
well, the Last Picked Up date should be entered if the owner paid the license fee and picked up the license.
Labels
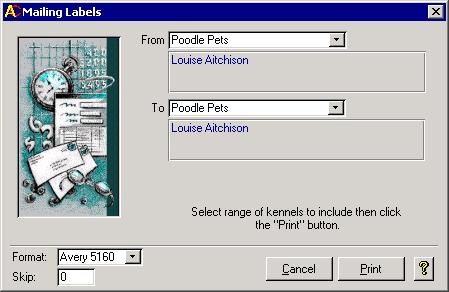 The second button from the left has the word Labels. Clicking it will bring up the Mailing Labels
screen as shown in the picture on the right. With this form, you can print one or more
labels that can be put onto envelopes for any correspondence that is to go to the
kennels. Pick the first and last kennel names to get labels and click the Print button. If you are not using Avery 5160 labels, you can select another format from the list. You can also
enter a skip number if you are working with a partially used sheet of label paper. If you type in the address using Canada Post's Addressing Guide, then the mailouts will
definately be acceptable. The second button from the left has the word Labels. Clicking it will bring up the Mailing Labels
screen as shown in the picture on the right. With this form, you can print one or more
labels that can be put onto envelopes for any correspondence that is to go to the
kennels. Pick the first and last kennel names to get labels and click the Print button. If you are not using Avery 5160 labels, you can select another format from the list. You can also
enter a skip number if you are working with a partially used sheet of label paper. If you type in the address using Canada Post's Addressing Guide, then the mailouts will
definately be acceptable.
Print
The third button from the left is labelled Print. That button will bring up the Kennels
report for the currently showing kennel record. This report contains all information in the system about the kennel. For a more concise list, use the Kennel List described on the Reports page.
Search
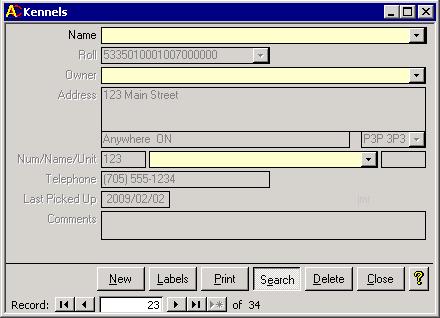 The fourth button, which is the search button, will grey out most of the screen disabling all fields
except for four. These four fields are the ones you can use to locate the kennel of your choice. Since most municipalities have fewer than a hundred kennels, this should be a fairly easy task. Once you
select a value from one of the lists, that record will be shown. As well, the fields of the form will be re-enabled. If you clicked the Search button by accident, just click on it again to cancel the search. The fourth button, which is the search button, will grey out most of the screen disabling all fields
except for four. These four fields are the ones you can use to locate the kennel of your choice. Since most municipalities have fewer than a hundred kennels, this should be a fairly easy task. Once you
select a value from one of the lists, that record will be shown. As well, the fields of the form will be re-enabled. If you clicked the Search button by accident, just click on it again to cancel the search.
Delete
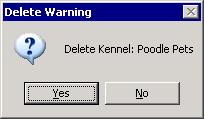 The fifth button says Delete. Clicking this button will
cause the Kennels screen to try to delete the current kennel record. You will see the message as shown in the picture on the right. If click the Yes button, then the
entire record will be removed. On the other hand, if click the message's No button, then the message box will disappear, but the kennel data will remain. The fifth button says Delete. Clicking this button will
cause the Kennels screen to try to delete the current kennel record. You will see the message as shown in the picture on the right. If click the Yes button, then the
entire record will be removed. On the other hand, if click the message's No button, then the message box will disappear, but the kennel data will remain.
Close
When you click the Close button, the Kennels form will shut down bringing you back to the Animal Control menu.
Yellow Question Mark
This button brings up this help page.
Record Navigation
Along the bottom left there are record selectors which help you to jump to the beginning, end, a new record, or anywhere in between.
|