Introduction The Files Inquiry screen shows all the records in the Files table.
This screen has been set up to look like the Baker and Associates' Property Master in the Property Management software. A sample screen is shown in the picture below. 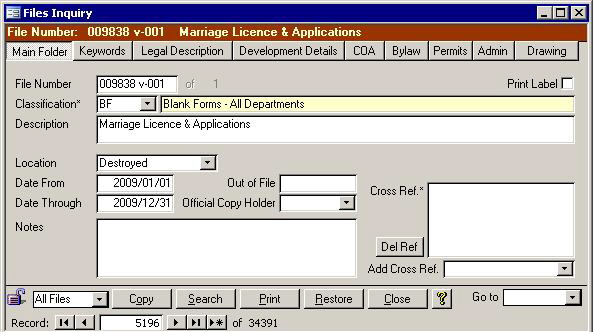
In the case, the bar along the top is red because this file has been destroyed. All other
records will show a dark blue bar instead.
Tabs
The tabs along the top are used to access different aspects of the files in the system. Some of the tabs will change colour if there is data on that tab. The Main Folder and
Admin Details tabs always have data, so they remain black. Each of the tabs are explained below. Main Folder Tab The picture of the Main Folder tab shown above has two hidden fields: Accession
Number and Stack Location. They will only be visible when the file status is Archived. As well, the Box Number, Aisle, Bay, Shelf, and File fields will only be visible when the file
status is Inactive. The status is set on the Admin Details tab. The Main Folder Tab is linked to the Admin tab with the Date Through field as well. When this date is changed,
the file destroy date is recalculated based on the retention period in the Classification table. The Classification field's label has an asterisk. That means that double clicking on
that field will pull up the Classifications screen to the selected class code. Keywords  Since files can now be found using any word in the Description, the old Keyword function has
been streamlined. It now has its own tab, and can be used to store words that are not in the description, but that could help locate the file. As in the picture on the right, this tab
contains a single large text box. Since files can now be found using any word in the Description, the old Keyword function has
been streamlined. It now has its own tab, and can be used to store words that are not in the description, but that could help locate the file. As in the picture on the right, this tab
contains a single large text box.
Legal Description Tab 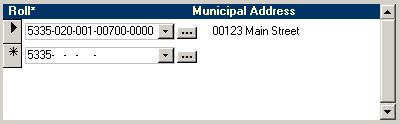 For municipalities that want to be able to search for rolls using consistent legal description data, the data can be entered onto this
tab. More than one roll can be entered for each file, so the Legal Description tab contains a list of those rolls. A sample of this tab is shown. To add another roll to the
list, either select it from the list in the bottom record, or click the small button to its right that has an ellipses (...) that will pull up a search screen. The search screen will
allow you to find a roll by the roll number, owner name from the roll book, property location, legal description, or street address. It is important to note that a roll can only
be associated with one file since it can only have one legal description. The Roll label has an asterisk; double clicking a roll number will open the screen in the picture below with data for that roll. For municipalities that want to be able to search for rolls using consistent legal description data, the data can be entered onto this
tab. More than one roll can be entered for each file, so the Legal Description tab contains a list of those rolls. A sample of this tab is shown. To add another roll to the
list, either select it from the list in the bottom record, or click the small button to its right that has an ellipses (...) that will pull up a search screen. The search screen will
allow you to find a roll by the roll number, owner name from the roll book, property location, legal description, or street address. It is important to note that a roll can only
be associated with one file since it can only have one legal description. The Roll label has an asterisk; double clicking a roll number will open the screen in the picture below with data for that roll.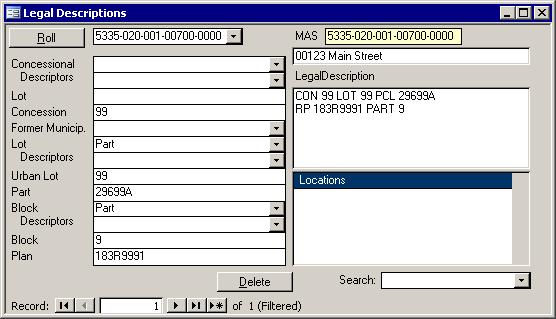
The MAS and Legal Description fields are from the Master table in the property tax
system. The Locations data is from the 911 system showing each driveway for the property.
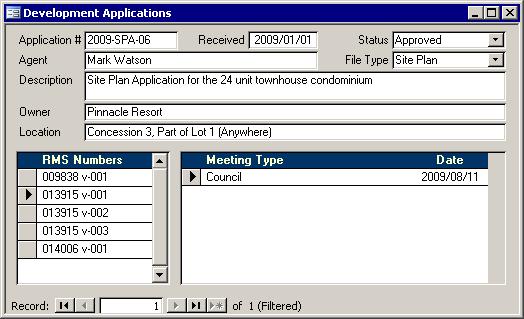
Development Details Tab 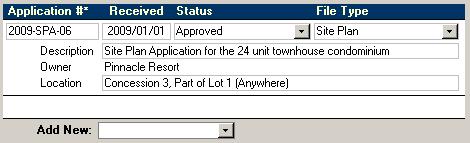 This tab contains a list of all Development Applications that have been
associated with the current file. Not all of the fields are shown in the list; only the main identifying fields are included. To add another application to
the list for the current file, if you are in Admin mode, simply pick it from the Add New box along the bottom. Since Development applications are a part of the Property
Management system, they are not editable here. Nor are they editable on the screen below which is accessed by double clicking on the Application #* in the list. This tab contains a list of all Development Applications that have been
associated with the current file. Not all of the fields are shown in the list; only the main identifying fields are included. To add another application to
the list for the current file, if you are in Admin mode, simply pick it from the Add New box along the bottom. Since Development applications are a part of the Property
Management system, they are not editable here. Nor are they editable on the screen below which is accessed by double clicking on the Application #* in the list.
As evidenced by the word "(Filtered)" along the bottom center, this screen opens up
only showing the application on which you double clicked. If you wish, you can remove the filter. What will appear then will be all Development Applications that have been
associated with the file that is currently showing in the Files Inquiry screen.Not all of the Development Application data appears on this screen either. The full set of data is in the Property Management system. The data on this tab cannot be edited
even if you have logged in as an Administrator. While linking to an existing application is possible, applications can only be edited from within the Property Management system. COA  Applications that were submitted to the Committee of Adjustment get input into the Property Management system. When they are associated with a
Records Management System (RMS) file, they will appear on that file's COA tab. More than one application can be linked to any particular file, so the above screen shows in
list format. New applications can be added to the list by anyone who has logged in as an administrator. Adding a application to the list is as easy as picking it from the Add
New pull down list. When you double click a number in the App #* column, a screen, such as the one below, will appear.
Applications that were submitted to the Committee of Adjustment get input into the Property Management system. When they are associated with a
Records Management System (RMS) file, they will appear on that file's COA tab. More than one application can be linked to any particular file, so the above screen shows in
list format. New applications can be added to the list by anyone who has logged in as an administrator. Adding a application to the list is as easy as picking it from the Add
New pull down list. When you double click a number in the App #* column, a screen, such as the one below, will appear.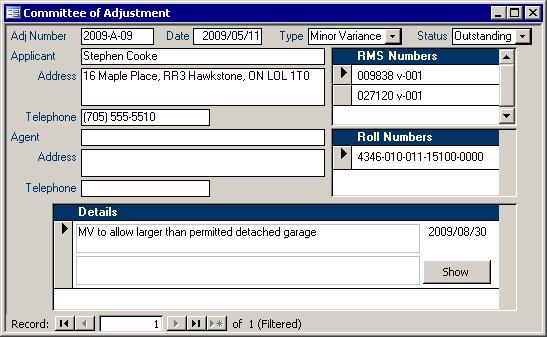
This screen is the same as the COA form in the Property Management except the buttons along the bottom left are missing in the RMS. The Show button is still available
though. Clicking it will show the Details section will appear with one record per screen. To see the next record, you will have to close the detail screen then click the Show
button beside the next record. Removing the filter on this form will make all COA records available that are associated with the file currently selected on the Files Inquiry screen.
Bylaw  The picture on the right shows the contents of this tab. This is a list of Bylaw complaints that have been received then assigned to this file
number by an administrator. The data is taken from the Property Management System, so it cannot be altered here. Double clicking on the complaint number will open a screen
that looks much like the detail screen from the Property Management. The only difference is that there are fewer buttons As in the picture below, there is only one button available.
The picture on the right shows the contents of this tab. This is a list of Bylaw complaints that have been received then assigned to this file
number by an administrator. The data is taken from the Property Management System, so it cannot be altered here. Double clicking on the complaint number will open a screen
that looks much like the detail screen from the Property Management. The only difference is that there are fewer buttons As in the picture below, there is only one button available. 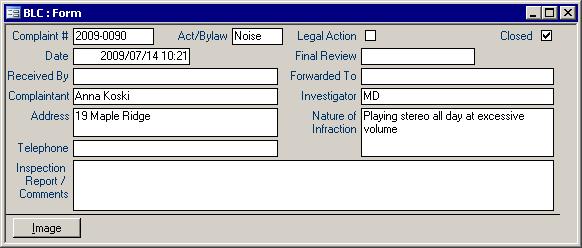
When the Bylaw complaint inspection form has been scanned in and saved with the
proper name, then the word Image on the button will be in red.
Permits  The list of permits that appears on the Permits tab are all those that
have been linked to the current file. If another permit has to be linked, just get someone who knows the Administrator password to select it from the Add New pull down
box. Double clicking on a permit number will open the screen below. The list of permits that appears on the Permits tab are all those that
have been linked to the current file. If another permit has to be linked, just get someone who knows the Administrator password to select it from the Add New pull down
box. Double clicking on a permit number will open the screen below.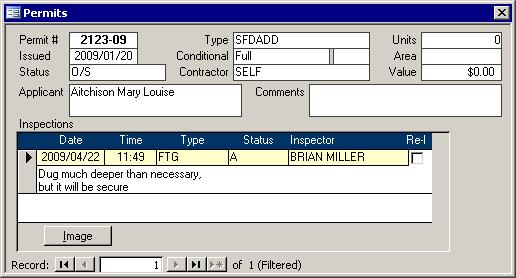
This screen shows just the basics for the chosen building permit. If the inspection sheet has been scanned in for the currently selected inspection, then the Image button will be
in red. Clicking a red Image button will pull up the file that contains the a picture of the inspection sheet. Along the bottom of the Permits form in the picture above, it says "of
1 (Filtered)." If you remove the filter, then you will be able to use the record selectors to browse through all permits that have been linked to the current file.
Admin Details Tab 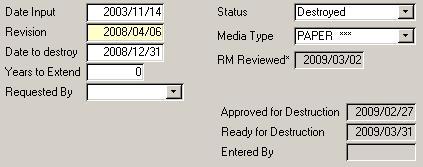 Only a few fields here can be edited. The Revision date field is locked and will only change when another field on the Admin Details or Main Folder
tab are changed. If you increase the Years to Extend, the Date to Destroy, which is locked as well, will be extended by that number of years. The Date to destroy will not change
on the Admin tab; it will continue to show the original calculated destroy date. It is a calculated field which gets recalculated whenever the Date Through field on the Main
Folder tab is changed. If the Status is changed to Destroyed, then the file will no longer be accessible from the Files Inquiry until it has been restored depending on the filter chosen. To view it again without restoring, use the Destroyed Files form. Only a few fields here can be edited. The Revision date field is locked and will only change when another field on the Admin Details or Main Folder
tab are changed. If you increase the Years to Extend, the Date to Destroy, which is locked as well, will be extended by that number of years. The Date to destroy will not change
on the Admin tab; it will continue to show the original calculated destroy date. It is a calculated field which gets recalculated whenever the Date Through field on the Main
Folder tab is changed. If the Status is changed to Destroyed, then the file will no longer be accessible from the Files Inquiry until it has been restored depending on the filter chosen. To view it again without restoring, use the Destroyed Files form.
Drawing The last tab holds information on a single drawing that is associated with the current
file. The picture below shows a sample screen shot.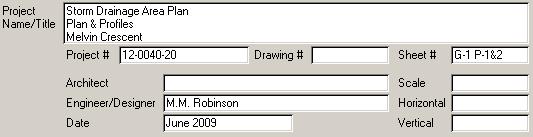
If the file has no drawings, then the drawing tab's fields should be left blank.
Buttons Etc. There are other notable features of this form. There are the Locked/Unlocked picture,
the Go to field, Cross References, and some buttons. Each are described here in detail. Cross References There are two fields on the bottom right of the Main Folder tab that are used for cross referencing files. The top list box shows all of the current cross references for the
current file. Selecting a file from the Locked/Unlocked Picture
Like most forms, there is a picture of a lock in the bottom left corner of the form. This indicates whether or not the form is locked. If it is unlocked, then Admin mode is on and
most of the fields can be edited. To get into Admin Mode, click on the Administration button on the Main Menu and enter the administrative password or your password if one
has been assigned to you. If the password is correct, then a full menu will be presented to you. Record Filter From the list you can choose All Files, Active Files, or Destroyed Files. The first shows
you all files that are in the system while the other two will limit the number of records showing to only those that are not destroyed or all that are destroyed respectively. Copy The copy button will create a new volume with the same first six digits of the file
number. All of the data including Keywords, and links to Committee of Adjustments, Legal Descriptions, and Development Applications. If you were able to reach volume
999, then you will be informed that no more copies are allowed. Search
The File Search screen will appear when the Search button is clicked. This File Search screen allows you to locate a file based on several fields including a File number,
Committee of Adjustment Application number, Development Application number, Roll number, Building Permit number, Bylaw Complaint number, or part of the Legal Description. Print Button
This button pulls up the File report for the currently selected file. If you want a list of several files, try the Search Files
form. Destroy/Restore
If the button's label says Destroy, then clicking it will cause several things to happen:
- The File status will be set to Destroyed
- The Location field will be updated to Destroyed
- The Revision date will be set to today's date
- The Updated By field will be set to the current user
- Location's Aisle, Bay, Shelf, File and Box Number will all be blanked out
If the button says "Restore", then you will be asked to confirm your selection after which the computer will set the Status to Active and update the Revision date to today's date. Close This button will close down the Files Inquiry screen when it is clicked. Yellow Question Mark (?) Button Click this button to pull up this help page. Go to Field Use the Go to field in the bottom right corner of the Files Inquiry form to quickly search
for a file. Simply select a file from the list, or type in the file number and press enter to be taken to that file. For the example in the picture at the top of this web page, typing
9838 then pressing the Enter key on the keyboard will pull up file 009838 v-001. |