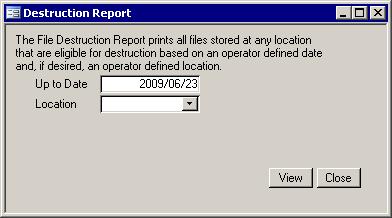
 The Destruction Report menu option opens a form that is
used to open another form. These forms provide access to the file destruction process. The first form, as shown on the right, lets you select a cutoff date and, if desired, a location. Clicking
the View button will bring up another form that shows all files with dates to destroy that are up the cutoff date. If you also chose a location
then only files that are designated as being in that location will appear. The location option makes it easy to clean up one location at a time. The picture below shows the
screen that the View button brings up. The Destruction Report menu option opens a form that is
used to open another form. These forms provide access to the file destruction process. The first form, as shown on the right, lets you select a cutoff date and, if desired, a location. Clicking
the View button will bring up another form that shows all files with dates to destroy that are up the cutoff date. If you also chose a location
then only files that are designated as being in that location will appear. The location option makes it easy to clean up one location at a time. The picture below shows the
screen that the View button brings up.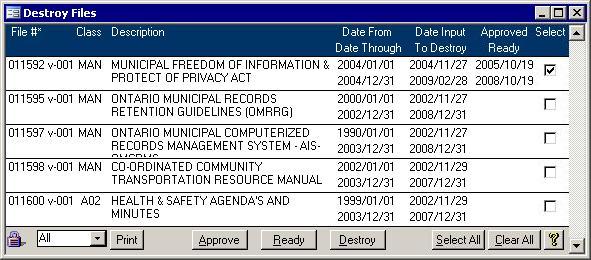
To use this form, put a check into the box in the last column called Select for all files for which you want to change the status. Using the data in the picture above, if file
011600 v-001 should be destroyed, put a check in its Select box. Once all files to be destroyed have been selected, click the Approve button. All selected files that do not
yet have an approved to destroy date will have the current date put into the Approved to Destroy field. You can do the same to set files as Ready to be Destroyed once a
printout of the Approved Files has been signed off upon by the department heads. The next step is to print a Ready to destroy list and collect all the files on that list.
Once they have all been found, select them and click the Ready button. You can now go onto another location. Once all files have been collected and have been destroyed, come back to this form,
select all that have a date in Ready to be Destroyed and click the Destroy button. One feature that will make this all much easier is the pull down box on the bottom left.
While in the picture above, it says "All," you can easily change it to any of the following:
- All:
Shows all records for the chosen location, if one was selected, and up to the chosen cut off date.
- Approved:
Shows the subset of the records for All above where only the records which have been assigned an Approved to Destroy date will appear. Those that
also have a Ready to Destroy date will not be included in the list.
- Ready:
All files that match the location and cut off date criteria and have a date in the Ready to Destroy box will be visible.
- Unapproved:
Only records that have not been approved yet will appear.
- Selected:
You can create your own subset of any of the above filtering options. Putting a check beside certain files then choosing Selected from the pull down list
will make visible only those you chose.
Once you have filtered out only the records you want, the Select All and Clear All buttons on the bottom right become useful.
|