Introduction The Search Files form is a dual purpose form. It allows you to search,
sort and filter the file and classification data. As well, it has been set up such that printing the form provides a useful report. The background colour is white because this form is the report as
well. As can be seen in the picture below, this is a large form. Those that are using a low screen resolution will have to use scroll bars to see it in its entirety. This was done so that as many
records as possible would be visible on the screen at one time. The report should end up being landscape due to this extra width.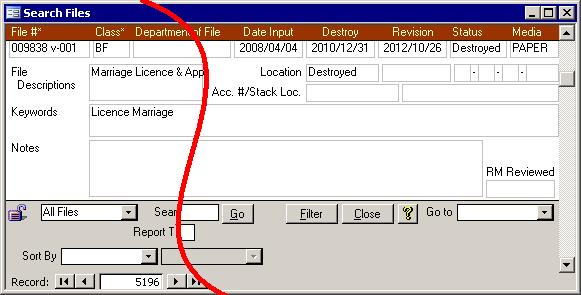
To see the report, click on the Preview tool in the menu bar. While in report view, the
bar along the top, that is red in the above picture, will not be visible. In form view the bar will be red for files that have been destroyed. It will be dark blue for all other
records. More information on the menu bar can be found below. Other than showing everything and being both a form and a report, there is not much to this form. The real
power is in the extras that come with the form that are detailed below.
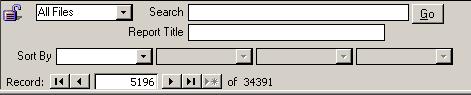
Buttons Etc. There are other notable features of this form. First of all there is a new menu that was
designed for this form. There are the Report Title field, the Locked/Unlocked picture, the Go to field, Sort By fields, and a Close button. Each are described here in detail, but
the special filtering functions have been given their own section below.
New Menu Bar 
Most forms have our regular menu bar while reports have another. The exceptions are
the menu screens and this Search Files form. While many of these are itemized on the Tools page in our General Help
, some should be highlighted here. The tool that is second from the left is the Print Preview button. With each click of this tool, it will switch back
and forth between form and report mode. A new tool is the red circle with a diagonal line through its center. This is the Filter Excluding tool. If you highlight some data and
click this button, then all records with that data will be removed from the current view. That is they will be filtered out. Much more information on filtering, finding and searching is available through the
Tools help page. As well, check out the Filter button
on the bottom of their form for which more information is available below. One tool that is missing is the Select Printer tool that appears for all reports. This tool will not work
with this form since the tool works only for open reports. Try pressing Ctrl+P on the keyboard to open the Print dialog box instead. Report Title Field
When you use print preview, the default report title is Records Management System (RMS) Files. It will be replaced with whatever is typed into this field.
Locked/Unlocked Picture Like most forms, there is a picture of a lock in the bottom left corner of the form. This
indicates whether or not the form is locked. If it is unlocked, then Admin mode is on and most of the fields can be edited. A notable exception are the Classification fields that
are within the blue box which are never editable. To get into Admin Mode, click on the Administration button on the Main Menu and enter the administrative password or your
password if one has been assigned to you. If the password is correct, then a full menu will be presented to you. Sort By Fields The four pull down lists along the bottom left can be used to change the sorting. While
the default sorting is by file number, you can select one of the following from the sort lists: File Num, Class Code, File Description, Date From, Date To, Department, Location,
Box Number, Aisle, Bay, Shelf, File, Accession, Stack, Out of file, Date Input, Revision, Destroy Date, Status, Media Type, Notes, Keywords, or RM Reviewed.
Once you select a value from the first Sort box, the form will be resorted according to that selection and the second sort box will become enabled. Picking an item from the
second box's list will add that to the sorting. As an example if Department is chosen in the first box then Destroy date in the second, then the form will be sorted first by the Department then by the Destroy date.
 Go to Field Go to Field
Use the Go to field in the bottom right corner of the Search Files form to quickly search
for a file. Simply select a file number from the list, or type in the file number and press the Enter key on the keyboard to be taken to that file.
Close Button The Close button will simply close the form without applying any changes to the filter.
Use the filter button if you want to apply changes that you made to the filter criteria.
Filtering The whole purpose of this form is to be able to quickly find records. One way is to
whittle down the number of records showing by filtering out the ones you do not want. There are three main ways of filtering outside of the normal filter by selection or filter excluding commands available in the
menu bar as discussed above. You can limit the
number of records that are available by choosing Destroyed Files or Active Files from the Filter Pull Down List, using the Search/Go function, or using the Filter button. Each of
these three methods are described below. Filter Pull Down List
This feature will change the set of records that this Search Files screen shows. It always starts out by showing all files, but you could select Destroyed Files or Active
Files from the list. All files that have a status of Destroyed would be available for the former while all files that do not have a status of Destroyed would be available for the
latter. Because the entire set of records is changed with this feature, it does not appear in the next two sections. Search/Go To quickly add a filter that will check the Description, Notes and Keywords fields, use
the Search field. Typing in "Marriage" then clicking the Go button added a filter that ended up showing me only two records. The filter looked something like this:
Description contains the word 'Marriage' or Notes contains the word 'Marriage' or Keywords contains the word 'Marriage'.Adding a second word to the search field, like searching for Marriage Licence, may yield
entirely different results. The filter will look something like this: (Description contains the word 'Marriage' or Notes contains the word 'Marriage' or Keywords contains the word
'Marriage') AND (Description contains the word 'Licence' or Notes contains the word 'Licence' or Keywords contains the word 'Licence') It is the AND that can make it
difficult to figure out why some records show while others do not. If you click the Filter button, which is along the bottom of the form, then all of the
instances of 'or' will be changed to 'and'. There is a big difference between an 'or' and an 'and' when it comes to filtering. Doing so yields no records in my Marriage example
because the word marriage does not appear in the Notes field. Filter Button This button will pull up the Search Files Filter form shown below. If you are not running
in Runtime mode, then you can use the built in Filter By Form function. If you are in Runtime mode, then you will be restricted to using this Search Files Filter tool. At any
time, you can click the Filter button and the screen shown below will appear.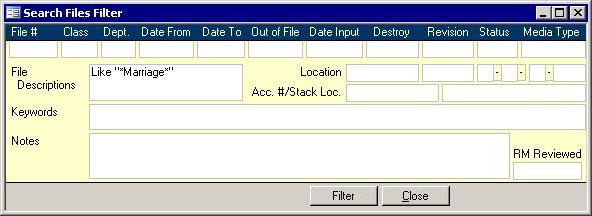
If you did not use the filter tools from the menu bar along the top, then the previous filter will appear on the Search Files Filter screen. In the above example, the previous
filter was where the File Descriptions had the word Application in it somewhere. Type in the criteria by which you would like to filter the data and click the Filter button again to
go back to the Search Files screen. You could click the close button instead. The Close button will simply close the form without applying any changes to the filter. Use the
Filter button if you want to apply changes that you made to the filter criteria. Some examples of filters can be found below:
Date range |
for the year 2009 |
>=#2009/01/01# and <#2010/01/01# |
Exact values |
Department is Admin |
"Admin" |
Containing a value |
Department has Admin in it |
Like "*Admin*" |
Starts with |
Department starts with Admin |
Like "Admin*" |
Ends with |
Department ends with Admin |
Like "*Admin" |
True check boxes |
Vital check box is true |
-1 |
False check boxes |
Vital check box is false |
0 |
|