Introduction This wizard takes you through setting up the system information. It is
automatically run when you first launch Baker and Associates software for the first time. If you do not complete the wizard, it will continue to run when you first enter the system. Once it has been finished, it can be
run at any time by the administrator. It is accessible through the Administration menu for those who know the Administrator's password.
 1. Starting Point 1. Starting Point
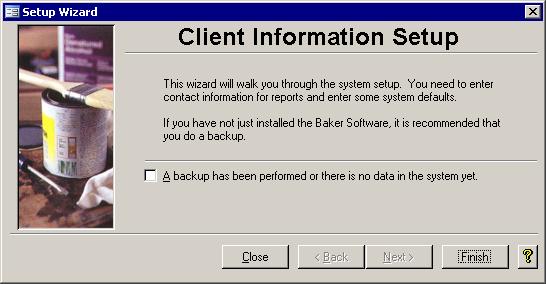
Before you can begin you have to back up the system to save the previous
configuration. If you are running this Baker and Associates software for the first time, you can just check off the box by clicking in it with the mouse. Click Next to continue on.
 2. Company Information 2. Company Information
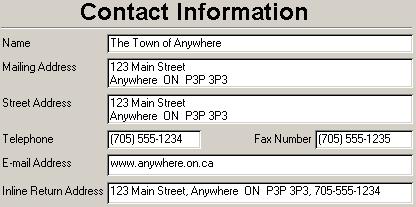 The Contact Information screen is where you
should key in your name, address, etc. The e-mail address can appear on external reports, so you could put in either a web URL or an actual e-mail address if you choose. The Inline Return Address is used on some reports
that are sent to the property owners and that do not get printed on letterhead. This address should only be on one line and will appear on reports just under the name. The Contact Information screen is where you
should key in your name, address, etc. The e-mail address can appear on external reports, so you could put in either a web URL or an actual e-mail address if you choose. The Inline Return Address is used on some reports
that are sent to the property owners and that do not get printed on letterhead. This address should only be on one line and will appear on reports just under the name.
3. Default Accounts  These accounts are used in a variety of
Baker and Associates systems. For example, the Year End Transactions report would not balance if the Surplus and Deficit accounts are not entered. These accounts are also checked when the Change Account
form is being used, so important accounts do not get deleted by accident. if there are any blank fields like the Accounts Receivable fields are in the picture on the left, they should be filled in. These accounts are used in a variety of
Baker and Associates systems. For example, the Year End Transactions report would not balance if the Surplus and Deficit accounts are not entered. These accounts are also checked when the Change Account
form is being used, so important accounts do not get deleted by accident. if there are any blank fields like the Accounts Receivable fields are in the picture on the left, they should be filled in.
4. User Access
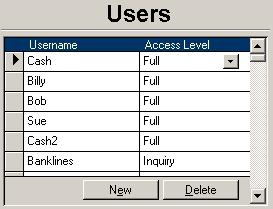 In the name of security, all users who are to
have access to the system must be entered in here. Those that are granted Full access will get to see everything. They also have add, edit and delete capabilities. Users with only
Inquiry access will be able to view the data for a select group of forms and reports. If a user is not entered here and tries to get into the GL, they will be kicked out immediately. The
system uses the username of the computer, so if you do not want people to use your computer to have access, then log out of your computer when you leave it and keep your password a secret. In the name of security, all users who are to
have access to the system must be entered in here. Those that are granted Full access will get to see everything. They also have add, edit and delete capabilities. Users with only
Inquiry access will be able to view the data for a select group of forms and reports. If a user is not entered here and tries to get into the GL, they will be kicked out immediately. The
system uses the username of the computer, so if you do not want people to use your computer to have access, then log out of your computer when you leave it and keep your password a secret.
5. System Settings 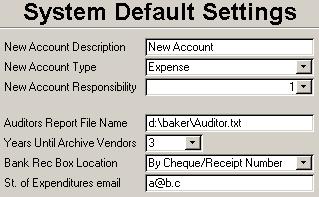 When a new account is created, the default name, type and responsibility level are assigned to it. If these defaults are not to your liking, you may change them here. Or if you are
creating a bunch of Revenue accounts, you could change the Type here first, so you will not have to edit that for each account you create.
When a new account is created, the default name, type and responsibility level are assigned to it. If these defaults are not to your liking, you may change them here. Or if you are
creating a bunch of Revenue accounts, you could change the Type here first, so you will not have to edit that for each account you create.Another option is the Years Until Archive Vendors. During the Year End Archive Wizard, the vendors that have
not been used in the number of years specified here will appear on a report ready to be deleted from the Accounts Payable system. Just because there is a number in this box,
it does not mean that you must delete inactive vendors. It still remains an option. You can choose from 1 to 8 years with the pull down list. When it comes to the Bank
Reconciliation screen, some people prefer to have the check box on the left beside the Cheque/Receipt number column, while others prefer it to be on the far right. Try both
and see which one you like best. The last option allows you to enter the email address to whom the Statement of Expenditures should be sent. Once you have set all these
fields to the values you want, click Next to move onto the Budget items.
 6. Budget Options 6. Budget Options
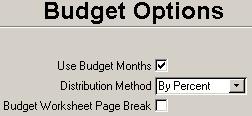 The first option is Use Budget Months. This will enable the Months button on the Budget screen and the check box on the Report Selections screen for the Income Statement. The second
field also has to do with Budget Months. This will be the default distribution method that is selected when revising an approved budget. You can select one of these four options: By
Percent, First Month, Last Month, Current Month. The bottom check box will add a page break to the Budget worksheet making the report longer but easier to distribute to department heads. The first option is Use Budget Months. This will enable the Months button on the Budget screen and the check box on the Report Selections screen for the Income Statement. The second
field also has to do with Budget Months. This will be the default distribution method that is selected when revising an approved budget. You can select one of these four options: By
Percent, First Month, Last Month, Current Month. The bottom check box will add a page break to the Budget worksheet making the report longer but easier to distribute to department heads.
|