Introduction These are not the Ministry's Financial Information Returns. They are a set of reports that will be used throughout the year to
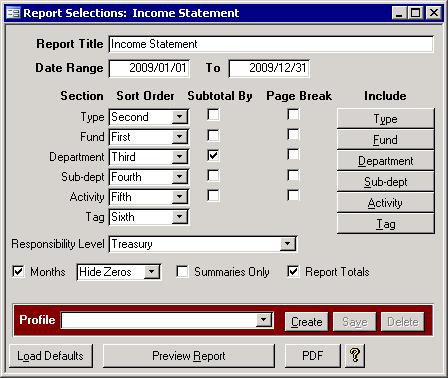
give a financial status. The five reports, Chart of Accounts, Trial Balance, Balance Sheet, Income Statement, and General Ledger, are all previewed using the Report Selection form. This form allows you to
change the sorting, subtotaling, and filtering as well as select the date range, the responsibility level, whether to show zeros, and whether to show only the summary sections. This section covers how to use the
different features of the Report Selections screen.
Report Title
The title shows on the top left corner of the report. You cannot edit the title of the system reports, but you are free to alter the title if it is a saved profile.
Date Range
Although the Chart of Accounts does not need them, each of the four financial reports
requires a start date and an end date. All transactions between those dates inclusive will be processed. If you want to see a trial balance for only one day, just enter the same date in both boxes.
Sort Order
Unlike with fixed reports, using the report selector, you can change the sort order of the report. If you are doing a Departmental report, you can first sort on Department. If you
want a more traditional report, you can sort on the Type first. Changing the sort order has a large effect on how the report looks. While the account type does not show in
the account number, it can be considered to be its own part.
Subtotal By
The Subtotal By option is useful for the first few levels. Beyond that, the report may end up with a total for each line of data which is useless; however, you can choose any
level you wish other than the sixth. Subtotaling on the last part will give a subtotal for each detail line. If you change the sort order of a part that is currently set as Subtotal
By to sixth, then the part that is first in the sort order will be set to Subtotal By.
Page Break
The check boxes for Page Break will cause each section to be on its own page. For example, if Department had a check in the page break box then each Department on the
report would start at the top of a new page.
Include
Another powerful feature is the ability to turn off, or filter, parts. If you only want to see budgetary expenses, you can make it happen. If you only want to see one
department, you can do that too. Combine this with the different sorting and subtotaling selections, and the number of possible reports that can be generated is
virtually endless. When you click on one of the Include buttons, the following form will pop up.The Select All button can be used to quickly get to a starting point. You have some options: 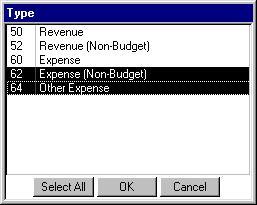
- If you want to deselect a few, click Select All, hold the Ctrl key and click on the ones you do not want to show.
- If you only want a few, click on one that you want, and hold the Ctrl key while clicking on the rest.
- If you want several in a row, you can click on the first, scroll down until you see the last one, hold the shift key and click on the last one. All parts that are in between will be highlighted.
This works much like Windows Explorer.
Responsibility Level
Some reports, like department and school reports, cannot show all accounts. Choosing the responsibility level of school or department will stop restricted accounts from showing up on the reports.
Months Although this option will only appear for the Income Statement, it allows you to toggle
between the old way and the new way of calculating the budget figures. The old way uses the budget figure for the entire year while the new way will add up the budget amounts year-to-date allotted in the Budget
Months form. The Months method can
show you a more accurate assessment of how far off budget the accounts are.
Show
For the four financial reports, there are now three options in the pull down box: Hide Zeros, Show Zeros, Zeros Only. If you do not want to show accounts that have only
zeros for data, choose hide zeros. The accounts will not show up. With show zeros, all accounts will show up unless restricted by the responsibility level or a filter. You can
also choose zeros only which will show only unused accounts. If the Chart of Accounts report is selected instead, then this box will contain Show Retired and Hide Retired which
will determine whether or not accounts that have been retired will show.
Summaries Only
If you just want a small report with only totals, then check this off. The details of the
report will not show up on the report. Of course, unchecking this will allow the details to show up again.
Report Totals
When checked, any total section at the end of the report will show. If this is not checked, then no total section will appear at the bottom of the report.
Profile
With profiles, you can save reports under whatever report title you want and use the Profile box to pull up a saved report. You can create a new profile based on the current
report. You can also simply type in a new name to save the current settings. You will be warned that the profile you entered does not exist and asked if you want to create
it. Reports you create will be saved under your user name. Only you will have access to your reports, so no one else can change your settings on you.
Create Another option for making new profiles is to click the Create button. Doing so will pop up
a box that will ask you for the new report title. It will be saved with the current report type. For example, if you have the Income Statement up when you click the Create
button, the new report will have the same columns as the Income Statement.
Save
If you create a report profile and its settings were not quite right, you can load the profile, change the settings to what they should be, then click this Save button. Of
course, if you want a one time report that is similar to one of your saved reports, you can bring up that report using the Profile field, change the settings, print the report and
close the report selector. Next time you load that report, the old settings will still be there. The changes to the settings were discarded.
Delete You can delete any non-system profile that you have created.
Load Defaults When a new part is created, it is automatically added into the include even if there are
no accounts that use it. Choosing to include only this new part will end up in a blank report. The Load Defaults button will recheck each part and get rid of any that are not
needed for the particular kind of report. Clicking the Load Defaults button will only affect the report shown at the top in the Report Name box.
You no longer have to remember to hit the Load Defaults button each time you get a new version of the General Ledger. The loading of the defaults is important to make
sure no data is missing from the financial reports. Every time the Report Selections form is opened, be it for the Income Statement, Trial Balance, Balance Sheet, Chart of
Accounts, or the General Ledger report, load defaults is now run automatically. If you want the same report that was printed out last time, then it will have to have been
saved as a profile. The last time each saved report is used, its settings are retained. This is because load defaults is not run automatically for user profiles. Now that the
settings for the five main reports will be reset each time, profiles may become more important. Time for an example. When a new department or location, or any part of the account
structure, has been created, it will automatically be added to the list of parts for all saved profiles. If that new part is not used, it will disappear again on the next loading of
the defaults but only for the five main reports. The saved profile reports will retain the new parts until they are deleted. As well, if a saved report has all tags included, then
any new tag will be included as well. Similarly, if the departments or locations, or any other part, are being filtered to show only sub set of those available, then new ones will
not be included in the filter. This is the case even if Load Defaults is clicked for a saved profile. The report should not change simply because new data were added.
Preview Report
Clicking this will build the data and preview the report on the screen. Some reports, like the General Ledger report are quite long and will be slow to build. If possible, restrict
the accounts that will show by using the Include section above.
PDF
If you wish to create an adobe pdf file of the report that can be emailed, click the PDF button instead. To email the report select Email... from the File pull down menu within Adobe Acrobat Reader. |