Introduction The chart of accounts is the most important part of the General Ledger.
It has to be set up properly. For every account, the system's chart stores the following for each account: Description, Type, Tax Code, Rebate Code, Responsibility Level, Retired Flag, and Memo. Each
will be described in this section. As well, an example of a chart that effectively uses our setup is included at the end. Another section that is important to the chart is the Maintenance
screen. Of course, the first stop is at the Chart of Accounts form.
The Chart of Accounts Form 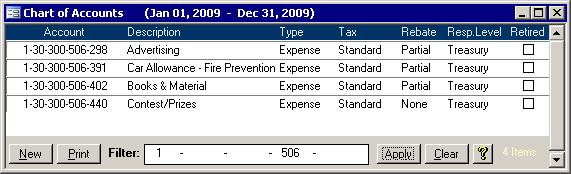
The chart form contains most of the information you need for the accounts other than the transactions. This section of help will first go through what the buttons do, then it will describe how the fields are used.
Buttons New 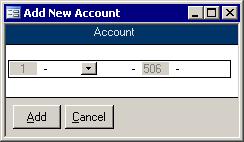 The New button opens the Add New Account screen and applies the current filter. Once on that
screen, finish the new account number and click the Add button. All parts must exist before entering a new account. For example, if in the picture below, the 311 was not a valid
subdepartment or panel, then you must do the following: The New button opens the Add New Account screen and applies the current filter. Once on that
screen, finish the new account number and click the Add button. All parts must exist before entering a new account. For example, if in the picture below, the 311 was not a valid
subdepartment or panel, then you must do the following:
- Click cancel
- Close the Chart of Accounts screen
- Click on the Other Maintenance button on the GL Menu
- Go to the subdepartment or panel form
- Add in 311 on that form first.
Once all of the new parts exist, you can return to the Add New Account Form. Once on that screen, finish the new account number and click the Add button
Note: New accounts may not appear immediately on trial balances. Clicking the Load Defaults button when selecting the report parameters will add new parts and accounts.
Print The Print button will let you preview the
Chart of Accounts report. Apply Click this button after entering the desired filter. Only accounts that match the filter will
show. Clear Clicking the Clear button removes the filter and shows all accounts.
Description
The account codes are broken up into parts. While each part has its own description, a single account is usually more than the sum of its parts. In other words, there is a need
to have a concise description for each account. This is especially useful when general parts are used. It is this description that shows up on forms and reports throughout the
system, so you won't have to guess which part's description should be used. In the example at the end of this section, the last part for all of the accounts is always
000. The description for that part is 'General' and cannot be put onto reports as a description of the accounts. You wouldn't be able to tell them apart. Since the parts
are used more than once, their descriptions are useless for describing individual accounts. Another description is needed for each account. This description is stored in the Chart itself.
Account Type
Each account is assigned an account type. This is used on reports to split accounts up into sections like all of the revenues together then all of the expenses together. You do
not need to set up separate departments -- an administration department for revenues and another for expenses. You should only have one department or function.
The different Types that are available are as follows: Changing an account type may cause it to be added to or removed from the budget
upon next repopulation. As well, once an account is in use, you are limited to what types you can choose. If it was an asset, it must remain an asset. If it was a liability,
it must remain a liability. If it was an equity, it must remain an equity. If it was a revenue, it must remain a revenue. If it was an expense, it must remain an expense.
Tax Code and Rebate Codes
Each account gets a default Tax Code and a default Rebate Code. When they are used in the Accounts Payable and the Accounts Receivable, these codes will appear on bills
and invoices when the account is selected. They can be changed on the bill or invoice to suit the particular circumstance, but the next time the account is pulled up, the
default Tax Code and Rebate code will appear again.
Responsibility Level
Responsibility levels are designed to hide accounts on some reports. For example, the School Report only shows accounts of interest to the Principal while the Department
Report will only show accounts the Department Head will want to see. These same reports, when printed by users with higher access will contain all accounts. This access
level is called the responsibility level. Each account has a responsibility level assigned to it.
Retired Flag Deleting accounts that are in use is not permitted. They are retired instead. When
retired, they will not show up in any lists and cannot be entered by the end user. If they were specified as a special account in the Setup Wizard before they were retired, then they may still be used.
Memo
If there is any extra information you wish to store about an account, you can enter a memo. These notes can be entered or edited on the Maintenance screen. This is not the same memo that is available by clicking the
Memo button on the Budget.
Example Chart Structure In an effort to create an example that is applicable to both municipalities and school
boards, only general accounts common to both have been used. The parts of the account structure is different for municipalities and school boards. The chart below shows how each use the different parts.
Part |
Municipal |
School Board |
Part 1 |
Fund |
Panel |
Part 2 |
Department |
Function |
Part 3 |
Sub-Department |
Location |
Part 4 |
Activity |
Classification |
Part 5 |
Tag/Object |
Item |
For simplicity, this example uses mostly municipal terminology. Below are some sample parts:
Funds
1 General
2 Separate Fund
Department
01 Administration
02 Non-departmental
Sub-Department
001 Cash and Bank
005 Accounts Receivable
009 Other Current Assets
010 Equipment
011 Long Term Receivables
020 Accounts Payable
024 CPP Full-time Payable
025 Loans
Activity
000 General
001 Cash
002 Bank
Tag
000 General |
|
This breakdown shows that only one department is needed for Administration. Because the type is stored with each individual account, there is no longer a need to have one Administration
department for revenues and another for expenses. Essentially, having the type associated with the account is just like having an extra part to the account number except that it does not
show. When you print the Income Statement, the revenues can easily be grouped together then the expenses. In fact, the report will group revenues together, then non-budgetary revenues
then other revenues. Next the budgetary, non-budgetary, and other expenses will have their own sections followed by a net totals line. |
|
Below is a section of a sample chart of accounts. This structure will allow all accounts
where part 2/Department is 01 to be grouped together. A trial balance can quickly show all accounts for 01 - Administration.
Account |
Description |
Type |
1-01-001-001-000 |
Cash |
Bank |
1-01-001-002-000 |
Bank |
Bank |
1-01-005-000-000 |
Accounts Receivable |
Accounts Receivable |
1-01-009-000-000 |
Other Current Assets |
Other Current Assets |
1-01-010-000-000 |
Equipment |
Fixed Assets |
1-01-020-000-000 |
Accounts Payable |
Accounts Payable |
1-01-024-000-000 |
CPP Full-time Payable |
Current Liability |
1-01-025-000-000 |
Equipment Loan |
Long Term Liability |
|