Introduction While it has not been set up like other wizards in Baker and Associates'
programs, it is not just a simple form. This is because the budget process contains several forms and reports. As well, the budget form itself is packed full of information while the other forms, if not used
properly, can wipe out a lot of your work. This section reviews all forms and reports used throughout the budget process, but first, you must start with the Budget Year Selection form.
Budget Year 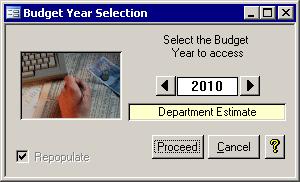 The purpose of this form is to select the year in which you wish to work on the budget. The two 'arrow' buttons on each
side of the year will change the year. You can only go up to the current fiscal year as long as the previous year has been approved. As well, you can only go as far
back as data exists in the table. Once the current year's budget has been approved, you can start work on the next year's budget. On the Budget Year screen, a yellow field lets you know the current level
of the budget process. Once you transfer the amounts to the next level, this level indicator will change. The purpose of this form is to select the year in which you wish to work on the budget. The two 'arrow' buttons on each
side of the year will change the year. You can only go up to the current fiscal year as long as the previous year has been approved. As well, you can only go as far
back as data exists in the table. Once the current year's budget has been approved, you can start work on the next year's budget. On the Budget Year screen, a yellow field lets you know the current level
of the budget process. Once you transfer the amounts to the next level, this level indicator will change.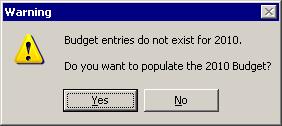 The Repopulate check box is useful. If you
are starting with a budget year that has not yet been created, then the window to the left will appear asking if you want to create the budget records for the new year. If you choose No then proceed to that year's
budget anyway, the Budget screen will be blank. The Repopulate check box is useful. If you
are starting with a budget year that has not yet been created, then the window to the left will appear asking if you want to create the budget records for the new year. If you choose No then proceed to that year's
budget anyway, the Budget screen will be blank.
Once the current year has been created, you may opt to skip the lengthy repopulation
step. Luckily, it now only takes a few extra seconds since computers are faster than when the budget program was first created in 1998. Repopulation does the following for the currently selected year:
- Add all budget accounts to the budget table. If any are missing, they are added in. If they already exist, their data is not overwritten. In other words, you will not lose your work.
- Updates the account description in the budget table.
- Calculates the previous year budget amounts.
- Deletes any account that is now non-budgetary.
- Calculates the previous year actual amounts.
- Calculates the current year actual amounts.
Put a check in the Repopulate box and click the Proceed button to initiate repopulation and open the Budget form. If you do not want to repopulate, uncheck the box before clicking Proceed.
The Budget Form 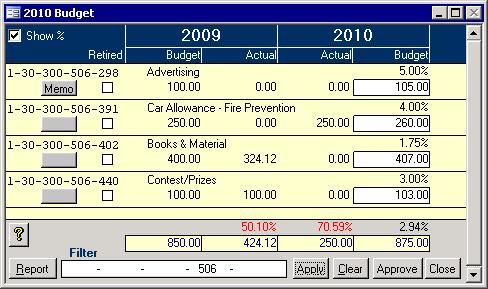
Now that you can finally see the Budget form, as in the picture above, let's go through what each of the fields and most of the buttons do.
Budget Form Fields
Unchecking this box will make the percent change values disappear.
Retired Check Box: Indicates if the account has been retired. If any retired flags are checked when working on the current fiscal year budget, then the budget should be repopulated.
Budget: Each department has to submit their budget. Either the values from that report should be entered here, or each department can enter in their own
values directly. If the latter is chosen, then it may be easier to use a filter as described in the next section
. Once a budget value is entered, it will become available to the purchase order forms and the income statement. This budget
amount then must be approved by the Board or Council.
Totals Line: The yellow cells immediately above all the bottom buttons display the totals for each column. As values change, so do the totals.
Filter: This series of pull down boxes is used to apply a filter and is covered in the next section.
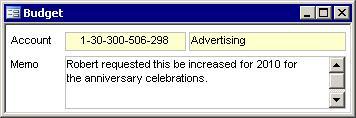 Memo Button: The button that usually does not have a label is the Memo button.
Click on it to add a note to the budget table for that account for that year. A sample of the memo edit screen is in the picture on the right. When a note exists, the button will say Memo
Report Button: This prints a series of worksheet and summary reports restricted by the filter.
Apply Button: This button applies the filter to the form, so only the desired data will appear.
Clear Button: Click this button to remove the filter from the form thus showing all records.
Approve/Revise Button: This lets you copy values from one column to another in the budget table. This is restricted by the filter. If it says Revise, then it lets
you move funds from one budget account to another.
Close Button: This checks the data before shutting down the Budget form. Memo Button: The button that usually does not have a label is the Memo button.
Click on it to add a note to the budget table for that account for that year. A sample of the memo edit screen is in the picture on the right. When a note exists, the button will say Memo
Report Button: This prints a series of worksheet and summary reports restricted by the filter.
Apply Button: This button applies the filter to the form, so only the desired data will appear.
Clear Button: Click this button to remove the filter from the form thus showing all records.
Approve/Revise Button: This lets you copy values from one column to another in the budget table. This is restricted by the filter. If it says Revise, then it lets
you move funds from one budget account to another.
Close Button: This checks the data before shutting down the Budget form.
Filters
Filtering lets see the accounts you want to see. You can use the filter to let only a certain department or sub-department show. What gets shown depends entirely on how you set up your Chart of Accounts. In the pictures in this Budget section, a filter has
been applied. The form has been set to show only accounts with a 1 as part 1, 31 as part 2 and 311 as part 3. These numbers were chosen from the pull down lists and then
the Apply button was clicked. Now clicking on the Totals button, Transfer button, Clear Columns button, or Reports button will bring up forms or reports that will all be affected by this filter.
To remove the filter, click the Clear button. All accounts will then show once again.
Transfer Totals When you click on the Approve button, a screen like the one in the picture below will appear. That same Approve button is also used to revise approved budgets. This
section will explain both. Approving/Transferring 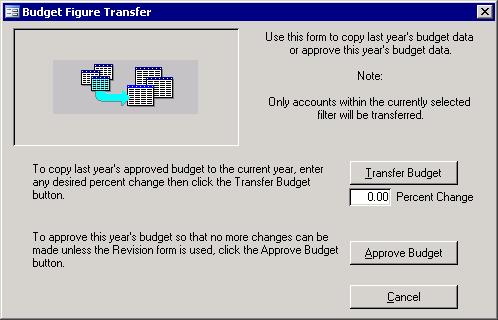
This form exists to help you get a starting point for the current stage of the budget. If
you want to copy last years figures with a 5% increase, you can. To do this, clear the filter on the Budget form, click the Approve button, enter 5.00 in the Percent change
box, then click the Transfer Budget button. The monthly percentages will be copied too. The transferring of totals is subjected to the filter on the Budget form. If you have
already changed some of the budget figures for the section currently filtered and you transfer the budget, you will wipe out your work. It is easy to lose data this way.
When you have completed your budget and it has been passed by council or the board, click the Approve Budget button on this form instead. Doing so will update your budget status. Revising 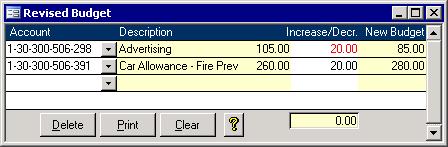 Once your budget has been set to approved, the Transfer will from then on read Revise. When clicked, it will pull up a screen such as the one on the
right. This screen is used to move budget amounts from one account to another. If you get an unexpected revenue amount, you can add to the budget. You can also move expense amounts around if need be. Once your budget has been set to approved, the Transfer will from then on read Revise. When clicked, it will pull up a screen such as the one on the
right. This screen is used to move budget amounts from one account to another. If you get an unexpected revenue amount, you can add to the budget. You can also move expense amounts around if need be.
Months
The whole point of the Months feature is so a more true budget value can show on the Income Statement where the Budget amount has been replaced with a Period Budget
amount. As well, if you use purchase orders, it will restrict users of the Remote/School accounting system to their budgeted amounts. If the use of Budget Months has been enabled in the Setup Wizard, then the Months button will appear on the Budget form
once the budget year in question has met final approval. Approving the budget will set up the Monthly percentages. Clicking the Months button on the Budget form will show
the screen below which allows you to move the budget amounts around for each month.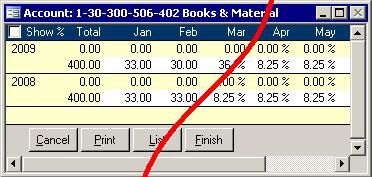 This form defaults to showing
you the dollar figures such as those on the left side of the red line in the picture. The top row of numbers is always the actual used amount while the bottom row is the budgeted amounts.
The Total column will be a duplicate of the Approved column from the Budget form. The columns to the right of the Total column show budget and
used amounts for each month. The first month will be the start of your fiscal period. On this form, there is also a check box that will, when checked, show the percent of the
budget allotted and used per month. In the picture above, everything to the left of the red line is without Show % checked while everything to the right is with it checked. The
Total column will not change and will show the total used with the approved budget amount below. The Percentages must total 100 otherwise you may get an error the next time you launch the budget screen. This form defaults to showing
you the dollar figures such as those on the left side of the red line in the picture. The top row of numbers is always the actual used amount while the bottom row is the budgeted amounts.
The Total column will be a duplicate of the Approved column from the Budget form. The columns to the right of the Total column show budget and
used amounts for each month. The first month will be the start of your fiscal period. On this form, there is also a check box that will, when checked, show the percent of the
budget allotted and used per month. In the picture above, everything to the left of the red line is without Show % checked while everything to the right is with it checked. The
Total column will not change and will show the total used with the approved budget amount below. The Percentages must total 100 otherwise you may get an error the next time you launch the budget screen.
Reports
Clicking the Reports button on the Budget form will bring up four reports. The first is a Budget worksheet which has lines along much of the right hand side to allow for
comments. The next three reports are summary reports based on the first three parts of the account structure. For example, if the first three parts of your account numbers
represent Fund, Department, and Sub-Department respectively, then you will get a Fund summary report, a Department summary report, and a Sub-Department summary report.
Note: All reports are filtered according to the filter chosen on the Budget form. |