Introduction 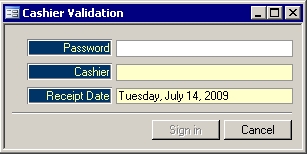 The Receipts entry screen is a tabbed report. This help page describes each of the tabs:
Taxes, Animal, General,
Water, and Cemetery
. To get to the cash receipts screen, you must be a cashier and you must log in with your password using the screen on the right. If you don't
have a password, ask you systems administrator for it. If you are the systems administrator, then you can use the
Setup Wizard to create cashiers. The Receipts entry screen is a tabbed report. This help page describes each of the tabs:
Taxes, Animal, General,
Water, and Cemetery
. To get to the cash receipts screen, you must be a cashier and you must log in with your password using the screen on the right. If you don't
have a password, ask you systems administrator for it. If you are the systems administrator, then you can use the
Setup Wizard to create cashiers.The receipt date shown in the blue title bar of the Cash Receipt Entry screen can be
modified using the first screen of the End of Day Wizard
. This End of Day Wizard is actually part of the whole Cash Receipts process. The steps for Cash Receipts is as follows:
- Enter cash receipt. If you are entering a bulk payment, click the Bulk button and choose a bank from the screen below.
- Click the Print button.
- Click the Accept button.
- Print Proof List and Cash Registers in the End of Day Wizard.
- Update the End of Day Wizard and transfer the receipts to the General Ledger.
Note: Voided Postdated cheques are deleted on finishing End of Day Wizard. This section of the help file only deals with the first three steps using the Cash Receipts
Entry form. This form has six tabs. There is also a Bulk button to enter bulk tax and water payments. Steps
on how to complete the receipt and where to go next are covered as well.
Tax Receipt
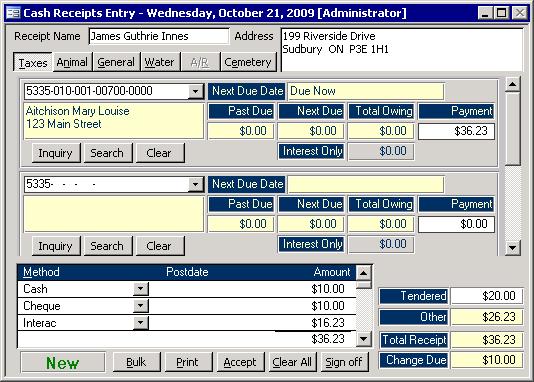
Roll: When you select the roll number, the due date and amounts owing are brought up.
Past Due:
This field shows the amounts owing that had not been paid by their due dates.
Next Due: This shows the amounts owing for which the due date has not yet passed.
Payment:
While this defaults to the total owing, you must enter the amount of the actual payment here. When you set the payment amount, the Total Receipt is updated.
Inquiry:
The Inquiry button brings up the Tax Inquiry
screen for the selected roll.
Clear: Clicking the clear button will delete only the current entry.
Flags: Whether the roll has signed up for the Pre-Authorized Payment Plan, has been
registered, has third year arrears still owing, or has a memo for the Tax Certificate, either a PAPP, Registered, 3rd Yr. Arrears, or Memo flag will appear respectively.
Bulk Payments 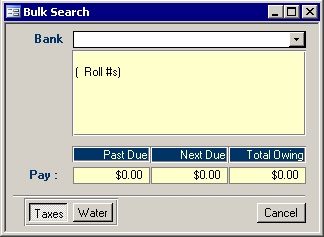
To use this form, simply choose a bank and the payment totals will come up. If the payment amount is not the same as on the paper sent to you by the bank, you will have
to edit the taxation data for the rolls the bank has excluded or included.
Animal Receipt If you have access to our Animal Control system, you can add animal related receipts here. Dog tags can be priced in one of two ways: by a price chart or by a rate
schedule. A price chart, that can takes gender and sterility into consideration, is the default. You would have to use the Setup Wizard in the Animal system to opt to use a
rate schedule. An example of a rate schedule would be $10 for the first dog, $20 for the second, and $30 each for the third or more.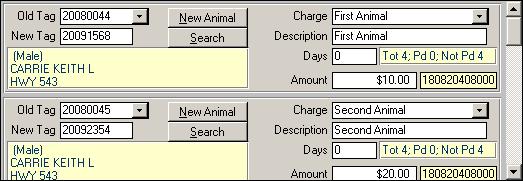
To start entering a receipt, begin by choosing the tag number from the Old Tag pull down list. If you are entering a tag renewal, you will have to enter the new tag number
into the New Tag field. The Charge is selected from a pull down list which will usually bring up a value into the Amount field. This amount will be added to the Total Receipt
box at the bottom of the entry screen. If the dog is not in the system yet, you can click the New Animal button to register the
animal first. As well, leaving the New Tag field blank is a useful way to add in other charges like a tag replacement. If a rate schedule is in use, then the last column of the Old Tag pull down list will be
important. It contains a count of animals that are at that same property. 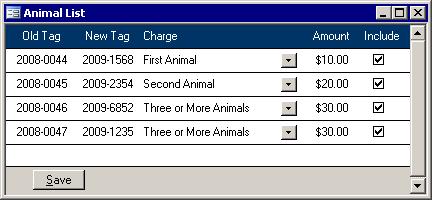 After you choose an old tag, even
if the count column contains a 1, the Animal List screen, like the one on the right, will appear. Initially, the New Tag column will be blank and will have to be filled in. As well, if any have already
received new tags, their Include column will not have a check mark which means they will not be a part of this receipt. If you need to exclude any of the
other dogs, perhaps due to a death, you can remove its check mark from its Include column box. When you hit Save, the data will be transferred to the Animal tab of the
Cash Receipts Entry screen. You can then finish the receipt. After you choose an old tag, even
if the count column contains a 1, the Animal List screen, like the one on the right, will appear. Initially, the New Tag column will be blank and will have to be filled in. As well, if any have already
received new tags, their Include column will not have a check mark which means they will not be a part of this receipt. If you need to exclude any of the
other dogs, perhaps due to a death, you can remove its check mark from its Include column box. When you hit Save, the data will be transferred to the Animal tab of the
Cash Receipts Entry screen. You can then finish the receipt.
General Receipt 
The General Receipt tab is used to enter general receipts that are not stored in
Accounts Receivable. After selecting an account from the list, you just have to enter the Reference and the amount. Alternatively, you could use the Shortcut field (Short).
Account shortcuts that have been setup using the Short List
form will appear in the list, and once you choose one, the associated account information will be pulled up for you. Once the amount is entered, the Total Receipt amount will be updated. As well,
entering the amount will automatically calculate the GST and reduce the amount by the amount of the tax. If the
Prices Include Taxes has been set, then the amount entered will be reduced by the amount of the PST and GST calculated.
Water Receipt ![]()
The Water Receipt tab was designed to work in a similar way as the Tax Receipt tab. Because they look so similar, the colour has been changed so the cashier can quickly
determine which screen is active. Other differences are that the rolls listed and figures brought up for them are from the water system and the Inquiry button will pull up a
Water Master rather than the Tax Inquiry screen once a roll has been chosen. If no roll has yet been chosen, then the Inquiry button will do nothing. Despite these differences,
you still have to choose the roll and the desired payment amount.
Cemetery Receipt 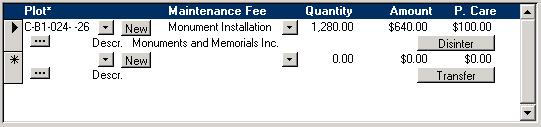
The Cemetery Receipt tab was designed to work in a similar way as the General Receipt tab. To enter a cemetery receipt, start by selecting the plot code. Do so by picking a
plot from the list, using the search form by clicking the button with the ellipses (...) that is beneath the Plot list, or clicking the New button to create a new plot. Once the plot
has been selected, choose a value from the Maintenance Fee list. The default amount and perpetual care values will be inserted automatically. If the maintenance fee type is
Monument then the Quantity field will be enabled, so you can enter the area of the monument. All that is left is the description if one is desired.
On the far right of each record is a button. For each plot, that is entered, you can associate either a rights holder transfer or a disinterment. If the plot is empty, then the
button on the far right will read Transfer; otherwise, the button will read Disinter. Clicking this button for the first time for the current plot will pull up a form for entering a
new Transfer or a form for entering a new Disinterment. Once the record has been added, subsequent clicks of the far right button will bring up the appropriate viewer
where you can edit the new record. If you enter a second cemetery receipt line for the same plot, the button on the far right will still work. Clicking the far right button will do
the same for all records with the same plot. If the cemetery receipt record is deleted, then the Transfer or Disinterment records will be deleted as long as the plot is not used
on other cemetery receipt records. Finally, clicking the button on the far right also checks if a Transfer or Disinterment record already exists for an accepted receipt that has not yet been through the End of Day wizard.
While it is not associated with a button, another function exists. Notice how the word Plot has an asterisk. Double clicking the Plot code will bring up a small version of the Plot Master.
Entering the Payment Method
When all of the above elements of the receipt have been entered, you must select a payment method and amount. You can enter a combination of payment methods for a
single receipt if needed. When you enter the first payment method, the receipt total will automatically be entered in the amount column. If a second payment method is desired,
simply change the amount and add in a second payment method on the next line. Postdated cannot be combined with other payment methods.
Finishing off the Receipt
The next step is to print the receipt. Clicking the print button is all you have to do to achieve this. The receipt is now complete until the bank deposit is prepared with the help of the End of Day Wizard
. To start the next receipt, click the Accept button. If this was just a test receipt, then you can choose Clear All before it is printed, or Void
after it is printed. If it was already accepted, then you will need to void the test receipt using the
Receipt View and Adjustment screen. |