Introduction This wizard has two uses: Change the receipt date and close off the
current receipt batch. If all you want to do is change the date on the receipts, then you only need Step 1; however, if you want to balance your bank deposit, you will need to complete all steps in the
wizard. These steps include adding postdated cheques to the current batch, closing the current batch, printing of the proof list, cheque list, register and updating the batch. While the adding of the
postdated cheques contains a few steps, the rest are fairly straight forward. Let's start now with the first step.
 Step 1: Receipt Date Step 1: Receipt Date
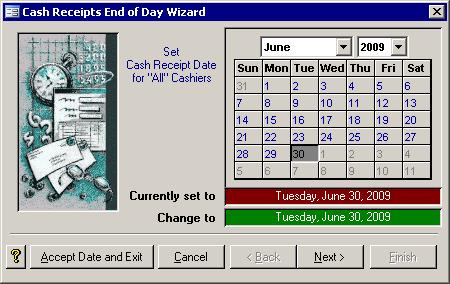
If you just want to change the receipt date, then use the calendar to select the desired
date then click the Accept Date and Exit button. Your job here is done.If you are preparing the bank deposit, you will have to click the Next button and keep going.  Step 2: Postdated Cheques Step 2: Postdated Cheques
A. Process New Postdated Cheques 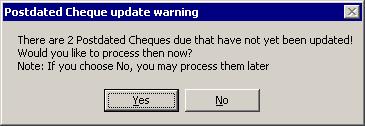 Postdated cheques end up going through the end of day routine twice. The first time is to register them as post dated cheques that will later be able to be added to a batch. The second time is to
register them with a batch. Usually this is not a problem because most postdated cheques are dated at least a month in advance. The message
on the right asks you if you want to do the initial processing of the 198 newly entered postdated cheques. The due date for these 198 cheques has already gone by or is the
current cash receipt date, so you can process them now as being a normal cheque rather than being postdated cheques. If you choose No, they will be processed as postdated cheques.
Postdated cheques end up going through the end of day routine twice. The first time is to register them as post dated cheques that will later be able to be added to a batch. The second time is to
register them with a batch. Usually this is not a problem because most postdated cheques are dated at least a month in advance. The message
on the right asks you if you want to do the initial processing of the 198 newly entered postdated cheques. The due date for these 198 cheques has already gone by or is the
current cash receipt date, so you can process them now as being a normal cheque rather than being postdated cheques. If you choose No, they will be processed as postdated cheques.
If no new postdated cheques have been entered, the computer will skip down to Section B.If no new postdated cheques were entered into the system and no existing postdated cheques have come due, then the computer will skip down to Step 3.
B. Add Previously Processed Postdated Cheques
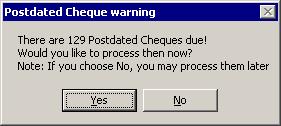
This message shows up if there exist some postdated cheques that have already gone through their initial end of day registration and have since come due. If there are none,
then you will not see the above message. Instead, you will be sent directly to Section D of this step. If you decide to process these now-due cheques, they will be added into
the batch as normal cheques and will be assigned to the cashier of your choosing. You make that choice in the next section.
C. Choose a Cashier for the Postdated Cheques 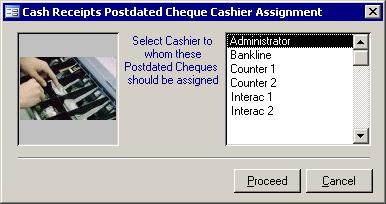 This form allows you to quickly select a cashier to whom you want to assign the now due (previously processed) postdated cheques. Simply click on the appropriate
cashier and click the Proceed button. The computer will generate a Postdated Cheque List report as shown in Section D below. This form allows you to quickly select a cashier to whom you want to assign the now due (previously processed) postdated cheques. Simply click on the appropriate
cashier and click the Proceed button. The computer will generate a Postdated Cheque List report as shown in Section D below.
D. Add Previously Processed Postdated Cheques to the Batch 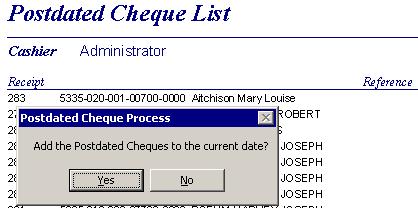
If new postdated cheques exist and you chose to process them now, this report will be
generated. Print it out and make sure the data is correct. When you close the report, you will be asked if you want to add these postdated cheques to the current batch. If
you choose not to, they will be added to the next batch.
Step 3: Close Off Receipt Batch
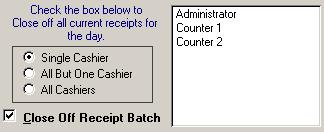
The large box on the right shows all cashiers that have receipts that have not yet been closed. If you only have one cashier, then this is an easy step. You will only be given
the option to close All Cashiers. If you want to close off the batch, then just put a check in the check box and click the Next button.
If more than one cashier has entered receipts, and there is no outstanding cash receipts batch, then you will get to choose which cashiers to close. You have three options.
You can close only the one cashier, all cashiers except one, or all cashiers. If you choose Single cashier, you much select the cashier to close from the cashiers in the box
on the right. If more than two cashiers are listed and you want to leave one cashier open to continue receiving cash receipts, then you can choose the All But One Cashier
option and then select the cashier that will remain open from the box on the right. If you or someone else canceled out of this wizard last time it was run, then you will not
be given the option to add any new receipts to this batch. You will have to update off the batch the way it was. Receipts added after the batch is closed will be added to the next batch.
Step 4: Proof Lists 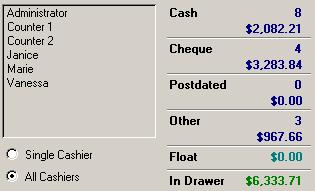
As you click on each cashier, you will see the totals for that cashier for the current
batch appear on the right. Usually you will want to just choose the All Cashiers option and click the Next button; however, you can a print
proof list for each individual cashier
if you like. A Tendered report may also show which may help you balance the till. Once all cashiers have been printed, either individually or all at once, you will be able to continue on to the next step.
Step 5: Deposit List  You may see the print
Cheques Deposit List screen next.
This is a copy of the full proof list without dollar values. Some banks have requested this list as a quick check list of the cheques sent with the deposit. You may see the print
Cheques Deposit List screen next.
This is a copy of the full proof list without dollar values. Some banks have requested this list as a quick check list of the cheques sent with the deposit.
If you do not see the Print Cheques Deposit List screen because it was not enabled in the Setup Wizard, then just skip down to the next step.
Step 6: Cash Receipt Register
 While the proof list is just a printout of the receipts table that is used in preparation of the bank deposit, the
registers show you how the receipts will be applied to
amounts owing for the rolls or accounts. If needed a register will be printed for taxes, dog tags and general receipts. They also show the General Journal transactions that will
be applied when the batch is updated. Do not update the current batch until the proof list and registers balance and they all look correct. While the proof list is just a printout of the receipts table that is used in preparation of the bank deposit, the
registers show you how the receipts will be applied to
amounts owing for the rolls or accounts. If needed a register will be printed for taxes, dog tags and general receipts. They also show the General Journal transactions that will
be applied when the batch is updated. Do not update the current batch until the proof list and registers balance and they all look correct.
Step 7: Consolidated Summary
 This step can be skipped if so desired. It will print a Consolidated General Ledger Update report that will total
all journal entries from the registers. In doing so, this report will have only one entry for the Bank account. Click next to continue on. This step can be skipped if so desired. It will print a Consolidated General Ledger Update report that will total
all journal entries from the registers. In doing so, this report will have only one entry for the Bank account. Click next to continue on.

Step 8: Update
 This is an important step. It will update the pending cash
receipts transactions as shown on the register reports, will delete voided postdated cheques, and will close off the cash receipts batch. You are now ready to make your bank deposit. This is an important step. It will update the pending cash
receipts transactions as shown on the register reports, will delete voided postdated cheques, and will close off the cash receipts batch. You are now ready to make your bank deposit.
|