Introduction Mistakes happen. This form lets you change a few characteristics of the
current receipts entered into the system. If a receipt was created with the wrong reference, then this form can be used to fix the reference before it is sent to the General Ledger. This screen can also be
used to view details about the receipts, view the payment information, print a duplicate copy of the receipt, or change the Void status all of which are accessible through buttons. 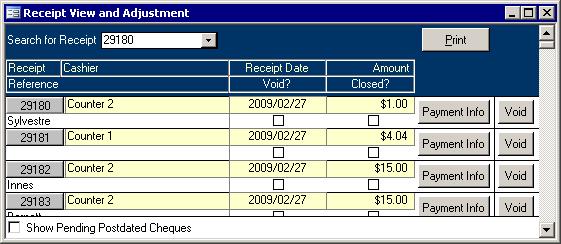
The Fields
If you know the receipt number for which you are looking, you can enter it here and the screen will jump to that receipt.
Receipt: The receipt number field is actually a button as described below.
Cashier: This is the user who entered the receipt.
Receipt Date: Every time a cashier logs in to the Cash Receipt Entry, the receipt date shows at the bottom of the Cashier Validation screen then again in the title
bar of the Cash Receipt Entry screen. This receipt date will be saved with the transaction. For example, a tax receipt will be sent to the property tax system
with the receipt date as the transaction date.
Amount: This is the total amount of the receipt.
Reference: The reference will be stored with the transaction as the description. Receipts for new animal tags will show the new tag number in this Reference field.
Void?: If the receipt was entered incorrectly, in error, or needs to be cancelled, use the Void button to put a check in the box to stop it from showing on the registers during the End of Day Wizard.
Closed: When running through the End of Day Wizard, if you chose to close all cashiers, but only wanted to close out a single cashier, you could remove the
check from these boxes for the particular cashiers before finishing the wizard.
Show Pending Postdated Cheques: Put a check in this box when you want to see the postdated cheques as well that have been processed once and are now waiting for their postdates to arrive.
The Buttons
There are four buttons scattered over this form which are described below. Receipt Detail Button The receipt number looks like a button. If you click on it, then the screen below will appear.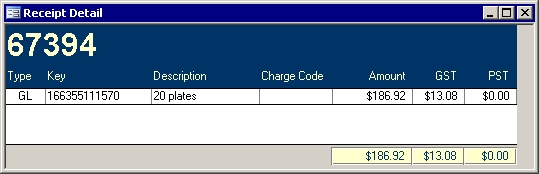
The detail is in a separate screen because each receipt can be used to indicate payment for multiple types of payments. The meaning of the fields is described below:
- Type:
This indicates the tab that was used to enter the detail. This could be T for a tax payment, GL for a General Receipt, H2O for a water payment, Animal for
a dog tag or related charge, and so on.
- Key:
Each of these types requires a unique identifier of some kind. For tax and water bill payments, the roll number will appear. The General Receipts will show
the General Ledger account that was entered, and an Animal receipt will also show the tag number.
- Description:
A description is stored as well. For the taxes and water, the roll owner's name will appear. The description typed in for General Receipts will be
here, but dog tags are different. If the receipt was for the sale of a dog tag, then the Description will hold the new tag number.
- Charge Code:
For most receipts, this will be blank. One exception is dog tags. The Animal Control system has a list of charges. When entering an animal receipt,
one of these codes must be chosen. That selected charge code appears in this box.
- Amount:
This is not the total receipt amount. Instead, this is the amount that will go to the appropriate General Ledger revenue, or receivable account. This
plus the taxes will equal the total receipt amount.
- Taxes:
These amounts will go to the accounts that have been set up in the General Ledger's setup wizard.
Payment Info Button 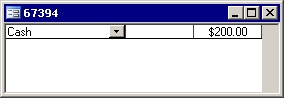
Clicking on a Payment Info button will launch the above screen. The breakdown of the
payment is shown with the payment method, postdate, and payment amount. This is in its own form since a receipt can accept multiple payment methods. For example, the
person can pay using any combination of cash, cheque, credit card, interact, phone banking, etc. Any payment method you can receive can be entered into the system.
The only exception are postdated cheques; receipts paid for using a postdated cheque cannot accept multiple payment methods. Void Button
Each receipt has its own Void button. Use this to toggle the Void box's check mark.
When the box is empty and the Void button is clicked, the computer will verify the receipt number with you to make sure the correct receipt is voided. Print Button In the top right corner is a button labelled "Print." Whichever receipt had focus when the
Print button is clicked will appear on the screen, so you can send it to the printer. The words Duplicate Copy appear on this report in large grey letters. |