Introduction
This wizard walks you through running a cheque batch. The process has been broken down into five or six steps to make it as easy as possible. The sixth step is for those who have used the Setup Wizard to enable the
Cheque Serial Number feature. These steps are detailed in this section. Please note that only one person can use this wizard OR use the quick cheque print on the bill form at one time.
 Step 1: Close off Cheque Batch Step 1: Close off Cheque Batch
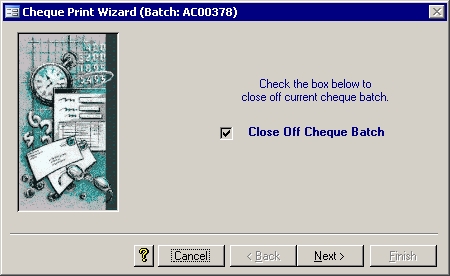
This first screen will usually have a disabled check box; therefore, you will normally only have to click the Next button.
 Step 2: Cutoff Date Selection Step 2: Cutoff Date Selection
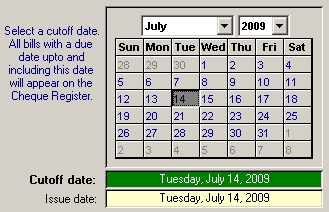 The system will print cheques for all bills whose due date is on or before
the cutoff date. This screen is where you choose the cutoff date for the current cheque batch. If there are no registered bills due by that date, you will not be able to continue. The
Effective Date of the Accounts Payable system shows as the Issue Date which will be put onto each cheque. Once you have chosen a satisfactory cutoff date, click the Next button to continue. The system will print cheques for all bills whose due date is on or before
the cutoff date. This screen is where you choose the cutoff date for the current cheque batch. If there are no registered bills due by that date, you will not be able to continue. The
Effective Date of the Accounts Payable system shows as the Issue Date which will be put onto each cheque. Once you have chosen a satisfactory cutoff date, click the Next button to continue.
Step 3: Print the Cheque Register
 The
Cheque Register shows all vendors who have
registered bills with a due date on or before the cutoff date. It also shows a list of Quick Cheques that have been printed from the Bills form as well as Manual Cheques entered using the Bills form. The
Cheque Register shows all vendors who have
registered bills with a due date on or before the cutoff date. It also shows a list of Quick Cheques that have been printed from the Bills form as well as Manual Cheques entered using the Bills form.
Step 4: Print the Cheques
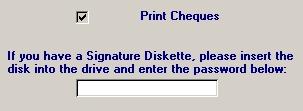 The
Cheques are printed next. If you have a Signature diskette, put it into the
drive and enter the password. See the Setup section for more information. If every thing on the Cheque Register looks correct, simply click the Next button to preview the cheques. The
Cheques are printed next. If you have a Signature diskette, put it into the
drive and enter the password. See the Setup section for more information. If every thing on the Cheque Register looks correct, simply click the Next button to preview the cheques.
Step 5: Associate the Cheque Serial Numbers
If the Setup Wizard's "Use Cheque Serial Numbers" option has been checked, then the serial numbers of the freshly printed cheques now need to be updated. Since the new
standardized cheques now include a mandatory serial number in the Magnetic Ink Character Recognition (MICR) line encoded on the bottom of the cheque, the banks will
now use this serial number on the bank statements. This is important when the bank statement is compared with the data in our system during the Bank Reconciliation routine in the General Ledger. These serial numbers will also appear on the Outstanding Cheque report.
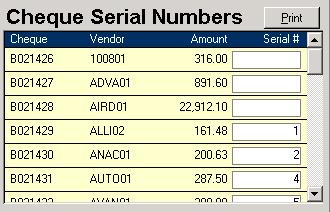 You now know where these serial numbers are used, but how do you get the numbers into the system, so that
each is linked to the correct Baker cheque number? This is where this step of the Cheque Print Wizard comes into action. The cheques were printed in order by Cheque number during the previous step above. As long as you
put the cheques into the printer so they would be used in ascending order by the serial number (opening the box from the bottom if required), then this form, as shown on the right, will work
well. Just type in the serial number of the first cheque into the Serial # box. The computer can then fill in the rest of the numbers for you in order. You now know where these serial numbers are used, but how do you get the numbers into the system, so that
each is linked to the correct Baker cheque number? This is where this step of the Cheque Print Wizard comes into action. The cheques were printed in order by Cheque number during the previous step above. As long as you
put the cheques into the printer so they would be used in ascending order by the serial number (opening the box from the bottom if required), then this form, as shown on the right, will work
well. Just type in the serial number of the first cheque into the Serial # box. The computer can then fill in the rest of the numbers for you in order.
It is now time for an example. In the picture above, the first three cheques were printed on the last cheque forms from the old batch that did not have preprinted serial
numbers. The new batch of cheques has the now mandatory serial numbers in the MICR encoded section. The B021428 cheque was the first one to be printed onto the new 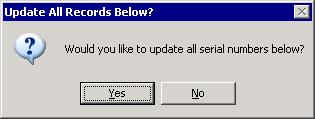 standardized cheque. For the sake of this example, let us assume that the first standardized cheque form has the serial
number of one. Once cheque B021428's serial number has been set to one, the pop up message on the left will then be shown. If you want the rest of the cheques to be numbered in order, then
click the Yes button on that message box. Cheque B021430 will then be assigned the number you entered plus one, so in this case, the number two. The next cheque,
B021431, will get the serial number of three. This continues on down the list of cheques. On the other hand, if you don't want any other serial numbers to be changed, then
click No button on that message box. No other serial numbers will be updated for you by the computer. standardized cheque. For the sake of this example, let us assume that the first standardized cheque form has the serial
number of one. Once cheque B021428's serial number has been set to one, the pop up message on the left will then be shown. If you want the rest of the cheques to be numbered in order, then
click the Yes button on that message box. Cheque B021430 will then be assigned the number you entered plus one, so in this case, the number two. The next cheque,
B021431, will get the serial number of three. This continues on down the list of cheques. On the other hand, if you don't want any other serial numbers to be changed, then
click No button on that message box. No other serial numbers will be updated for you by the computer.
Continuing with the example, since the printer ate a cheque form, cheque B021431 actually was printed on the cheque form with a serial number of four. The rest followed
sequentially from there. To fix the series, the 3 was changed to a 4 and Yes was selected from the resulting Update All Records Below message box. If the print job had
completed and the B021431 cheque was simply reprinted onto the cheque form with a serial number of, say, 24, then only one Serial # would have to have been updated.
Once B021431's serial number is updated to 24, then the No button would have to be selected from the pop up message box.
Be careful when editing the numbers. You will not be able to proceed to the next step if there are duplicate serial numbers. Finding duplicates may be a difficult task if there are
many cheques. This step also has a Print button on the top right that shows the completed list of cheque serial numbers as entered on this form. This report could be a
good way to quickly find and fix duplicate serial numbers.
 Step 6: Update Step 6: Update
 This, the final step of the Cheque Print Wizard, is where
everything happens. Clicking in the empty box will produce a check mark and will enable the Finish button. Once the Finish button is clicked, the journal transactions are recorded, the cheques are saved, the bills
are updated, and the temporary cheque data is deleted. Once all that is done, the wizard closes down. This, the final step of the Cheque Print Wizard, is where
everything happens. Clicking in the empty box will produce a check mark and will enable the Finish button. Once the Finish button is clicked, the journal transactions are recorded, the cheques are saved, the bills
are updated, and the temporary cheque data is deleted. Once all that is done, the wizard closes down.
|