Introduction
The ability to email reports in pdf file format has been added to most of our systems. That is why the reports have changed to the Arial font. Other fonts were not always compatible with the pdf
export. Unless the pdf send out is a part of a process like pay stubs, to send a report as a pdf file, you first must preview the report on the screen. In the toolbar, you should see a tool that looks like
this:  . Clicking that tool will add an
entry to and pull up the Email Control Form as shown below. . Clicking that tool will add an
entry to and pull up the Email Control Form as shown below.
To get to the above form to show, you can also use the Email Control option of the Utilities pull down menu that is available when you are on the main menu screen of each
system. Once you do get to this form, you may notice that there are a bunch of controls you can use. This form has plenty of fields as well as buttons as described here.
Fields
- Attachment*: This is the full file name and path. The asterisk beside this field's label means you can double click in that field. Double clicking in this field will open
the file using your pdf reader.
- To: While the From address comes from the User table as set using the Baker Main Menu, you have to select the address from the list or enter it yourself. Once
you enter an address, it will be added to your address book. If you want to send the file to multiple email addresses, you can by separating each with a comma.
Each address will be added to your address book if it is new.
- Subject: The subject line for the email.
- Body: This is a multi lined box. To get to a new line, hold the Ctrl key down when you press the Enter key.
- Sent: The date it was sent will appear if only some of the emails to be sent were successful.
- Status*: Error messages will appear here. The asterisk beside this field's label means you can double click in that field. Doing so will pull up a window that lists
the full email errors. If the error was not from the server but was only due to something simple like a missing Address, then "Address?" will appear in the status
field and the Email Errors screen will be blank. As well, if the attachment file does not exist, or the field is blank, then status will show "Attachment?" instead.
- Send: A check in this box means this email will be included in the next batch which will be sent when the "Send mail" button is clicked.
- Del: A check in this box indicates that that record should be deleted next time the Delete button is clicked. Once an email has been sent, it is automatically set to be deleted.
- Cc/Bcc: When checked, the carbon copy and blind carbon copy boxes become visible. They work similar to how the To box works.
On the top right there are two check boxes. The one on the left will toggle the Send check boxes of all records on or off. Similarly, the check box on the top right will toggle the Del check boxes.
Buttons
There are several buttons along the bottom of the form. You can also double click on any field whose label has an asterisk to make some function happen.
- New: The first button on the left will send you to a blank record, so you can register another file to be sent via email using our program. It does not have to
be a pdf file, but you must have access to it from your terminal server account.
- Delete: Any email records that have a check in the Del column will be removed.
- Copy: An exact copy of the current record will be created.
- Send mail: This launches our email sending program. That system will attempt to send all email records that have a check mark in the Send column.
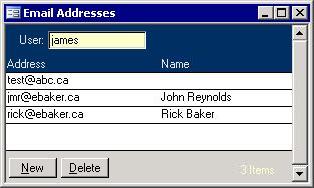
 Addresses: Every time you type an email address into the To, Cc,
or Bcc fields, it gets saved in your address book. Click the Address button to see the address book screen as shown on the right. You have the option to put in a user friendly name in the Name field
beside each email address, but that name will not appear on the Email Control screen. You can also add new email addresses right into
the address book and you can delete those that are no longer needed or that were spelt incorrectly. Addresses: Every time you type an email address into the To, Cc,
or Bcc fields, it gets saved in your address book. Click the Address button to see the address book screen as shown on the right. You have the option to put in a user friendly name in the Name field
beside each email address, but that name will not appear on the Email Control screen. You can also add new email addresses right into
the address book and you can delete those that are no longer needed or that were spelt incorrectly.- Refresh: This will recalculate how many were sent. It will also show the Sent data for those records that were successfully delivered to the mail server.
- Yellow Question Mark: Clicking the button on the bottom right will open this help file. If you found this web page some other way, then you may want to consider
using these context sensitive help buttons.
|