|
|
|
Introduction If you have a terminal server, user information can be kept up to date with the User Management set of forms. While not all Baker systems require users to have a user record, most Baker programs do. The User Management form allows you to add new users, edit existing users, and delete those that are no longer required. There are some things of which you should be aware when editing users. Depending on the systems to which they are given access, some settings may be required. As well, some systems need special settings outside of this form. All of these will be described within this help page. It is important to note that this User Management cannot fulfill all needs. Some programs may require settings that are outside the capabilities of the User Management forms. For example, municipalities or school boards could have multiple stations running Cash Receipts and could require that all receipts to be printed on a specific printer. In that case, each cashier must have a CashReceipts printer set up in their printer profiles or the terminal server must have a CashReceipts printer accessible to all. Similarly, tax certificates and some final property tax bills must have a printer set up that is called Legal which is set to use legal sized paper. Another example is that any user that has access to print cheques and has an external drive, like a floppy disk, that contains the cheque signatures, must have that external drive shared and mapped from the terminal server. The Property Management requires any scanned documents to be stored in sub folders on the server, so Building Department users must have access to those folders. If a payroll deduction exists for Canada Savings Bonds, then the CSB transfer program must be installed on the server. And if Property Management, General Ledger, Payoll, or Fire Watch II users need to be able to send reports via email, then a MAPI enabled email program must be installed. There are other settings that may be needed as well, but, again, they are outside the influence of this User Management function. Besides the User Management form, there are several others that perform various tasks. These are accessed primarily using the buttons along the Main Form The User Management form has four sections. The top left contains the data pertaining to that user alone. Things like full name, login name, and other items that are stored in the User table appear there. Immediately below that is a list of fields that govern what kind of access the user has to the various systems. The section on the right reveals the systems to which the user has access. Finally, there are controls along the bottom that give access to other functions or reports. An example of the main User Management form is shown below.
The rest of this help page will describe each of these four sections in more detail. User Information Section
The Location field is used by purchase orders of the remote system. Users will usually only be able to have their own location's address appear in the ship to address of purchase orders. Some individuals may need to be able to order goods and services for multiple remote locations. This is where the Show Locations field becomes important. That field can be set to Single, Remote Sites, or All. When set to Single, the user will only be able to select their own location for the shipping location of purchase orders. The Remote Sites option will allow the user to have orders shipped to any of the locations designated as remote as well as their own location be it remote or not. Users that are set to All can choose from the entire list of ship to addresses. Because they are needed by the Accounts Payable and Remote AP systems, the list of ship to addresses is maintained within the Accounts Payable program. The final field in the user information section is a check box labeled "Access to all GL accounts." When this box is checked, the user will be able to access all accounts in the chart of accounts of the General Ledger for entering purchase orders. If there is no check in the box, then the user will only have access to a limited set of accounts. The accounts that have been set up in the User Chart form, of the General Ledger system, will appear in the list of accounts for purchase orders; meanwhile, the income statements use a larger set of accounts. In the remote system, the statement of accounts will show only the accounts for that user's location and responsibility level. Figuring out when each setting is used throughout the Baker systems can be a daunting task, but the key components have been outlined above. The other sections get more straight forward as we progress through this help page.
User Access Section The middle-left section, shown below, reveals the level of access that has been granted to the user. Not all of the Baker
Now that we know what the fields represent, what records could exist in this section? The Payroll and Payroll Report Generator programs need a PRClient record to exist that has a Form Name of System. Other programs that need a System record are Accounts Payable, Accounts Receivable, General Ledger, Human Resources, and Remote School AP/HR. As stated above, the Remote system also could have a form name of GroupCd which is used to specify a group code in the Criterion column. While GroupCd is not a form name, group codes are found on the Group form within the Human Resources system. A few other programs are different. While the Remote system is the only one that uses either a Systems entry or a GroupCd entry, the Municipal Tax Manager, Machinery, and Fire Watch II systems do not need a record with the form name of Systems. Instead, they use the Form Name column to hold the name of a form. It was in these systems that the extra security of specifying user accessibility of forms was first introduced. For example, if the deletion of records is set to be controlled in the Fire Watch II system, then users must have an FWClient record with an Access Level of Full in the User Access section to be able to delete incidents and more. Similarly, the editing of property owner names and addresses as well as bank information can be controlled in the Municipal Tax Manager. As well, a record for the Machinery system with a Form Name of Time Cards will permit the user to enter time cards. Everyone else can only see the time records. Hence that was the original use of the User Access entries. Since the humble beginnings of User Access restricting the level of access to single forms, it has evolved into a powerful tool that controls access to the various systems. More detail on these systems is covered in the next section.
Once you are sure the user is not online, just put a check in the Available column's boxes of the systems that user needs. The first click will change the New and Delete buttons on the bottom left to Save and Undo. When you are done selecting or unselecting the systems, click the Save button; otherwise, click the Undo button if you do not want to save your changes. If you close or change records before clicking the Save button, then Undo will be clicked for you reverting the user back to their previous state. The Save button does a considerable amount of work. It makes sure the user's directory exists, clears all files from their directory, moves a fresh copy of the Main Menu
there, copies the programs that were checked in this Systems section, deletes User Access records that no longer apply, sets up any new default User Access records, and
finally sets the buttons on the bottom left back to New and Delete. The next section has more information on the buttons. Bottom Section The bottom section contains controls that each have their own of function. The buttons open reports, open other forms, or navigate the records. The pull down list finds user records by the full name field. An example of this section is shown in the picture below.
Other than the last button on the right with the yellow question mark that will open this help page, each of these functions is described below New Button
The Swap with pull down list is a nice feature. If someone was hired to replace another user, you can select the original user from the list. The new user will get the old user's chart access accounts, user access records, and system list.
Delete
Swap Clicking the Swap button will bring up the screen showing The Commit button will perform several tasks. Once it has verified that both the Swap and With boxes have unique values, it will swap the user's locations, list of accounts, user access records, and list of systems. Their folders will be cleaned out, the Main Menu program will be copied to their folders on the server, then, finally, the systems to which they now have access will be distributed to their folders. The User Management form's data will be recalculated and will end up showing the user who was in the top Swap pull down list. Usage The Usage button will bring up the System Usage report. Surprise! This report lists each system that your board or municipality uses. Below each system is a list of user logins that have access to that system. For example, the login names of all users that have the General Ledger program checked as available in the Systems section will appear below the General Ledger heading. By User This button shows a report that is similar to the Usage report. Called the Systems in Use report, it shows each user with their Location and whether or not they have been granted full access to the General Ledger's chart of accounts. Below each user record is a list of the systems to which that user has access. With the extra user information, this report is considerably longer than the System Usage report. Redistrib Instead of having to change the data, change it back, then hit Save, you can now just click the Redistrib button to get the programs to be redistributed to the current user. Navigation There is more than one way to navigate through the records. To find the user you wish to view or edit, you can either use the record selector buttons on the bottom left, or you can use the Search pull down list. Both methods have their merits. The Search field, found in the top left corner of this User Management screen, is fast and permits you to find the user by their full name starting with their first given name. The only problem is some users may have the same name. While the login names must be unique, the full names do not. Luckily, this problem is fairly rare. If you do not know the name of the user, you can manually go through the records one at a time using the navigation buttons on the bottom left. If you know the user is always the second one in the list, or the last one, then the navigation buttons may make it easier. If you know that the user is somewhere in the last half, you can type a number into the box between the arrow buttons and hit enter to jump part way through the list. For example, in the pictures above, entering 30 would put you at the halfway point in the list of users. As well, you can change the sorting. By sorting and filtering the User Management form by Location, you can use the navigation button to walk through the records of users that belong to chosen locations. Check out the User Chart page in the GL help manual for more information about setting up the list of accounts to which a user can use on purchase orders. Yellow Question Mark The last button is the one with a yellow question mark. Clicking it will cause this help page to appear.
|
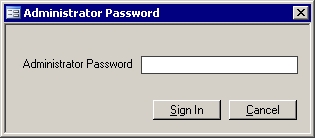 bottom of the User Management form. In fact, the first screen you see when you click on Users from the Administration menu is not the User Management screen at all, but
instead is a screen requesting the administrator's password. A sample of this form is shown on the right. This form is used to grant access to the main User Management form for those that
know the administrator password.
bottom of the User Management form. In fact, the first screen you see when you click on Users from the Administration menu is not the User Management screen at all, but
instead is a screen requesting the administrator's password. A sample of this form is shown on the right. This form is used to grant access to the main User Management form for those that
know the administrator password.
 As shown in the picture on the right, not much information is required for each user.
Besides the login and full names, only a few other fields exist. While the Location and Show Locations fields are related, the full General Ledger account access check box has
its own purpose. Let's start with the two fields pertaining to location first.
As shown in the picture on the right, not much information is required for each user.
Besides the login and full names, only a few other fields exist. While the Location and Show Locations fields are related, the full General Ledger account access check box has
its own purpose. Let's start with the two fields pertaining to location first.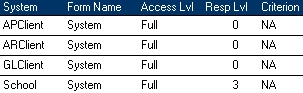 systems need to have an entry in this section. For example, the Cash Receipts program has its own set of users called Cashiers, so they can have their own password and a
float amount. On the other hand, programs like the Accounts Payable (APClient), General Ledger (GLClient), and Payroll require entries in the User Access table. Without those entries, the user will not
be able to launch the programs. Other programs, like the Municipal Tax Manager, require entries only when certain forms are locked for all but a few users. Before spelling out
which systems use what settings, the columns will be described first.
systems need to have an entry in this section. For example, the Cash Receipts program has its own set of users called Cashiers, so they can have their own password and a
float amount. On the other hand, programs like the Accounts Payable (APClient), General Ledger (GLClient), and Payroll require entries in the User Access table. Without those entries, the user will not
be able to launch the programs. Other programs, like the Municipal Tax Manager, require entries only when certain forms are locked for all but a few users. Before spelling out
which systems use what settings, the columns will be described first.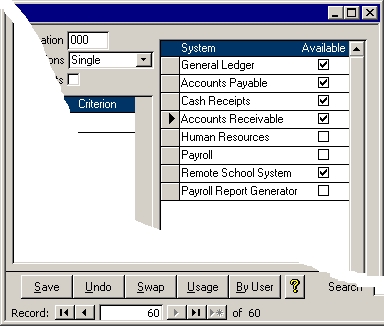 The section on the right allows you to control the systems to which a user has access. All
systems that the municipality or school board use will show up in this list other than the Main Menu. As shown on the right, this part of the User Management form is easy to use. Before using this form,
make sure the user has logged out. Otherwise, files will be locked and it is likely any changes will not be applied properly. If you are adding a new user, then don't worry. New users cannot log in until
they have been assigned systems with this form.
The section on the right allows you to control the systems to which a user has access. All
systems that the municipality or school board use will show up in this list other than the Main Menu. As shown on the right, this part of the User Management form is easy to use. Before using this form,
make sure the user has logged out. Otherwise, files will be locked and it is likely any changes will not be applied properly. If you are adding a new user, then don't worry. New users cannot log in until
they have been assigned systems with this form.
 The New button brings up the form showing on the right. This form allows you to create a new
user. All you have to do is enter the full name of the user, their unique login name for signing onto the terminal server, and their location. If your General Ledger restricts some users' access to a
subset of accounts for purchase orders, then you have to decide whether or not this user should get full access to the chart of accounts.
The New button brings up the form showing on the right. This form allows you to create a new
user. All you have to do is enter the full name of the user, their unique login name for signing onto the terminal server, and their location. If your General Ledger restricts some users' access to a
subset of accounts for purchase orders, then you have to decide whether or not this user should get full access to the chart of accounts.  Once all the appropriate fields have been filled in, click the Create button. If you do not use the Swap
feature, then the new user will not start off with any systems. The screen on the left will appear informing you of this. This is an easy situation to remedy. Click the
OK button then follow the instructions in the
Once all the appropriate fields have been filled in, click the Create button. If you do not use the Swap
feature, then the new user will not start off with any systems. The screen on the left will appear informing you of this. This is an easy situation to remedy. Click the
OK button then follow the instructions in the  The Delete button is pretty simple. When it says Delete, it will show a warning message
as shown here. If you click the Yes button, then the named user will be removed from the system entirely. Their user, user access and systems records will be abolished. Their
directory on the server will be cleaned out then deleted. The only thing that will be left is their user name on any purchase orders,
scheduled permit inspections, fire incidents, etc. The only one that is restrictive are the purchase orders. The school system cannot be used to open another users' purchase
orders. It would be best to complete or cancel any outstanding purchase orders before deleting the user; otherwise, the Accounts Payable clerk will have to finish those outstanding purchase orders.
The Delete button is pretty simple. When it says Delete, it will show a warning message
as shown here. If you click the Yes button, then the named user will be removed from the system entirely. Their user, user access and systems records will be abolished. Their
directory on the server will be cleaned out then deleted. The only thing that will be left is their user name on any purchase orders,
scheduled permit inspections, fire incidents, etc. The only one that is restrictive are the purchase orders. The school system cannot be used to open another users' purchase
orders. It would be best to complete or cancel any outstanding purchase orders before deleting the user; otherwise, the Accounts Payable clerk will have to finish those outstanding purchase orders. below. When you have two
users who are simply swapping positions, this feature will be useful. Whichever user you were currently viewing will appear in the first box. If that is not one of the users, simply choose
another from the list. Selecting the second user in the lower box must be done before clicking the Commit button.
below. When you have two
users who are simply swapping positions, this feature will be useful. Whichever user you were currently viewing will appear in the first box. If that is not one of the users, simply choose
another from the list. Selecting the second user in the lower box must be done before clicking the Commit button.| [Tools] [Backups] [Compact] [Users] |